Overscan
"Overscan" is the term used to describe the practice of TVs hiding the extreme edges of the picture they receive. In old CRT TVs this was because the edge of the tube would have produced a bad image, so the viewable area was reduced. This has since become a broadcast standard so there is often garbage and computer signals carried on the border of television broadcasts, so even HDTVs presume these extreme edges should be hidden. You can read more about overscan here.
The various applications within RetroPie typically don't account for overscan, and will often include important information across the entire image. For this reason, overscan can be an issue.
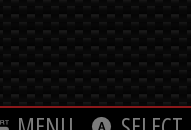
My image is cut off!
For this reason, a common scenario is that part of the image is 'cut off'. For example:
The easiest and best way to fix it is to adjust your TV. All other methods of overscan correction may introduce performance issues and unwanted scaling artefacts. Modern HDTVs will usually have a setting somewhere in the options that displays the entire 1080p image, including the areas that would be ignored as "overscan". For example:
Samsung
Menu > Picture > Screen Adjustment > Picture Size > change to "Screen Fit"
LG
Settings -> All Settings -> Picture -> Setting for aspect ratio -> Just Scan
Select "On"
Pioneer
Look for "Dot by Dot".
(please add more examples if you work it out for your TV!)
If your TV doesn't have this setting, you can change this manually by editing /boot/config.txt. Type sudo nano /boot/config.txt and enable overscan by making sure the following lines are set and uncommented:
disable_overscan=0

overscan_left=16
overscan_right=16
overscan_top=16
overscan_bottom=16
The overscan_XXXX=16 lines create a blank border around the image being sent to your TV, so that it doesn't get cut off. By changing the number from 16 to something else, you can change the size of this border if need be.
Note that the line disable_overscan=0 is not strictly necessary -- what is necessary is to avoid disable_overscan=1 being set. For this reason, you might see the commented line #disable_overscan=1 instead, which is also fine so long as it's commented.
My image has a border!
This should be a rarer scenario. In this case you need to do some configuration changes. Please consult this video:
Summarised: You can fill the whole expanse of your screen by editing the overscan settings. Exit to the terminal with F4 or access your pi over SSH
sudo nano /boot/config.txt
# preceding the line)
#disable_overscan=1
disable_overscan=1
ctrl+x
Then reboot. If it doesn't work then try messing with some of the other overscan settings manually
The console looks good, but the picture is off for EmulationStation/RetroArch/etc!
For EmulationStation to obey the overscan settings, the line overscan_scale=1 must be set in /boot/config.txt. If your overscan settings are only affecting the console picture and not EmulationStation's, type sudo nano /boot/config.txt and make sure that the line overscan_scale=1 is there somewhere. Also be sure that the line doesn't start with a # (i.e. make sure it doesn't look like #overscan_scale=1).
This can sometimes get unset due to a bug in raspi-config. Raspi-config enables you to change overscan settings graphically, but upon doing so, silently comments out all settings beginning with overscan_..., and leaves them commented even upon re-enabling overscan unless you re-change /boot/config.txt manually. For this reason, it is recommended that you change /boot/config.txt manually rather than using raspi-config to change overscan settings.