Playstation gameboy mashup
-
Wow, that looks really good! Very clean work, excellent job!
I'll help you a bit with the images:


-
Cool! How did you get Playstation to run on a Pi Zero? Thought it was WAY too slow (and never had luck on mine - although it was a completely stock configuration).
-
It just worked for me, havnt changed a thing in retropie regarding settings, the ps1 games i have tried just worked. Maybe the roms i have work better because i had a couple that wouldnt run at all :/
-
@sjpearson said in Playstation gameboy mashup:
It just worked for me,
I'll have to try it again. Now that I think of it I might have been trying N64 (which doesn't run 100% correct on a Pi 3 anywho) and not PS1.
-
Nicely done! I like the mixture of large and small buttons, gives it a unique look.
Do you have any inside shots?
You have some interesting uploads on your Photobucket, did you make all those things?
-
Yes i can do some inside shots, not much to see realy....just hacked up gameboy internals and some perf board with buttons on :D yes i used to make ecig mods.... still do now and again but fancied doing something different and found myself here :D
-
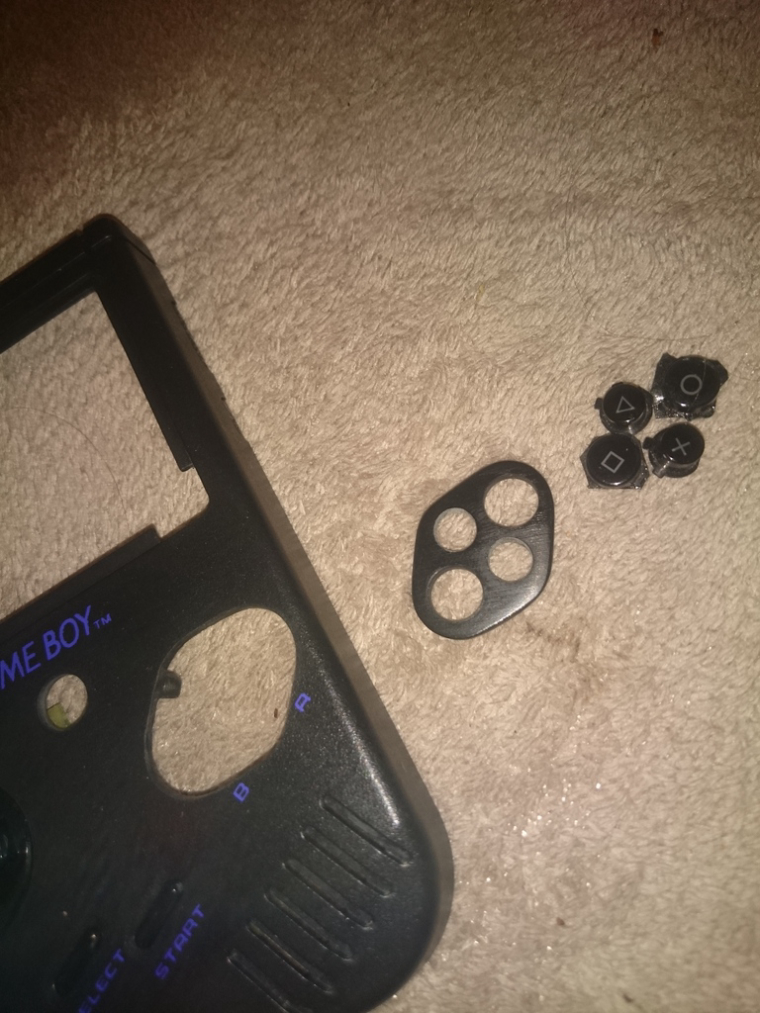
Very nice. Any tips on how you modified the action button area? (triangle, square, circle, x)
-
Yes i just decided what layout i wanted for the buttons and a shape to go around them. Then i transfered that layout to the gameboy on some masking tape. I then cut that shape out using a jewellery saw but not right to the line so i could file right to the line for a neat finish. I then transfered that finished shape to some 3mm thick black acrylic....again using masking tape. I then marked my holes and drilled them out before cutting out the shape. This was to avoid any cracking or breaking of the acrylic as the holes are quite close. Then i cut the shape out, this time a little larger than it needs to be so i could again file back for a good fit. Take your time with this and just take a bit off, test fit...take off some more and so on until its as good a fit as you can get. Mine is a tight fit but will eventualy be glued in as i start to wrap up the project.
Here is a pic, sorry but i dont know how to put images on here yet. Hope this helps :)
[URL=http://s1372.photobucket.com/user/simonjohnpearson/media/Mobile%20Uploads/DSC_0080_zpsvqaemglg.jpg.html][IMG]http://i1372.photobucket.com/albums/ag353/simonjohnpearson/Mobile Uploads/DSC_0080_zpsvqaemglg.jpg[/IMG][/URL]
-
Thanks! That helps a lot. I'm working out how to do something like that with my Gameboy Advance project.

-
Wow, impressive build!! Thanks for the explanation about the buttons, great work!
Would be interested to see the backside of the front plate where the button go and how you fastened the buttons?Agin, very impressive!
Contributions to the project are always appreciated, so if you would like to support us with a donation you can do so here.
Hosting provided by Mythic-Beasts. See the Hosting Information page for more information.