Bartop arcade, 1st attempt
-
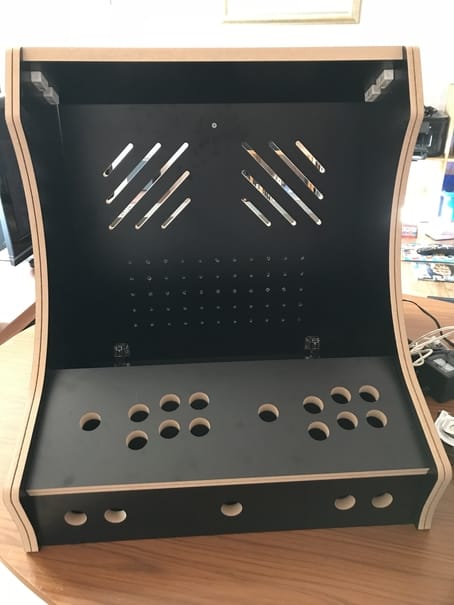
Hey guys, in the early stages of building my first bartop arcade. Here is where I am so far:
I'm not planning any really fancy bells and whistles but might go further on a future build.
I have Street Fighter side panel vinyl and orange t-moulding on their way to me this week.
Lots of other stuff to add/do so I'll update as and when it gets done.
I'll probably need help with stuff along the way e.g. the dreaded wiring of joysticks and butttons.
Regards,
Joe -
@domogram-rovers Looks good! And come on. . . wiring up the sticks is the fun part!
-
I think the tougher part is done. Now just get the joystick and buttons wired up. I think you might need a hat for the joystick and buttons.
-
@caver01 No, no! That's the bit I dread the most. I've watched a few videos on YouTube but still not very confident. You can attach the wiring to the pins already on the Raspberry Pi, right? What are the pros and cons of wiring it up to a separate controller board like I've seen done?
Anyway, I haven't even bought joysticks or buttons yet so that's in the future.
Your roadcase build is the bee's knees, your techy/diy skills are way ahead of mine. -
@domogram-rovers Those are kind words, but keep in mind this is not my first arcade system. I have been messing with this stuff for almost a decade, and others have been doing it even longer.
Pros and Cons will differ depending on who you ask. I tend to follow the old-school route of running all of my arcade inputs through a keyboard controller. Most emulators for arcade games support keyboard input, so this has long been the tradition. However, much of the documentation is geared toward hand-held controllers and game consoles--so much of the configuration has the console flavor/bias (thinking in terms of buttons as ABXY etc. instead of BUTTON1, BUTTON2).
My setup uses an IPAC4 primarily because I already owned one, but also because I needed support for 4-player input. Obviously, an IPAC2 is a good option for 2-player input, but you might be able to get away with wiring directly to GPIO pins only. Going with a dedicated controller is convenient but more expensive (and a bit more complex to configure). If you try to go GPIO only, you will need some software such as RetroGame, GPIOnext, or MK_Arcade. These are essentially drivers that will convert button/Joystick switches into inputs by creating a virtual keyboard or gamepad interface. You press a button wired to GPIO and the software translates that into a keypress, or a gamepad button press.
It looks like you need 4-direction inputs, 6 buttons, Start, Coin(select) per player, x2 which is 24 inputs. I have seen diagrams that feature a pin-by-pin layout for 24 inputs this way. You also have a hole in the middle front. Maybe that is for a USB port, or maybe another button. If you use GPIO+software, you just need to plan which pins are available, as not all can be used.
If I was going to build a bartop today, I would probably go with GPIO with a layout just like yours, living with the limitations of running out of pins. That would mean few (none?) buttons for admin functions like QUIT, PAUSE, Volume+-, opting instead for hotkey functionality for these.
If you can spare a little more cash, a controller like an IPAC (or others) can save a lot of GPIO effort.
You can also get a kit that includes a controller (or more than one), then do a little research on the forums for posts by others who have used that model.
-
@caver01 Im just messing around with a relay module and an arduino so I can turn off my joysticks when I want to, I have found that the little kids, although they love playing, want to play all the time, and press things,
in KODI this is especially annoying. So i rewrote some code last night so I can cut the ground from the buttons with the relay, hopefully will get it wired soon, the plan is to be able to turn off both player one and or player two, and thus be able to play with a kid yanking onthe other joystick :) -
@caver01 Yeah, I think an IPAC2 is the way I'll go. I see there's plenty of info on it here that I can get my teeth into. I'm sure I'll have plenty of questions when I get to that part of the build.
-
@sgtjimmyrustles A "hat" for the joystick and buttons? Sorry, what does that mean?
-
Added the side art and t-moulding:
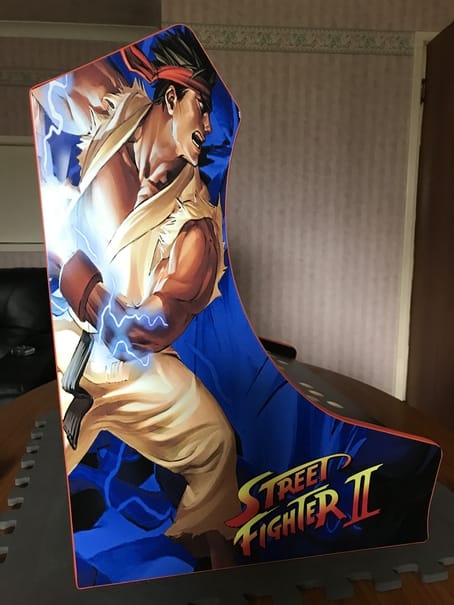


I've had to take the back door off again as I had it hinged at the bottom so it could open but it scuffs against the t-moulding. I'll need to sand a millimetre off each side.
Next job is to add the marquee light which arrived today then that'll be it for a couple of weeks until I can afford to buy more bits.The King in King & Balloon is a dead ringer for Donald Trump!
-
@domogram-rovers Lookin' good!
-
Nice work so far!
-
Update time. I've now got the joysticks and buttons in place but not wired up yet. I'll be ordering an ipac2 and wiring later this week so I'll hopefully receive it before Christmas.
I have a used Dell 19" monitor which I got off ebay which is nearly perfect except for a tiny mark on the screen which you don't notice when it's on.
I added a marquee light and small usb speakers up the top.
Not much to do now except wire it up and put the monitor and pi in the cabinet.
I've spent about 380 GBP so far, eek!
My intention was to design something myself for the marquee and get in professionally printed on vinyl but I might have to knock something together myself i.e. the cheap option. -
Kudos for your build thus far. It looks very clean and overall it has a very professional look to it. Awesome!
As for the marquee. Are you going for a satin or a gloss finish? If gloss, then maybe print the design on regular (but high quality) paper and stick it behind a plexiglass panel?
-
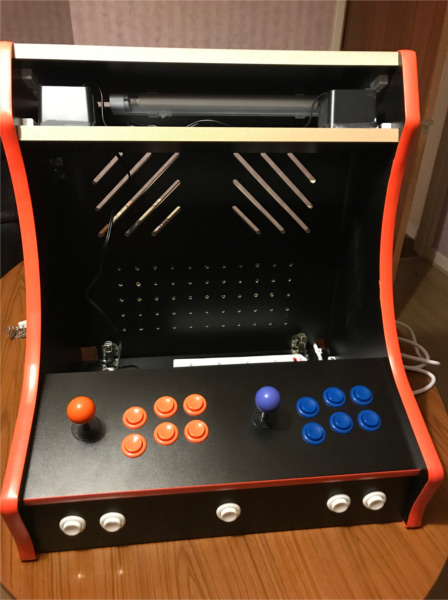
Okay, ipac2 and wiring is here so I'll start wiring everything up tomorrow. As you can see, I have six gameplay buttons for each player and another five buttons (2-1-2) on the front panel. Is that enough to cover all options? It will be mostly arcade classics like Asteroids etc I'll be playing and SNES games, nothing more advanced than that era. The cabinet kit I bought also has a button hole on each side but they are currently covered over by the vinyl art which I don't want to spoil if possible.
Any tips for stripping the wires as I have to bare the ends and screw them into the tiny holes in the ipac. The wire is very thin.
I have made my own marquee out of a spare piece of laminate flooring. I got a graphic of the classic space invader and recreated the outline in dots then drilled all the holes out so the light shines through in the dark.


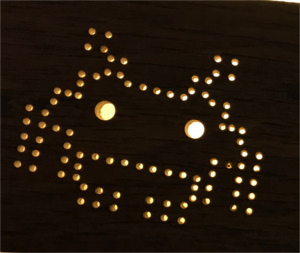
Marquee cost: zero
Should be finished by Friday or I'll have smashed it all up in frustration! -
Run into a problem.
I have wired everything up and both joysticks work but none of the buttons.I connected the ipac2 to my laptop to test it by opening Notepad++ but none of the buttons respond. I have connected the ground wire daisy chain to all buttons and then into the ipac.
The sticks are Sanwa with their own five pin connector for up, down, left, right and its own ground wire and both sticks work.
Anyone any ideas as to what has gone wrong?
Is it a case of all or nothing with the buttons i.e. one dodgy connection somewhere would result in no buttons at all working? -
@domogram-rovers said in Bartop arcade, 1st attempt:
Is it a case of all or nothing with the buttons i.e. one dodgy connection somewhere would result in no buttons at all working?
Check your ground. If the chain is broken, any button beyond the break will not work. Also, take a piece of wire and connect one end to ground and the other you can use to manually touch the screw heads of each input, simulating the switches. This way, you can effectively test your IPAC to ensure each input is working. This will prove it is a wiring problem.
Do you have a multimeter? You can use that to check continuity.
-
Thank you so much. I'll try your suggestions shortly. I'd be happy if I could at least get player one working and take it from there.
-
@domogram-rovers Great artwork, where did you get it from? I'm building my own upright cabinet and haven't found any good artwork in printable quality yet.
-
@clyde I got it from Rockstar Print here in the UK. They have dozens of designs for bartop side panels and also do full sets for the whole cabinet. It's high quality print on self adhesive vinyl and well worth the cost IMO.
Are you Clyde as in the Scottish river and the football club "The Bully Wee"?The King in King & Balloon is a dead ringer for Donald Trump!
-
@caver01 Definitely seems to be a problem with the ground wire. I tried your tip of touching a bit of wire to the screws and it confirmed that they are all registering a connection.
I have taken all the wiring off the player two side to concentrate on player one. After redoing player one from scratch I got the first two buttons working so there must be a fault with the wire at button three, right? I tried a spare microswitch in case it was faulty on button 3 but it's still the same.
Contributions to the project are always appreciated, so if you would like to support us with a donation you can do so here.
Hosting provided by Mythic-Beasts. See the Hosting Information page for more information.