Retro game stuff talk
-
@FlyingTomahawk said in Retro game stuff talk:
@Danorak1981 said in Retro game stuff talk:
Now I'm thinking about bleaching it and popping a Pi in... Hmmm
That sound like a great idea. You should take a look at @obsidianspider SNES build thread maybe push that motivation. ;-)
Thanks! I'm really liking how it turned out, and I play it almost daily. At this point I'm curating my ROMs and working on cleaning up box art. I still don't see anyone else doing that second screen thing aside from the one guy who gave me the idea with his arcade cabinet, though there are a few that are doing text displays.
Pi in a Game Boy? That scares the shit out of me.
Solder and a Dremel are your friend. Oh, and lots of patience.
I also considered the SNES pad at first but gave up, same issue narrow space.
I still think putting a Zero in a SNES controller with the screen where Start and Select are normally located might be doable…
-
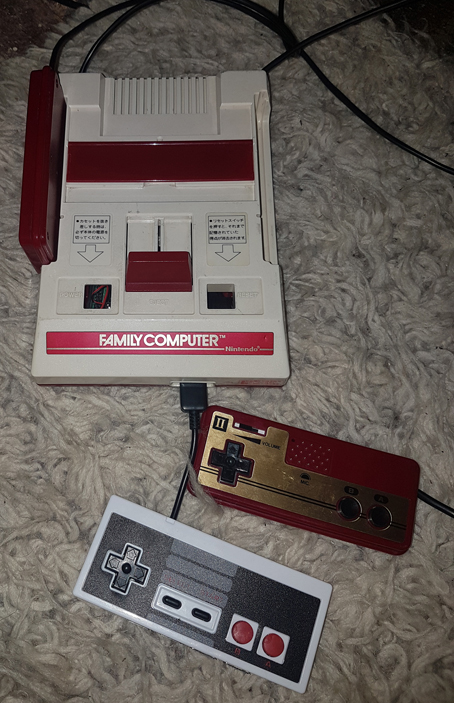
@FlyingTomahawk Wow! What a drastic difference! You can see under where the red front label used to be what color the console was when it was new. What's the quality of reproduction stickers that are available? Was the red slider discolored at all by the bleach? How hard is that to take out? Is the now-bleached console any more brittle? I have to wonder what other things the bleach is doing to the plastic. Does anyone know how long the bleaching lasts? Does it go back to pub yellow in a few weeks?
-
I have no problems to get the transparent labels that point towards the power, reset button and that plug hole on the front. Those labels can be printed anytime.
Not sure if I can find some new or new looking red Famicom front labels and rear labels. Will do some research.
The plastic doesn't feel brittle at all. Just very, very clean. No oil, no dust, no nothing.
I think most of the damage happened on my very first try to bleach them in the bucket with stronger kitchen bleach. The bleach that I used later, Wide Haiter EX, is lot milder but does a lot better job. This time as you can see in the above image I removed all labels just in case. I put it already into the bleach (Wide Haiter EX). Tomorrow I gonna replace that old bleach liquid with new, fresh one just to get good results as fast as possible.Here you can see left the bleached one and right side the one I just put in today. The left one used to be almost if not same pub-yellow as the right side one.
I would say the bleaching has worked great, except for the label thing.
-
@FlyingTomahawk If you can find a good source for reproduction labels, I think you have a great way to make some nice looking Famicoms.
Any more game store adventures for you lately?
-
This may sound off topic, but I'm thinking of hooking up a cartridge slot for an SNES to my Raspberry Pi so that I can play retro games while having the original cartridges.
-
@FlyingTomahawk said in Retro game stuff talk:
I have no problems to get the transparent labels that point towards the power, reset button and that plug hole on the front. Those labels can be printed anytime.
Not sure if I can find some new or new looking red Famicom front labels and rear labels. Will do some research.I've seen the clear labels on eBay, but remembered I have some decal transparency sticky stuff, so am planning on masking up and respraying it matt white with Plastikote, as, well, no sunshine here.
I did find this site that had replacement stickers for the family computer piece.
http://retroraiderjapan.weebly.com/store/p159/Famicom_decal_%2F_controller_restoration_kit.html
The rear one wouldn't take long to recreate, I'm planning on redoing my one as the ports have moved a bit.
-
I posted a link, twice I think, to the transparent labels printable layout. I will get my transparent sheets in the next few days then I can print hundrets of em.
The front label (red Famicom) that you posted is very close to the original but not 100%. The Famicom logo on the left is missing and the Famicom text spacing is not the same. But I guess better to have a almost looking same than a messed up one. Do they sell the front label only?The rear one shouldn't be too hard to copy.
I will scan the one I have removed and just reprint it. -
@FlyingTomahawk said in Retro game stuff talk:
I posted a link, twice I think, to the transparent labels printable layout. I will get my transparent sheets in the next few days then I can print hundrets of em.
The front label (red Famicom) that you posted is very close to the original but not 100%. The Famicom logo on the left is missing and the Famicom text spacing is not the same. But I guess better to have a almost looking same than a messed up one. Do they sell the front label only?The rear one shouldn't be too hard to copy.
I will scan the one I have removed and just reprint it.Now you mention it...my Famicom case doesn't have the FF on it either.
Not found anywhere that does just the front piece.

Almost finished messing around with it...(The inside is quite busy) and it is a little yellower than the pic shows.
Just waiting on the Mausberry circuit, for my power switch, been a month nearly.
The case I gutted for the controllers got turned into a 'Retro Look' USB hub :D
-
From what I've seen, there are multiple revisions of the Famicom, and that front panel art can vary. I think the one with the "FF" looks cooler, but I'm nut sure which label is newer/older.


-
@obsidianspider I find the one with FF on a little off balance, doesnt look the same size as the Family Computer either...
If it was sat breaking the line like the Nintendo...
I just need me one of them red port plugs, sure I've seen them on a site.
-
Got the transparent label print paper today. (Sorry for the bad pic quality.)

Just need to cut them out. One page should cover a couple Famicoms. :)
-
@FlyingTomahawk said in Retro game stuff talk:
transparent label print paper
Nice, I managed to peel mine off easily last night as I sprayed the Famicom, they are currently sat on some baking paper between books, may use some spray adhesive, or look at buying some paper later on.
-
@FlyingTomahawk looks like you're starting a restoration business. How did you print them? Laser printer? How do they look on a Famicom? I wonder how well they'll hold up over time.
-
Famicom restorations at your service. How can I help you today? Hehehe...
Those decals were inkjet printed on a special for inkjet made transparent label paper.
They should hold pretty good for a while.Here you can see a finished result from a guy that has done it already.
-
@FlyingTomahawk Wow, that looks fantastic!
-
Looks good, my peeled off ones are yellowed underneath them, so looks like another Amazon purchase, seen the sheets, be a lot of spares, or, I shall be thinking of of some stickers to print up...
So close to finishing this, waiting on my Mausberry that I ordered on the 6th March.
I blame it all on @FlyingTomahawk
-
lol
Funny we are waiting for the same item which was ordered at the same time.
Send me your address and I'll cut you one row of my printed stickers and send it over to you. You can find my e-mail address in my profile.
-
@FlyingTomahawk said in Retro game stuff talk:
lol
Funny we are waiting for the same item which was ordered at the same time.
Send me your address and I'll cut you one row of my printed stickers and send it over to you. You can find my e-mail address in my profile.
You sir are a gentleman.
I have emailed Mausberry about my order, but are yet to hear anything back.
-
Forget about getting an answer from him/them. I send 3 e-mails, all unanswered.
I read that it might take up to 1 month for the Mausberry to arrive. I don't care about the lost money if it doesn't arrive at all, (Well I do care a tiny bit.), it's more annoying that I cannot continue my Famicom build because of that. And I am a bit busy with work at the moment so not a big deal yet but if I don't get anything by first week April I will have to figure out a different way to power up the Famicom even if it means that I won't be able to use the original button. -
Yeah, the switch is my final piece (well, Roms are a never ending job, but I'm making a very very short lead to plug inside so I can sit the USB stick just inside the cartridge slot), with that bit of board, and working out how to get the reset button on the pins as an 'Escape' key which I just thought about, I can finally get it all in the case, and put the screws back in.
Contributions to the project are always appreciated, so if you would like to support us with a donation you can do so here.
Hosting provided by Mythic-Beasts. See the Hosting Information page for more information.