RetroPie in a Dreamcast VMU!
-
@obsidianspider looks cool. Except for the odd split screen.
-
@edmaul69 I think they broke the TFT. The video says it's a prototype, so I'm guessing that'll be swapped out for one without the line in it. I've certainly not seen anyone put a Pi in a VMU before, though there is this thread over at sudomod.
Shipping time on the TFTs I just ordered is about a month, and for the VMUs it's about a week, so we'll see what happens.
-
Shit, talking about narrow space. lol
I was already stunned by the Game Boy Micro. So small and capable of normal game play, if your fingers are small enough.
This here is crazy. Who would want that? And besides you can play only NES stuff with it (2 buttons only)
But hats of to them that is some crazy work right there. -
@obsidianspider you will never fit a pi3 in there!
-
I think his thread is actually this one
http://www.sudomod.com/forum/viewtopic.php?f=13&t=2644
The space is workable, would be lots easier with a custom PCB, reduce the bulk
-
@FlyingTomahawk I think it's more about doing it just to see if it's possible. I would love to see photos of the inside, but that video seems to be all that is out there about that build.
Then again, there isn't a lot out there about the insides of the Burger King Gameboy Colors and I'm attempting one of them too…
-
@obsidianspider I like how the vmu icon has appeared in your signature already! :P
-
@moosepr Well, I ordered one already, (two actually) so it's as far along as the Burger King project that's in a box. ;) I'll start a thread for that once parts show up.
-
@moosepr I can't seem to find the OLED display that was used on satri360's build, but the tfts I ordered from China were $4 each, so I think it's worth the experiment.
-
@obsidianspider if you have ordered the 1.44 inch tft screens, you can actually remove it from the pcb and wire it direct
-
@obsidianspider His is the adafruit oled with the sd card
He seems to have trimmed the PCB down to save space
-
@moosepr You read my mind, good sir. I actually thought of you when I was contemplating the attempt! If for no other reason than to figure out how to pin it and if fbtft would work. Watching some Greek and Russian YouTube videos about the screen lead me to learn that it's got an ILI9163 driver, so it should work with the latest incarnation of fbtft. An interesting note about those screens is in the code comments
/*
- This display:
- http://www.ebay.com/itm/Replace-Nokia-5110-LCD-1-44-Red-Serial-128X128-SPI-
- Color-TFT-LCD-Display-Module-/271422122271
- This particular display has a design error! The controller has 3 pins to
- configure to constrain the memory and resolution to a fixed dimension (in
- that case 128x128) but they leaved those pins configured for 128x160 so
- there was several pixel memory addressing problems.
- I solved by setup several parameters that dinamically fix the resolution as
- needit so below the parameters for this display. If you have a strain or a
- correct display (can happen with chinese) you can copy those parameters and
- create setup for different displays.
*/
I really need to stay off the Internet at 2 AM when I can't sleep. At least I'm only into this project $20 so far. It'd only be $10 if I bought one of each, but I've learned my lesson on breaking stuff before…
-
@obsidianspider well I was already a few weeks into my latest project when this one popped up.
I couldn't find the ili9163 driver when I was testing the other night, but the screen seems OK with the st7735 driver (apart from it trying to do 128x160 resolution)
-
@moosepr Since it looks like you've already got some experience with that particular ILI9163 display would you be willing to share how you attached directly to the ribbon cable? The PCB has a resistor, capacitor, and something else that I can't quite identify, so I'm not sure what they're doing.
-
@moosepr said in RetroPie in a Dreamcast VMU!:
already a few weeks into my latest project
I saw the teaser photos on Twitter. Now I'm curious what else you're up to. Your skill in making PCBs is something I would love to learn.
-
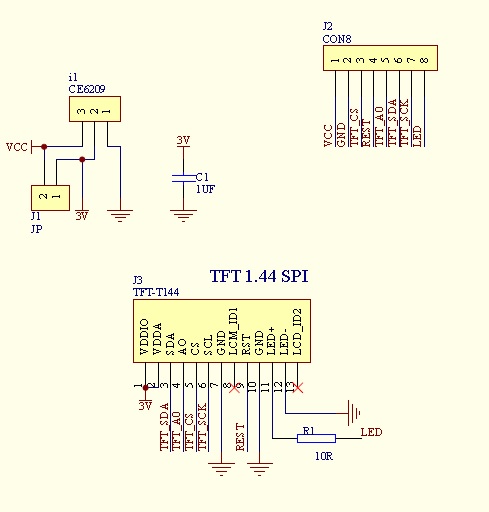
Sure! You will need a 10ohm resistor to tame the backlight, and other than that, wire it straight to the pi!
The boards have a 3v regulator. I can't find an exact data sheet for the screen I have, but most indicate that the screen is OK with 3.3v
Here is the schematic for the little red board

-
@obsidianspider said in RetroPie in a Dreamcast VMU!:
@moosepr said in RetroPie in a Dreamcast VMU!:
already a few weeks into my latest project
I saw the teaser photos on Twitter. Now I'm curious what else you're up to. Your skill in making PCBs is something I would love to learn.
Making the boards isn't that difficult really, the hardest part is getting the schematic electrically correct
-
@moosepr A resistor I can handle. We'll see if I can solder on the ribbon cable without messing it up. I knew there was a reason I bought two. ;)
-
@obsidianspider just be gentle with the heat and you will be fine. Tin the wire, flux the ribbon, and it will soon stick
-
@moosepr do you have a link on how to wire it directly?
Edit: Nm. The page didnt load all the posts. I see it now
Contributions to the project are always appreciated, so if you would like to support us with a donation you can do so here.
Hosting provided by Mythic-Beasts. See the Hosting Information page for more information.