RetroPie forum home
    • Recent
    • Tags
    • Popular
    • Home
    • Docs
    • Register
    • Login

    The 1976 RetroPC. (DIY retro gaming computer build)

    Scheduled Pinned Locked Moved Projects and Themes
    retroretropiefight stick
    14 Posts 7 Posters 5.1k Views
    Loading More Posts
    • Oldest to Newest
    • Newest to Oldest
    • Most Votes
    Reply
    • Reply as topic
    Log in to reply
    This topic has been deleted. Only users with topic management privileges can see it.
    • DipkidD
      Dipkid
      last edited by

      Presenting my latest build - The 197X RetroPieC.
      Finally got the screen working after a couple of days of ripping out my hair etc,
      so I guess its done now:
      Raspberry Pi 3B with Retropie 4.3 (ES & AM), in a Korean Goldstar vintage tv with a cheapo Aliexpress 9" TFT lcd. Small 3v speakers inside.
      Put a 4x USB hub in the front if one would need a silly amount of gadgets attached.
      MagicForce keyboard with custom keycaps, a retro Usb mouse & a DIY zero delay fightstick. Did all of the design & drawings for the cnc in illustrator. All pieces got a custom paintjob. Will mostly emulate Amiga & ScummVM but have also installed the full Pixel Desktop so one can do regular stuff like emails & youtube..

      0_1506255247592_retropc.jpg

      0_1506255261191_splash.jpg
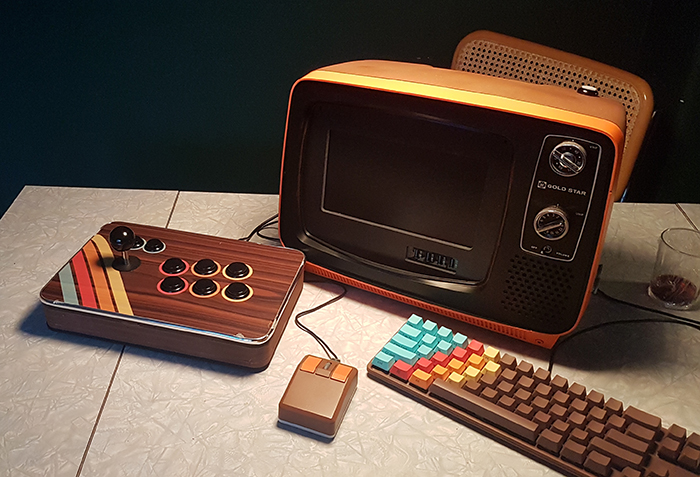
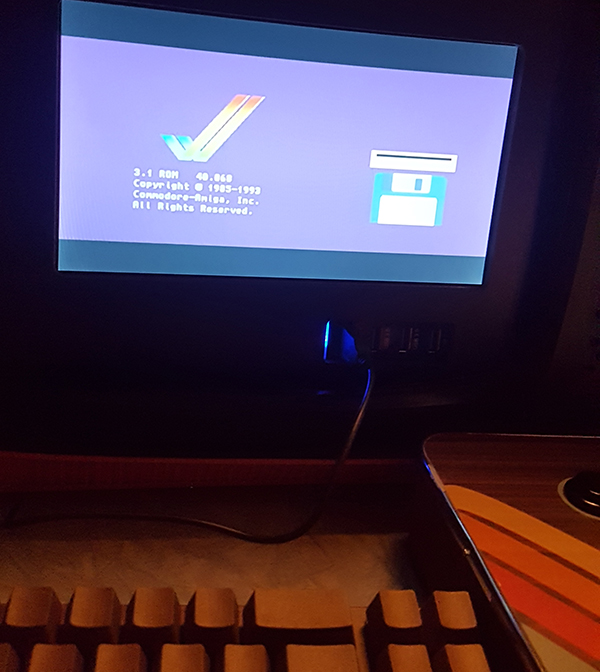
      Custom splashvideo; Amiga bootup animation with a classic chiptune to go.

      0_1506255321751_1976_computer_collage.jpg
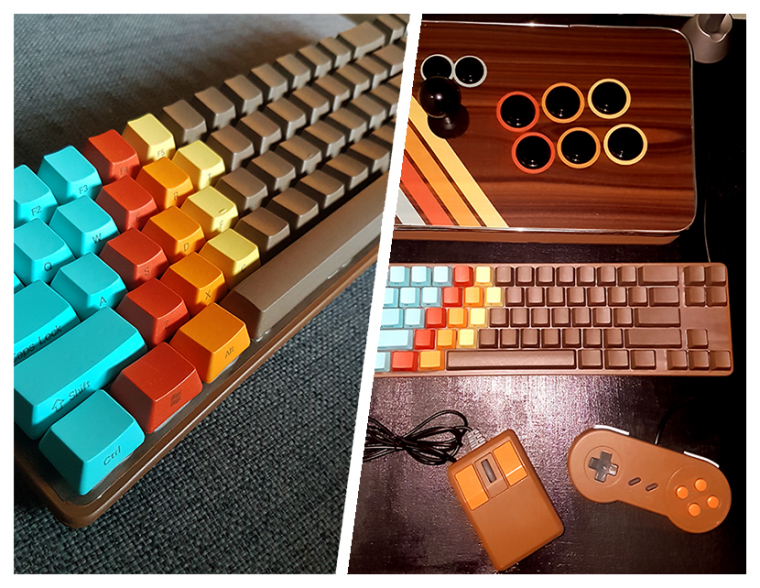
      DIY stick, snes pad, retromouse & keyboard.

      RetroPC: https://retropie.org.uk/forum/topic/13048/the-1976-retropc-diy-retro-gaming-computer-build
      Wallcab: https://retropie.org.uk/forum/topic/28324/wall-mounted-cab-2-0
      Candy Cab: https://retropie.org.uk/forum/topic/34290/diy-candy-cab-arcade

      meleuM edmaul69E 2 Replies Last reply Reply Quote 12
      • P
        Pietze
        last edited by

        Fantastic!

        1 Reply Last reply Reply Quote 0
        • ?
          A Former User
          last edited by

          Looks great! Any reason you didn’t use the screen that was in the TV?

          DD-IndeedD DipkidD 2 Replies Last reply Reply Quote 1
          • DD-IndeedD
            DD-Indeed @A Former User
            last edited by

            @livefastcyyoung

            Propably it was busted and couldn't find replacement screen. Besides, it's really difficult to work with tube TV's.

            Fantastic project nevertheless.

            My soul rests, when I hear the PS1 boot music

            1 Reply Last reply Reply Quote 0
            • DipkidD
              Dipkid @A Former User
              last edited by

              @livefastcyyoung @DD-Indeed Yeah, its over 40 years old, black n white & didnt really work.
              Also, those tubes are dangerous! Fortuneatly I didnt know that until I was done, when I went looking for some tips online. By then I had already used a hammer and boltcutters on it. Apparently they carry voltage for a long time, an are full of toxic led, AND they can explode due to the high vaccum pressure in the tubes.. But im still here! :) (My gf was pissed thouh..)

              RetroPC: https://retropie.org.uk/forum/topic/13048/the-1976-retropc-diy-retro-gaming-computer-build
              Wallcab: https://retropie.org.uk/forum/topic/28324/wall-mounted-cab-2-0
              Candy Cab: https://retropie.org.uk/forum/topic/34290/diy-candy-cab-arcade

              DD-IndeedD 1 Reply Last reply Reply Quote 0
              • DD-IndeedD
                DD-Indeed @Dipkid
                last edited by

                @dipkid

                Haha, that can happen indeed. But I think that you could get modern curved displays somewhere, that would fit into this.

                My soul rests, when I hear the PS1 boot music

                DipkidD 1 Reply Last reply Reply Quote 0
                • DipkidD
                  Dipkid @DD-Indeed
                  last edited by

                  @dd-indeed I tried to save just the outher curved protection glass thats is sort of welded / molded to the tube, but it became to much of a struggle. Another time...

                  RetroPC: https://retropie.org.uk/forum/topic/13048/the-1976-retropc-diy-retro-gaming-computer-build
                  Wallcab: https://retropie.org.uk/forum/topic/28324/wall-mounted-cab-2-0
                  Candy Cab: https://retropie.org.uk/forum/topic/34290/diy-candy-cab-arcade

                  DD-IndeedD 1 Reply Last reply Reply Quote 0
                  • DD-IndeedD
                    DD-Indeed @Dipkid
                    last edited by

                    @dipkid

                    So the glass is welded to the chassis somehow or is it glued down ?

                    My soul rests, when I hear the PS1 boot music

                    DipkidD 1 Reply Last reply Reply Quote 0
                    • meleuM
                      meleu @Dipkid
                      last edited by

                      @dipkid
                      so_cool

                      • Useful topics
                      • joystick-selection tool
                      • rpie-art tool
                      • achievements I made
                      1 Reply Last reply Reply Quote 1
                      • DipkidD
                        Dipkid @DD-Indeed
                        last edited by

                        @dd-indeed sort of, some of em have a wax like material, just gettin the lightbulb-lookin glass case out of the tv was easy. (atleast when u dont realize the thing is lethal!) but then there is some sort of coating thats holds the outer glass on to the CRT-tube. Im pretty useless at explaining, but this guy and others on YT shows how one could do it:

                        RetroPC: https://retropie.org.uk/forum/topic/13048/the-1976-retropc-diy-retro-gaming-computer-build
                        Wallcab: https://retropie.org.uk/forum/topic/28324/wall-mounted-cab-2-0
                        Candy Cab: https://retropie.org.uk/forum/topic/34290/diy-candy-cab-arcade

                        DD-IndeedD 1 Reply Last reply Reply Quote 0
                        • lipebelloL
                          lipebello
                          last edited by

                          Gorgeous!


                          Retrorama Tshirts:
                          https://www.teepublic.com/user/lipebello
                          https://www.instagram.com/phillbello/

                          1 Reply Last reply Reply Quote 1
                          • DD-IndeedD
                            DD-Indeed @Dipkid
                            last edited by

                            @dipkid

                            Yea it's super difficult, they have glued it down with this sort of hard silicone stuff and heating it up is risky business. You would basically need flexible and super thin saw to break up the glue.

                            My soul rests, when I hear the PS1 boot music

                            1 Reply Last reply Reply Quote 1
                            • edmaul69E
                              edmaul69 @Dipkid
                              last edited by

                              @dipkid this is a really sweet build. My main pi is in an apple iie that i converted the monitor to a flatscreen and converted the disk drives to dvd drives so i definitely love the retro look. This turned out great. Two thumbs up!

                              1 Reply Last reply Reply Quote 1
                              • DipkidD
                                Dipkid
                                last edited by

                                Why not:

                                0_1506428562224_beerholder.jpg

                                RetroPC: https://retropie.org.uk/forum/topic/13048/the-1976-retropc-diy-retro-gaming-computer-build
                                Wallcab: https://retropie.org.uk/forum/topic/28324/wall-mounted-cab-2-0
                                Candy Cab: https://retropie.org.uk/forum/topic/34290/diy-candy-cab-arcade

                                1 Reply Last reply Reply Quote 2
                                • First post
                                  Last post

                                Contributions to the project are always appreciated, so if you would like to support us with a donation you can do so here.

                                Hosting provided by Mythic-Beasts. See the Hosting Information page for more information.