NESPi case, trying to hack in a Mausberry, may have destroyed it, help!
-
@jmcfsu13 thanks for your answer however I am not sure I understand how to do the wiring. The post you linked seems to be more of a measuring voltage guide, even if I don't get the part where it seems I should give an 'impulse' to the pi?
-
@day The wiring should be clear but in fact the post here is more a technical how to perform a shutdown via GPIO signal. It's not a guide of measuring voltage ... it's a guide what will happen if you do so :)
I don't get the part where it seems I should give an 'impulse' to the pi?
If you use a momentary switch you give an impulse to mausberry and via gpio the pi can also give an impulse back.
But back to your question:
What's your mausberry version? Is there a switch already installed?
Can you provide a picture or shema of yours? -
@cyperghost I have the same mausberry PCB as mentionned in this thread. And have the retroflag NESPi case which switches I wish to use.
I have no idea how to wire the mausberry PCB to the case so that I case use the switches.
I tried wiring the red and black wires that went to the micro USB PCB from the case (the one OP removed, and did as well) to the SW + and - of mausberry PCB. Then I connected the blue and white pins to the gpio23 and 24, then I wired the 2spring green connector 5v and gnd to the pi3.
Then I plugged the RJ45 and USB extension from the case to the pi3.
I added a fan and the on button would work, fan would turn. Pi3 doesn't turn on however, neither off and reset button.So here I am :)
-
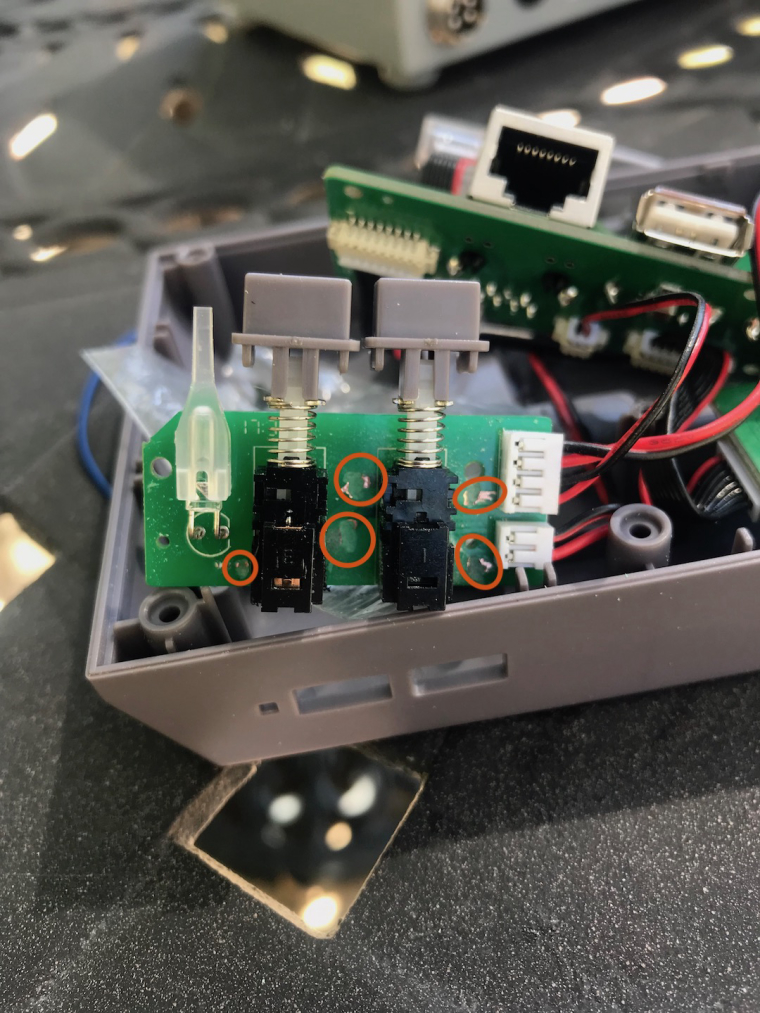
@day You have to cut the traces to the switches or do it like I've done
-
@cyperghost I am not 100% sure of what you did exactly since I do not clearly see on the picture where the wires go to...
also, I do not whish to have the duoled. do you have a simple wiring diagram somewhere ? or maybe explain the "cut the traces" approach along with the correct diagram for that option ? I would be grateful.Best,
day -
@cyperghost I am thinking I need to get one of these cases for my next project, but I don't see why you'd have to cut any traces or even replace the power PCB. Can't you simply follow the traces to the built-in header block and add your wiring there instead of using the stock plugs? Seems like even the Mausberry circuit could nestle in next to the existing power board and you could just run the power wires over to it or solder on a micro USB plug. Maybe the space constrains are too tight? I think I would have to give it a try.
-
@day

Cut these traces that are circled. That isolates the switches and LED.

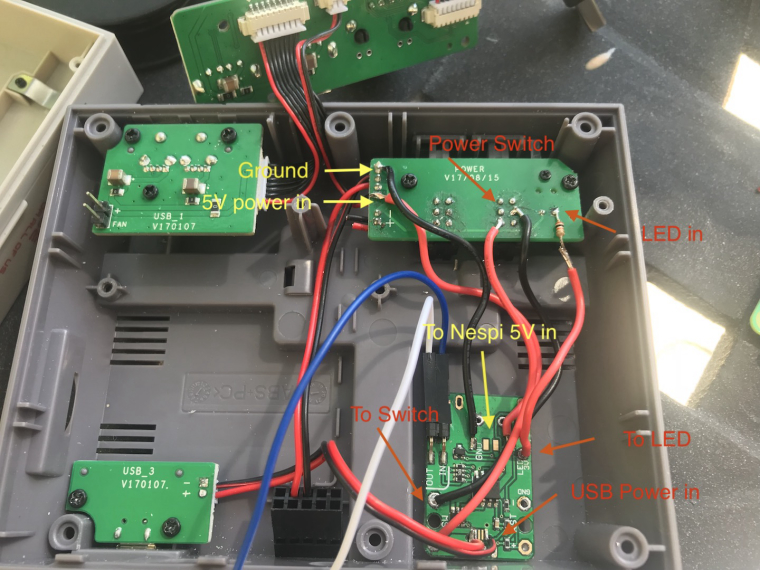
This is how I wired mine up. I hope these help to understand how to hook it up -
@day sorry I meant to post to the thread not a specific post. If you go to the beginning of the thread there is more info
-
@lostless what size resistors did you use?
-
@jmcfsu13 I used a 200ohm resistor on the LED. A basic red LED drops 1.7 - 2.0 volts and max current of 18-20mA. So giving it 3.3V minus the 1.7 leaves 1.6 volts to be used by the resistor.. We want 18mA max. In don’t know the specs of this individual led. So ohms law. 1.6/0.018 = 88.8 ohms. So 100ohms is the closest and an extra 100 to lower brightness a tad if even noticeable.. LED don’t dim in a lineier fashion and i’ve ran them in the microamps with it still being visible.
-
@lostless cool, can you explain the two resistors on the reset button and how you came to those values? You seem to really know your stuff.
-
@jmcfsu13 it’s just a voltage divider. The 2 are a 10k ohm and 1k ohm. It’s 10k from 3.3v to gpio and one side of switch. 1k from other side of switch to ground. With the reset open, the 10k really does nothing. It does help lower the current going to the gpio pin. But it’s virtually 0 if set up right. From what I undersatnd, Gpio pins are basically look like and open circuit when set as a input with pull up tuned on. It’s just measuring what voltage there is on the pin. That’s it. So with the switch open, it just reads 3.3 ish volts. A high. When the reset is pushed the 3.3 v now has a route to ground through the second resistor. From there the gpio is measuring the voltage from ground across the 1k. Since the 10k is ten times greater than 1k. So the 10k drops 10 times more voltage than the 1k.
Formula 3.3v = x + 10x. X being the voltage at the 1k
So the point between the Two resistors is 0.3v. The pi low point triggers around 1.1v. So the pin reads low. The large nubers are there just to keep current down. Ohms law again. 3.3/(10k+1k)= 0.3mA or 300 microamps, is pulled when the button is pressed. Gpio cares nothing about current as an input.Ohms law
E=I*R
E measured in volts
I measured in amps
R measured in ohms -
@lostless thanks a lot for these pictures and explanation. Helps a lot. Will give it a try tonight. Quick qsts however, I don't see the 'reset resistors' you just explained, in fact I don't see the reset switch wired to anything and nothing from RST on mausberry PCB, why? Also, I should cut something in the PCB that is top right in the second picture, right? And finally, white and blue wires from mausberry goes to gpio23 and 24 of pi without resistors, right?
Best,
day -
@day do not cut the pcb! That was a mistake by the guy who started the thread. If it Doesn't fit cut a notch in the screw hole to make room.
-
@jmcfsu13 sorry I meant red and black wires in the switch PCB not the mausberry PCB itself.
-
@day he’s probably looked at my post on this other thread. https://retropie.org.uk/forum/topic/13361/yet-annother-retroflag-nespi-case-with-mausberry-softshutdown-duo-led-momentary-switches/
-
@caver01 said in NESPi case, trying to hack in a Mausberry, may have destroyed it, help!:
@cyperghost I am thinking I need to get one of these cases for my next project, but I don't see why you'd have to cut any traces or even replace the power PCB. Can't you simply follow the traces to the built-in header block and add your wiring there instead of using the stock plugs?
Yes... buy one! It's really a nice case and worth the money but don't spend more than 20-25$
About the switches. There are two of them a momentary (the reset switch) and a permanent (the power button). If you don't cut the traces then 2 working power switch that can be used like a momentary or a permanent buttons.
So I think it's better to cut the traces and make use of two seperate buttons. But as the mausberry is working better momentary buttons (think about software shutdown) - I rebuild the whole PCB with two momentary units ;)
Seems like even the Mausberry circuit could nestle in next to the existing power board and you could just run the power wires over to it or solder on a micro USB plug. Maybe the space constrains are too tight? I think I would have to give it a try.
Surly the MB fits next to the orginial power input. But then you have to solder directly on the Mausberry without proper pads. Surly it works but I don't like it that way and would always prefer soldering lugs.
I removed the old power unit and dremeled down the old holders. Made a small cut in the column (the first poster here should better do that) and used some small plastic rows as holders fixed with super glue.
-
@jmcfsu13 With cut the traces I ment the traces on the switch PCB not the Mausberry device!
Like @lostless wrote you can see the two ways of building this in the thread here
https://retropie.org.uk/forum/topic/13361/yet-annother-retroflag-nespi-case-with-mausberry-softshutdown-duo-led-momentary-switches/@lostless cutted the traces of the orginial NESPi buttons
@cyperghost rebuilded the NESPi switch PCB -
@cyperghost said in NESPi case, trying to hack in a Mausberry, may have destroyed it, help!:
So I think it's better to cut the traces and make use of two seperate buttons. But as the mausberry is working better momentary buttons
I guess I am looking at that switch PCB and to me it looks like those traces just lead to a little white connector block. Why not just unplug the connector there and tap into the switches using the existing block? The Mausberry I have works with either momentary or regular on/off switches--according to the maker/vendor it auto-detects whichever you decide to use.
Surly the MB fits next to the orginial power input. But then you have to solder directly on the Mausberry without proper pads. Surly it works but I don't like it that way and would always prefer soldering lugs.
I was not thinking of soldering the power directly to the Mausberry, but sticking a micro USB connector on the end and just plugging it in, effectively using the existing power PCB as a mounted port--a passthrough to the mausberry circuit. I think my mausberry circuit is smaller than yours--maybe half the size.
I will have to pick up one of these cases on my own and do a few tests. In the end, It's cheap enough to just modify it by dremeling the post and cutting traces, but I was thinking there were non-desctructive ways to do it.
-
@caver01 Sorry for my bad english
The original state of the power and reset switch do exactly the same. They just cut the power.The original NESPi switch PCB has 6 cabels.
2 for feed in power from the power connector
2 for feed USB Hubs of NESPi case
2 for the switches...So the reset and the power button are doing the same action... They are just cutting power. So you have to cut the traces or rebuild the PCB.
I was not thinking of soldering the power directly to the Mausberry, but sticking a micro USB connector on the end and just plugging it in, effectively using the existing power PCB as a mounted port--a passthrough to the mausberry circuit. I think my mausberry circuit is smaller than yours--maybe half the size.
The mausberry I used is ~ 22x33mm
Of course you can use the orginal power inlet - I considered in doing this, too. But it was easier in preparing the way I did, because you have always to mount the PCB in a fix place and imho it doesn't matter to take the time to do an exact job to fit to the connector hole or just to mount it somewhere :)
But as I said ... get that case ... it's really a pleasure to work with it.Imho the @petrockblog Powerblock is the best power switch for this usecase
Contributions to the project are always appreciated, so if you would like to support us with a donation you can do so here.
Hosting provided by Mythic-Beasts. See the Hosting Information page for more information.