RetroPie Instruction Booklet (for not tech-savvy friends and family)
-
'Tis the season (well... almost) and I am planning on giving my folks a RetroPie setup with a few games from their (and my!) childhood. It came out looking
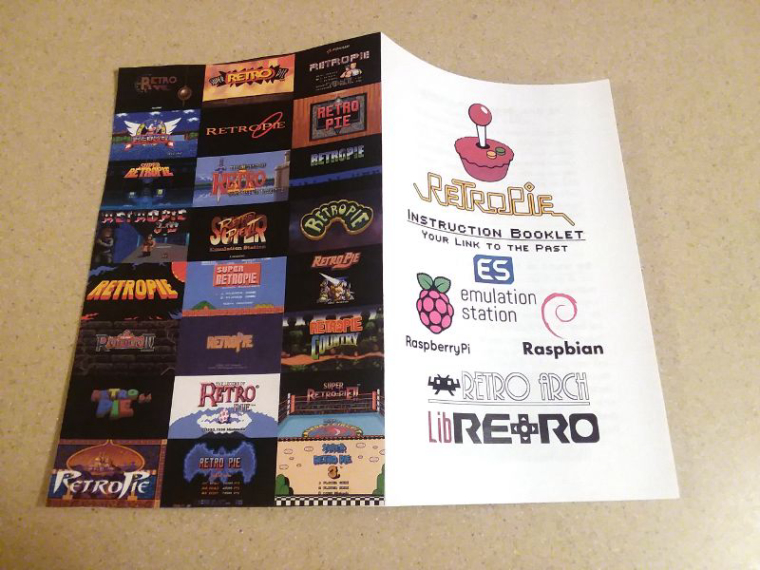
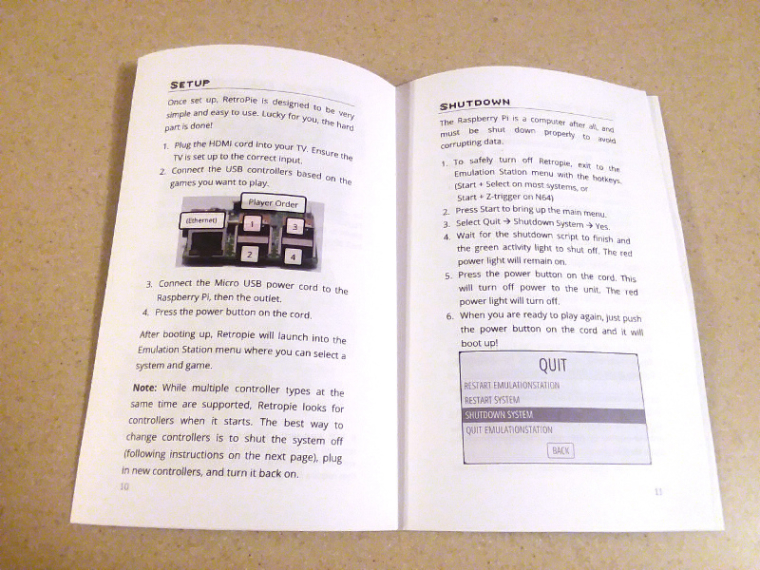
actually quite good, so I figured I would share it with you wonderful people!Have a preview:


The aim was to go over the basics (setup, safe shut down, controller configurations, what even is this in layman's terms, etc.) and introduce the reader to RetroPie's basic features. Important to note that the controllers are already configured and everything is set up and ready to go. It is assumed that this person won't have to do anything other than plug and play. Now, my Dad knows his way around computers but he doesn't know anything about emulation or RetroPie, so that's the target audience. You might want to tone it up or down depending on who's going to be reading it. I know there are other general-advice manuals out there that are quite good (check out the 'manual' tag!) that are already finished. You can print those out and use them immediately, but this is more for someone who wants to personalize everything. You'll definitely have to put in more work, but hopefully you'll think it's worth it.
Download is below, but come on, read this first because I put [TODO]s everywhere that you have to address before you print it. The manual is highly customized to the setup I have going and the specifics probably won't work exactly for you, then you'll have confused family/friends calling you asking to explain stuff and that's exactly the opposite of what we want here.
What you need:
- Microsoft Word 2002 or above, with the ability to export to .pdf
- The fonts Open Sans, Ambitsek, and Segoe UI
- .pdf reader
- Printer and paper and obvious stuff like that
- But also a scissors or xacto knife and glue (rubber cement recommended)
- (Optional) Long stapler OR thick-ish needle and thread
I went through the original document and replaced the most likely customization conflicts with [TODO]s. For example, you're going to want to address it to the recipient and replace my personal anecdote on the second page with your own memory. But more technical things too: I put it in this NES case so if yours is different you'll want to change the picture. That's obvious, but there's things that are easy to miss in there too: I got a power cord with an on/off button (highly recommended!), so in the shutdown menu it now says "Press the power button on the cord [TODO]" because if that's not the setup you have you'll definitely want to edit that. I also put in custom hotkeys for NES and N64, bought waaaaay too many controllers, and have a launching image that will change how you can trigger the Runcommand menu.
I'm sure I'm forgetting things, and I probably missed tagging some [TODO]s in the booklet too, so please please please read it first! Also I'd appreciate you pointing out any mistakes so I am not giving out incorrect information.
What I would do is read over everything and change the relevant bits as you find them, then ctrl+f search for TODO and make sure you didn't miss any. You probably spent tons of time customizing your RetroPie, spend just a little more to get a customized and professional-tier booklet (not to mention that this took me hours to make and I'd hate to see a half-@$$ed implementation!).
Before you get the link, you might be wondering: How did I get the back cover to print right to the edge like that? And even if you aren't wondering humor me, because I bet you'll want to do it too.
The back cover image was printed separately on a full sheet of paper and attached to the booklet, because no printer I am aware of can print full bleed like that without leaving a border and cutting it off. So on the booklet file you'll notice the last page is blank. There is a separate document with all the pictures on it that you should print out, cut to size, and glue on the back cover. I cannot recommend rubber cement enough. It glues paper together without any wrinkles and can be easily rubbed off if you get it somewhere it shouldn't be. The images are a tiny bit too big so I printed it at 98% full size and it was almost spot-on. You could probably go a little smaller.
I got the images from the splashscreen repository (mostly contributed by @lilbud and @Rookervik, but other people too). I encourage you to pick your favorites and customize your back cover!
Rookervik's gallery
Lilbud's gallery
Everything (official repository)So close, but you aren't done yet! after I got everything exactly the way I wanted and was all ready to print... Good ol' Microsoft Word absolutely butchered my painstaking layout and made everything rather unreadable.

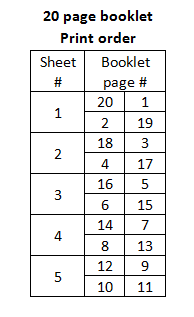
So what I had to do was manually put the pages together in print order, turn it into a .pdf, then finally print from there. After that it worked wonderfully!
Print order will be as follows. Sheet # is the actual sheet of paper it will be on. Booklet page # should be how it is laid out in your document. It will go page 20 (which should be blank!), 1 (front cover), 2, 19 etc. Hopefully it makes sense.

If you are having trouble visualizing it, assemble a mini booklet with scrap paper or post it notes and number the pages (that's how I had to figure it out the first time). Because the paper is folded in half, back sided, and nested within each other, it is not really intuitive how they are supposed to fit together.All right, thanks so much for getting this far! Here's the template: RetroPie Instruction Booklet Template Link
And the back cover
Don't trust Google's preview. The margins on Word are set up in booklet mode and it totally messes them up. Once you get the fonts and open it in word all should be well... but I have Word 2007 so I can't speak for other versions. If the formatting is still wonky no matter what you do, have a pdf.Dec 2021 Edit: Wow! It's been a while! There's been an uptick in people requesting permissions in Google Drive - which is great! I am so glad this is still getting use after all these years. However, I thought you would just be able to download it from Google Drive, which I guess might not be the case? If the above links don't work, try these from MediaFire.
Instruction Booklet doc
Booklet Back Cover doc
Booklet pdfTips:
- 20 pages is good because it fits exactly on 5 sheets of paper (double sided). If you end up with a total number of pages that's not a multiple of 4, I'd recommend throwing some lined "Notes" pages on there until you do to avoid having to cut any blank pages off.
- For the "Systems Included" table I used @Rookervik's sweet pixel art graphics, grab 'em here!
- Also for that table a protip is to highlight it, show all borders, edit it, then remove borders again. Much easier to edit when you can see what you are doing.
- Make sure you are printing in landscape mode.
- On the back cover document, I changed the text wrapping on all the pictures to "In Front of Text" because I found that limits most instances where I move one picture a tiny bit then all the other ones explode all over the page... you know what I am talking about if you tried to do any graphic design in Word!
- When you're done don't forget to change the page numbers and table of contents!
Addendum: continuing with the theme of 'overdo everything' I couldn't find a stapler long enough so I decided to bind the pages together by stitching them, following this bookbinding tutorial. All you really need is a thick-ish needle, a ruler, and some thread (I used embroidery floss but you can probably use whatever). Don't let all the fluff dissuade you, the first diagram is really useful (and pretty much all you need). Looks much fancier than a stapler!
Although if you follow their instructions and begin on the inside going to the outside you will end up with the knot on the inside of the book. I think I would have preferred the other way but there may very well be a good reason it's like that (less chance to get caught on something an unravel? I don't know, I put super glue on the knot anyways so it's not going anywhere). I have no clue, I've never tried to sew a book together before. But it turned out to be pretty easy. Give it a try if you are feeling adventurous!
I hope you and the recipient enjoy!
-
@parviglumis nice job.
-
I gotta tell you - It's stuff like this that really makes me love this community.
-
Superb work, thanks for sharing!
-
Hi all! It's been a while! Gravedigging this post to let everyone know I updated the links. I've been getting an uptick in people asking permissions to view/edit the files in Google Drive (!!! that's really cool) but I can't manually fulfill them all, so check the OP for updates or try these mediafire links:
Instruction Booklet doc
Back Cover doc
Booklet pdf
Contributions to the project are always appreciated, so if you would like to support us with a donation you can do so here.
Hosting provided by Mythic-Beasts. See the Hosting Information page for more information.