RetroPie forum home
    • Recent
    • Tags
    • Popular
    • Home
    • Docs
    • Register
    • Login

    Moving ethernet to back of NESPI case

    Scheduled Pinned Locked Moved Projects and Themes
    nespi caseethernetmodcasemod
    23 Posts 8 Posters 8.7k Views
    Loading More Posts
    • Oldest to Newest
    • Newest to Oldest
    • Most Votes
    Reply
    • Reply as topic
    Log in to reply
    This topic has been deleted. Only users with topic management privileges can see it.
    • J
      jerryfudd
      last edited by

      felt inspired and did the same :)
      alt text

      alt text

      Dan

      caver01C cyperghostC 2 Replies Last reply Reply Quote 3
      • caver01C
        caver01 @jerryfudd
        last edited by

        @jerryfudd oh, excellent job. I like your location better than mine.

        My 4-player cocktail style cabinet built as a custom "roadcase"

        1 Reply Last reply Reply Quote 0
        • cyperghostC
          cyperghost @jerryfudd
          last edited by

          @jerryfudd Nicely done ;) I see you've a NESPi+ ...
          Nobody clears that question and I can only assume because of the python code used to shutdown. Can you affirm that a total shutdown (poweroff) isn't available? You will see, that on the Pie the red LED will still glow after shutdown ;)

          1 Reply Last reply Reply Quote 0
          • Drakaen391D
            Drakaen391
            last edited by

            Even enough space for the average laptop fan

            RPi B & RPi 3B OC (Now Raspberry pi 4b 8gb)
            Retropie (Latest Stable)
            PiBox with Wind Tunnel Cooling System

            1 Reply Last reply Reply Quote 0
            • EvertE
              Evert
              last edited by

              @caver01 said in Moving ethernet to back of NESPI case:
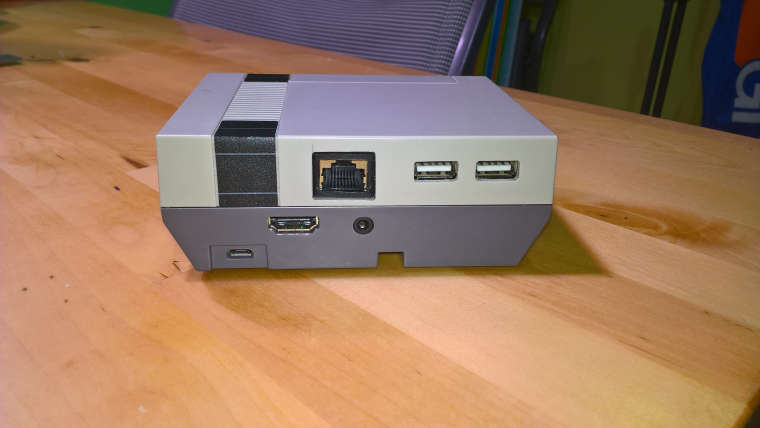
              RJ45 jack

              That's brilliant, they should make them like that to begin with.

              My Transformer Arcade Cabinet
              https://retropie.org.uk/forum/topic/8658/my-transformers-arcade-cabinet

              1 Reply Last reply Reply Quote 0
              • M
                mcjacksebastian
                last edited by

                I see that many of you irritate sockets under the flap in NesPi Case. I do not know why the producer placed them in this place. Probably the print on the flap itself is easier technologically, so this is the idea to put these nests forward - in a word, aesthetic and functional misunderstanding. In the front there should be only 2 USB ports for Joypads.

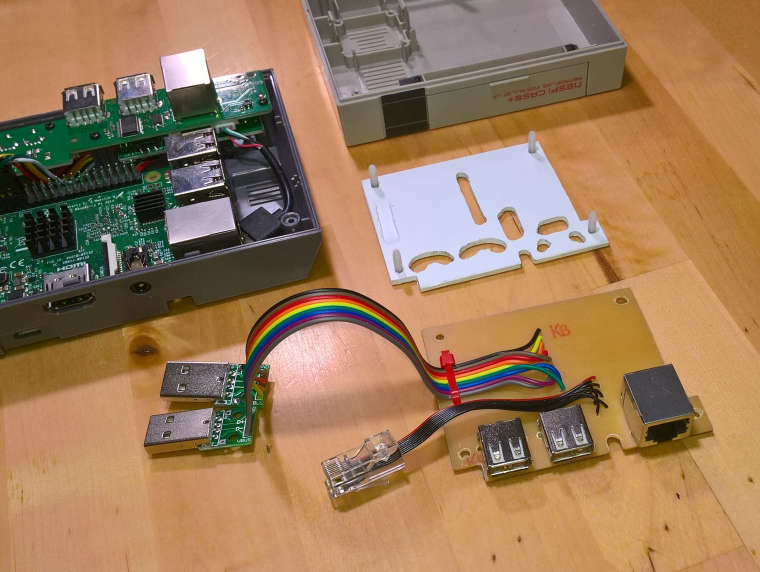
                I use 3.5 "HDD connected via USB, and Ethernet sockets - I decided to move everything to the back of the casing.The first plan was to transfer the original PCB module from under the flap to the back of the case, but after calculations, however, I could not do it very well. Placing two USB sockets and an Ethernet socket has become quite difficult.

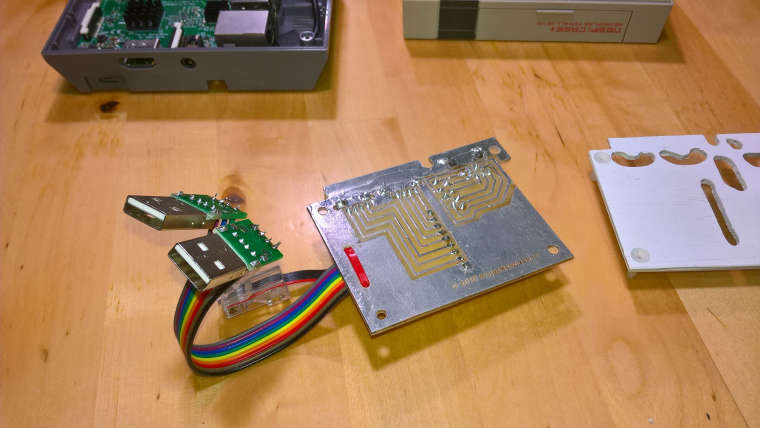
                Finally, I came up with the idea that I would design a simple PCB without any electronic components to place the sockets in the right places. I decided to fix the plate with screws to a piece of a plastic plate, so that the whole thing can be glued non-invasively with a double-sided adhesive tape.

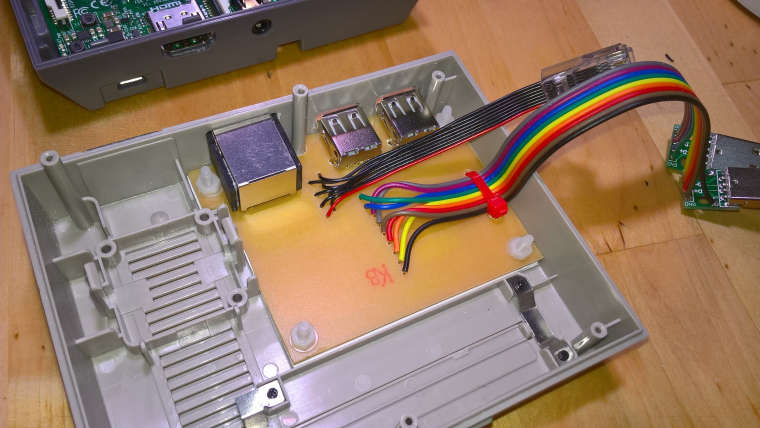
                When I cut the Ethernen socket I made a little too big hole and then I put on a small mask to improve the look. It came out nice and functional but it's a huge mass of work and probably the second time I would not want to do it.

                0_1531938141990_WP_20180717_23_56_45_Pro.jpg
                0_1531938699944_WP_20180718_00_00_08_Pro.jpg
                0_1531938712462_WP_20180718_00_27_38_Pro.jpg
                0_1531938741175_WP_20180718_00_54_32_Pro.jpg
                0_1531938747656_WP_20180718_01_12_21_Pro.jpg

                caver01C D 2 Replies Last reply Reply Quote 0
                • caver01C
                  caver01 @mcjacksebastian
                  last edited by

                  @mcjacksebastian Excellent work! I really love your solution. Making a PCB is a good, strong method. It is a bit beyond what I was able to do, but I do like that you included the USB ports. So, now you have a NESPi with six (6) USB ports. Nicely done.

                  I do agree, modifying the case is very involved and you have to be really careful when making and enlarging the holes so that they are in the perfect place and be careful not to scratch the rest of the case with your tools.

                  In the end, I think it is worth it. I wish I had the ribbon cable RJ45 when I made mine. That would have made everything easier too.

                  My 4-player cocktail style cabinet built as a custom "roadcase"

                  1 Reply Last reply Reply Quote 0
                  • M
                    mcjacksebastian
                    last edited by

                    Thanks a lot! I used the original Rj45 cable from the NESpi enclosure - it's a bit short but it worked! I would prefer the Ethernet socket to be on the right side but mine did not fit in here.
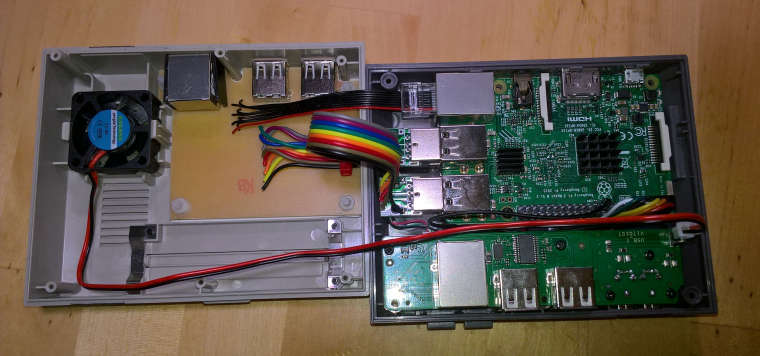
                    I noticed that you also changed the power supply of the fan to 3.3 V - noise reduction by 80%. :-)

                    caver01C 1 Reply Last reply Reply Quote 0
                    • caver01C
                      caver01 @mcjacksebastian
                      last edited by

                      @mcjacksebastian Oh I see. You desoldered the ethernet cable from the existing jack PCB and added it to your custom board. Nice.

                      Yes, I have the fan running off 3.3v which is slower, and probably hotter, but I have not seen the overheat issues so this works well for me.

                      My 4-player cocktail style cabinet built as a custom "roadcase"

                      1 Reply Last reply Reply Quote 0
                      • D
                        Dalarielus @mcjacksebastian
                        last edited by

                        @mcjacksebastian Hey there! I know I'm resurrecting an old post, but would you be willing to share a CAD file for your board? It looks like a really elegant solution!

                        M 1 Reply Last reply Reply Quote 0
                        • M
                          mcjacksebastian @Dalarielus
                          last edited by

                          Hello,
                          I hardly look here anymore and got no notice.
                          Are you still interested in the subject of this PCB for Nespi Case?

                          D 1 Reply Last reply Reply Quote 0
                          • D
                            Dalarielus @mcjacksebastian
                            last edited by

                            @mcjacksebastian

                            It looks like I hardly look here anymore either xD

                            If you still have the design for your PCB, I'd love to see a copy of it :D

                            1 Reply Last reply Reply Quote 0
                            • First post
                              Last post

                            Contributions to the project are always appreciated, so if you would like to support us with a donation you can do so here.

                            Hosting provided by Mythic-Beasts. See the Hosting Information page for more information.