Retropie Installation on Ubuntu Server x64 18.04.1
-
As @movisman mentioned, I now have an updated script for 20.04 that is available for testing, and it also includes many of his improvements. It's in a new branch found here: https://github.com/MizterB/RetroPie-Setup-Ubuntu/tree/LTS-20.04
A list of changes is in the README, and it seems to be working OK in a 20.04 server virtual machine that I am developing against. If others would like to test it out and provide feedback I would appreciate it! Testing of this new version against physical installs of both 20.04 and 18.04 would be helpful. Thanks!
-
By the way, I also had the login screen issue in 20.04. It is fixed in my new branch, which boots the system into the multi-user (command line) runlevel, rather than the graphical one. Booting into multi-user makes it easier to finely-tune the way X Windows & OpenBox start up.
-
Applied this setup to my custom aarch64 build (NVIDIA Jetson Nano) and it works like a charm. The Nano doesn't have the same access to EGL from CLI as most other SBCs, so I was after a lightweight X solution, and this was the perfect solution.
Many thanks!
-
@MisterB Would you mind sharing what you did to preseed a mini or server install? I have edited your preseed file to my needs but am having issues getting the installer (USB) to use it.Scratch that...figured it out. :)
TIA!
John
-
@MisterB said in Retropie Installation on Ubuntu Server x64 18.04.1:
[...] If others would like to test it out and provide feedback I would appreciate it! Testing of this new version against physical installs of both 20.04 and 18.04 would be helpful. Thanks!
@MisterB I am attempting to get RetroPie running on an older Intel computer (Core 2 Duo E8400, 4GB RAM, 500GB drive, ATI Radeon 7850) but I have an interesting issue after installing from the retropie_setup_ubuntu.sh setup script. I start with a clean install of Ubuntu 20.04 LTS and then use the build script. The build/configuration process takes about 70 minutes from start to finish and after it is done, I reboot the machine, see the Pacman animated screen for a bit, and then get left in a black screen and nothing else (no arrow, no cursor, nada).
I know that removing all of that is by design but I am stuck on how to debug this. I can successfully SSH into the machine but wanted a bit of advice before I go mucking around in bash profiles, any grub files, etc.
Also, after some fumbling around on the Ubuntu box, itself, I hit CTRL+ALT+F1 on the Linux box and then (blindly) started up X via startx. I could get a terminal window from there, if that helps describe where I am at.
Not sure what I should be looking at, though. This does sound like a bit like some of the problems reported here so wanted to definitely chime in with my results and seek your advice. This is a purely physical build and I am fresh installing the OS. I am running the wget, chmod, and script execution exactly as detailed on https://github.com/MizterB/RetroPie-Setup-Ubuntu/tree/LTS-20.04.
Not sure what to try. Thoughts? Happy to share the log file from the build, if that is helpful. Would -really- appreciate anyone's thoughts on what to try next.
And thanks to all involved for putting together the script. This really has made the build and installation process painless. It feels like I am 98% of the way there but just a bug here or there is preventing the last bit of it to work.
Any help would be appreciated!
-
@MisterB said in Retropie Installation on Ubuntu Server x64 18.04.1:
As @movisman mentioned, I now have an updated script for 20.04 that is available for testing, and it also includes many of his improvements. It's in a new branch found here: https://github.com/MizterB/RetroPie-Setup-Ubuntu/tree/LTS-20.04
A list of changes is in the README, and it seems to be working OK in a 20.04 server virtual machine that I am developing against. If others would like to test it out and provide feedback I would appreciate it! Testing of this new version against physical installs of both 20.04 and 18.04 would be helpful. Thanks!
I believe that this line needs to be updated in your
README.md:chmod +x ./retropie_setup_ubuntu.shShould be....
sudo chmod +x ./retropie_setup_ubuntu.shIf I don't run it as sudo I get an error.
John
-
@ObiEric I ran into similar looking problem with Intel NUC. On boot it goes from plymouth boot screen to black screen (without mouse) and then in about 30 seconds drops back to shell. And, if I then manually enter 'startx', ES starts normally.
Did you look into your
/home/pi/.local/share/xorg/Xorg.0.log (<-- my xorg log in pastebin for failed start)?I have no idea what the root cause is but I'll hazard it has something to do with i915 / drm kernel modules being in bad state / not yet properly loaded (see somewhat similar issues here and here and e.g. here). Alas, none of the workarounds and their Ubuntu equivalents appeared to work.
So I gave up and just upgraded to 5.8.4 Mainline Kernel. And...it works (at least with NUC).
EDIT: also works with 5.7.18 kernel. 5.8.x had some issues (at least with NUC) which 5.7.18 doesn't appear to have, so I am going with that.
EDIT #2: if applying this workaround, please check kernel.org for latest stable kernel releases (I am using 5.7.19 EOL as of 2020-09 for 8th gen NUC) and consider using Ubuntu mainline kernel matching one of the latest stables instead of versions indicated above.
-
@etheling - Good thought. I have not looked at that but I'll check it out (likely this weekend). Thanks for the advice!
-
Big Thank You to @MisterB , @movisman, @johnodon and everyone else on this thread! Info in this thread and MisterBs install script just saved me countless hours of tinkering! I made a mistake of trying RetroPie on PC and now running it on Pi feels like driving my old truck after trying out manual shift roadster! ;-)
MisterB, some thoughts/comments on your script:
- I managed to run it once as root using sudo (which doesn't work very well :) ). So I added below to the beginning of the script (there's probably better ways to do this...):
# test if we were invoked using sudo, and that we're not logged in as root (Eth) if [ -z "$USER" ]; then echo "Aborting. Please use sudo: sudo $0" exit 1 fi if [[ "$USER" == root ]]; then echo "Aborting. Don't Be Root. Run as normal user using sudo." exit 1 fi- RetroPie 4.6 stock install on RaspberryPi install 'triggerhappy' daemon by default (and I am using it in my setup). I added it to RETROPIE_DEPENDS:
# Minimal depedencies to install RetroPie on Ubuntu RETROPIE_DEPENDS=( xorg openbox pulseaudio alsa-utils menu libglib2.0-bin python-xdg at-spi2-core libglib2.0-bin dbus-x11 git dialog unzip xmlstarlet joystick triggerhappy )- I have script that makes variety of post-install customizations to retroarch and es config files that I've used for rPi. To launch it from your script I added following function before repair_permissions(). This allows me to drop $POST_INSTALL_SCRIPT to same dir with your script and it gets executed as part of the install (if found).
POST_INSTALL_SCRIPT="retropie_ubuntu_post_install.sh" ## .... # Custom post-install modifications (Eth) function post_install_custom_mods() { if [ -f $SCRIPT_DIR/$POST_INSTALL_SCRIPT ] ; then echo "--------------------------------------------------------------------------------" echo "| Found $SCRIPT_DIR/$POST_INSTALL_SCRIPT" echo "| Executing custom post install script" echo "--------------------------------------------------------------------------------" chmod +x $SCRIPT_DIR/$POST_INSTALL_SCRIPT ; # just in case we forgot to set +x $SCRIPT_DIR/$POST_INSTALL_SCRIPT if [ ! $? -eq 0 ]; then echo "-> WARNING: $POST_INSTALL_SCRIPT exited with errors. Please review logs." fi else echo "--------------------------------------------------------------------------------" echo "| Skipping custom post install modifications. Custom post installs script" echo "| $SCRIPT_DIR/$POST_INSTALL_SCRIPT was not found." echo "--------------------------------------------------------------------------------" fi }- Ubuntu 20.04LTS complains about 'dbus-launch gsettings set org.gnome.Terminal.Legacy.Profile:/org/gnome/terminal/legacy/profiles:/:b1dcc9dd-5262-4d8d-a863-c897e6d979b9/default-show-menubar false' line in .bash_profile (and it doesn't work). Replaced it with below, and now menu bar gets hidden:
gsettings set org.gnome.Terminal.Legacy.Settings default-show-menubar false- In my setup if I check $HOME/.xsession-errors there are some errors and probably unneeded stuff loaded by openbox (default load):
$ cat .xsession-errors
....
** Message: 08:07:50.313: xdg-autostart.vala:39: Processing /etc/xdg/autostart/org.gnome.SettingsDaemon.PrintNotifications.desktop file.
** Message: 08:07:50.313: xdg-autostart.vala:64: Not found in OnlyShowIn list, aborting.
...
Thus, I added this to your script at the end of 'autostart_openbox_apps()' to clean this part up a bit (might be cleaner to just rename everything in /etc/xdg/autostart, but it may need pulseaudio at least):
edit: what is needed from below is still WIP
## get rid of warnings in ~/.xsession-errors (Eth) mkdir -p $USER_HOME/.config/autostart mv -v /etc/xdg/autostart/org.gnome.SettingsDaemon.Sound.desktop /etc/xdg/autostart/org.gnome.SettingsDaemon.Sound.desktop.skip mv -v /etc/xdg/autostart/org.gnome.SettingsDaemon.Wacom.desktop /etc/xdg/autostart/org.gnome.SettingsDaemon.Wacom.desktop.skip mv -v /etc/xdg/autostart/gnome-keyring-secrets.desktop /etc/xdg/autostart/gnome-keyring-secrets.desktop.skip mv -v /etc/xdg/autostart/gnome-keyring-pkcs11.desktop /etc/xdg/autostart/gnome-keyring-pkcs11.desktop.skip mv -v /etc/xdg/autostart/org.gnome.Evolution-alarm-notify.desktop /etc/xdg/autostart/org.gnome.Evolution-alarm-notify.desktop.skip mv -v /etc/xdg/autostart/org.gnome.SettingsDaemon.MediaKeys.desktop /etc/xdg/autostart/org.gnome.SettingsDaemon.MediaKeys.desktop.skip mv -v /etc/xdg/autostart/org.gnome.SettingsDaemon.Wwan.desktop /etc/xdg/autostart/org.gnome.SettingsDaemon.Wwan.desktop.skip mv -v /etc/xdg/autostart/org.gnome.SettingsDaemon.ScreensaverProxy.desktop /etc/xdg/autostart/org.gnome.SettingsDaemon.ScreensaverProxy.desktop.skip mv -v /etc/xdg/autostart/org.gnome.SettingsDaemon.A11ySettings.desktop /etc/xdg/autostart/org.gnome.SettingsDaemon.A11ySettings.desktop.skip mv -v /etc/xdg/autostart/org.gnome.SettingsDaemon.UsbProtection.desktop /etc/xdg/autostart/org.gnome.SettingsDaemon.UsbProtection.desktop.skip mv -v /etc/xdg/autostart/org.gnome.SettingsDaemon.Smartcard.desktop /etc/xdg/autostart/org.gnome.SettingsDaemon.Smartcard.desktop.skip mv -v /etc/xdg/autostart/org.gnome.SettingsDaemon.Housekeeping.desktop /etc/xdg/autostart/org.gnome.SettingsDaemon.Housekeeping.desktop.skip mv -v /etc/xdg/autostart/org.gnome.SettingsDaemon.Power.desktop /etc/xdg/autostart/org.gnome.SettingsDaemon.Power.desktop.skip mv -v /etc/xdg/autostart/org.gnome.SettingsDaemon.Rfkill.desktop /etc/xdg/autostart/org.gnome.SettingsDaemon.Rfkill.desktop.skip mv -v /etc/xdg/autostart/org.gnome.SettingsDaemon.Datetime.desktop /etc/xdg/autostart/org.gnome.SettingsDaemon.Datetime.desktop.skip ## edit: this is needed (or otherwise gsettings won't work) ## mv -v /etc/xdg/autostart/org.gnome.SettingsDaemon.XSettings.desktop /etc/xdg/autostart/org.gnome.SettingsDaemon.XSettings.desktop.skip mv -v /etc/xdg/autostart/org.gnome.SettingsDaemon.Keyboard.desktop /etc/xdg/autostart/org.gnome.SettingsDaemon.Keyboard.desktop.skip mv -v /etc/xdg/autostart/gnome-keyring-ssh.desktop /etc/xdg/autostart/gnome-keyring-ssh.desktop.skip mv -v /etc/xdg/autostart/org.gnome.SettingsDaemon.Sharing.desktop /etc/xdg/autostart/org.gnome.SettingsDaemon.Sharing.desktop.skip mv -v /etc/xdg/autostart/org.gnome.SettingsDaemon.PrintNotifications.desktop /etc/xdg/autostart/org.gnome.SettingsDaemon.PrintNotifications.desktop.skip mv -v /etc/xdg/autostart/org.gnome.SettingsDaemon.Color.desktop /etc/xdg/autostart/org.gnome.SettingsDaemon.Color.desktop.skip mv -v /etc/xdg/autostart/at-spi-dbus-bus.desktop /etc/xdg/autostart/at-spi-dbus-bus.desktop.skip mv -v /etc/xdg/autostart/gnome-shell-overrides-migration.desktop /etc/xdg/autostart/gnome-shell-overrides-migration.desktop.skip mv -v /etc/xdg/autostart/nm-applet.desktop /etc/xdg/autostart/nm-applet.desktop.skip ## pulseaudio.desktop ; # lets keep this for now mv -v /etc/xdg/autostart/xdg-user-dirs.desktop /etc/xdg/autostart/xdg-user-dirs.desktop.skip mv -v /etc/xdg/autostart/geoclue-demo-agent.desktop /etc/xdg/autostart/geoclue-demo-agent.desktop.skip mv -v /etc/xdg/autostart/im-launch.desktop /etc/xdg/autostart/im-launch.desktop.skip mv -v /etc/xdg/autostart/print-applet.desktop /etc/xdg/autostart/print-applet.desktop.skip mv -v /etc/xdg/autostart/snap-userd-autostart.desktop /etc/xdg/autostart/snap-userd-autostart.desktop.skip- As to see how long the install takes I added below to the script (after logging to file starts and before complete_instalI:
echo "*** Installation started `date` ***"
### ...
echo "*** Installation finished `date` ***"
Then some possibly not so smart things that I did try out:
- Disable Spectre, Meltdown, etc. mitigations in kernel:
# Danger, Ethelin, Danger..
function disable_cpu_mitigations() {
    echo "+-------------------------------------------------------------------------------"
    echo "| Disable Spectre/Meltdown/.. kernel mitigations"
    echo "+-------------------------------------------------------------------------------"
    ##backupFile /etc/default/grub
    sed -i 's/GRUB_CMDLINE_LINUX_DEFAULT=\"/&mitigations=off /' /etc/default/grub
    update-grub
    echo -e "Done\n\n"
    sleep 4
}
Based on GeekBench this gives ~5% (or less) perf boost on CPU on the NUC. And likely less in reality. But since this will be effectively single user box, with no browser to run bad js, seems like a risk I'm willing to take. GeekBench results before disabling mitigations, and after disabling them.
-
I installed preload package. Probably end up giving close to zero positive impact on performance. But I've got RAM so maybe I get microsecond shorter load somewhere,...
-
It looks like you could do away without pulseaudio and just install alsa-base. But that requires manual change to /opt/retroarch/configs/all/retroarch.cfg to set alsa as audio backend. So probably not worth it.
-
Installing X and OpenBox brings in some services that are probably not needed. I disabled these for my setup (of course if you use BT controller, or want to run samba share, then don't disable them). And disabling apparmor may very well come to bite me too:
DISABLE_SERVICES=( apparmor avahi-daemon.service bluetooth.service nmbd.service smbd.service ModemManager.service ) # Disable services function disable_system_services() { echo "+-------------------------------------------------------------------------------" echo "| Disable OS services..." echo "+-------------------------------------------------------------------------------" systemctl disable ${DISABLE_SERVICES[@]} echo -e "Done\n\n" sleep 4 }- disable snap (just because I can, can't see any benefit either):
# get rid of snapd
function eradicate_snapd () {
    echo "+-------------------------------------------------------------------------------"
    echo "| Removing snapd (OS purge will also purge snapd)..."
    echo "+-------------------------------------------------------------------------------"
    snap list
    snap remove lxd
    snap remove core18
    snap remove snapd
    ## TODO: maybe rm -rf /snapd
}
Some random notes:
- Ubuntu 20.04.1 LTS Server default install doesn't come complete with wpa_supplicant (?!?!) so running misterBs script in wireless only environment requires installing it from debs first (libpcsclite1, libnl-route-3-200, wpasupplicant).
-
To make X mouse cursor 'completely' invisible (and as an alternative to using unclutter) I put together [gnome] cursor theme that sets all mouse pointers to 1x1 pixel red dot (was black), and added it to install script:
# Make X cursor 1x1 black dot function xcursor-to-dot() { echo " " echo "+-------------------------------------------------------------------------------" echo "| Turn X mouse pointer into 1x1 pixel black dot to hide it 'completely'" echo "+-------------------------------------------------------------------------------" git clone https://github.com/etheling/dot1x1-gnome-cursor-theme sudo tar zxf dot1x1-gnome-cursor-theme/dot1x1-cursor-theme.tar.gz -C /usr/share/icons sudo cp /usr/share/icons/default/index.theme /usr/share/icons/default/index.theme.orig sudo cp dot1x1-gnome-cursor-theme/index.theme /usr/share/icons/default/index.theme echo -e "Done\n\n" } -
Excellent contributions @etheling!
Have you considered forking MisterB's github repo and incorporating your changes/additions? I fear that he has moved on and updates to his repo may become stagnant.
John
-
Still here... :). Just not so active around here during the summer months and didn't realize there were updates to this thread.
First off, many thanks for the additional feedback and code snippets. I'm glad to see the continued interest in this and appreciate the extra help.
I do intend to continue maintaining the repo - I have a few other projects currently taking my time, but expect a new RetroPie build to be one of my fall projects. This script is a key component, the other is updating my post-install script, which aims to apply my personal customizations and configurations consistently across X86 and RPi builds. So @etheling 's hook is a great idea!
Adding these changes is pretty easy, but the challenge going forward is finding the dividing line between "solid installation base" and "personal configuration/tweaks". There is an ever-growing list of functions available to call, and some are more optional than required. I need to consider an approach that allows people to opt in/out of certain settings while keeping things simple and consistent, which were my original goals. A config file or simple dialog logic might be options, need to think more about it. Feedback welcome.
-
I'm glad to see the continued interest
Very much so! :) And if I may, I really like how you wrote the script style-wise too.
challenge going forward is finding the dividing line between "solid installation base" and "personal configuration/tweaks".
My thinking is that 'main' setup script should probably produce a stable configuration that to a reasonable extent mimics what you get when you install RetroPie using stock image on RPi. Then more experimental / controversial / unstable modifications and e.g. build specific customizations for e.g. Arduino tools could be done from another script after the main script has executed.
I'm still working on my post-install customizations, but I'll post my script in a week (or two or three) as one example of what can be done.
simple dialog logic might be options
Not my call of course, but I hope that I could run the whole install process 'unattened' without a need to interact with the script once it has launched.
-
Quick note about ScummVM (and lr-scummvm): Retropie setups scummvm.sh clones version 2.1.1 of ScummVM, which fails to compile on Ubuntu 20.04 likely because of this. Worked around by removing version tag from git clone in
scummvm.shand cloning master branch.This will eventually sort itself out as RetroPie moves to newer versions of ScummVM.
scummvm-lr segfaults out of the gate on Ubunbtu 20.04. Didn't do any analysis yet as of why.
-
edit: See this post for updated information regarding installing wine
I realize this may be pushing boundaries of what is in the scope of RetroPie, but it occurred to me that since I'm running RetroPie now on Intel platform, some of the games from my GOG library could be integrated to the setup and launched directly from ES through Ports. I first tried to get Linux versions of e.g. Papers Please and Secret of the Monkey Island SE to work. But getting them to run in my opinion required too much work trying to strace which 32bit copies of libraries are needed for each game. And even then I got garbled audio in some. What seems like a better route is to install Wine and run Windows versions of those (and other games).
Although some changes were still needed, I now have all the LucasArts Remastered editions from GOG.com running through Ports ( with the exception of Grim Fandango Remastered that crashes after intro). What's great is that e.g. Day of the Tentacle and Secret of the Monkey Island appear to have been made playable using gamepad and work great on TV (instead of having to have a mouse and sit by a desk to play).
Here's the part of my customization script that installs Wine (somehow it feels fitting that these games are run in an emulator rather than using native Linux versions ;):
function install_wine() {
    echo " "
    echo "+-------------------------------------------------------------------------------"
    echo "| Install Wine - https://www.winehq.org/"
    echo "+-------------------------------------------------------------------------------"
    cd /tmp
    ## but use Ubuntu stock package instead of https://wiki.winehq.org/Ubuntu
    sudo dpkg --add-architecture i386
    sudo apt -y update
    sudo apt install -y wine wine64

    ## install wine tricks - https://wiki.winehq.org/Winetricks
    cd /usr/local/bin
    wget  https://raw.githubusercontent.com/Winetricks/winetricks/master/src/winetricks
    chmod +x winetricks

    sudo -u $USER winetricks -q corefonts
    sudo -u $USER winetricks -q xact
    sudo -u $USER winetricks -q d3dx9

    # these need X to run...
    # sudo -u $USER winetricks -q vcrun6
    # sudo -u $USER winetricks -q vcrun2005
    # sudo -u $USER winetricks -q vcrun2008

    sudo -u $USER winetricks list-installed

    cd $CURDIR
    echo -e "Done\n\n"
    sleep 4
}
And a sample .sh to launch the game:
pi@retropie:~$ cat RetroPie/roms/ports/DayOfTheTentacle-remastered.sh
#!/bin/bash

CURDIR=`pwd`
cd "/home/pi/RetroPie/roms/ports/game-data/Day of the Tentacle Remastered/"
wine64 ./Dott.exe 2>/dev/shm/wine64.log
Note that it's better to run the GOG Windows installers on Windows and then copy the installed files to RetroPie (GOG installers didn't run great under Wine).
-
You learn something new everyday.
I run RetroPie on top of Ubuntu on an Asus CN65 Chromebox (Intel(R) Core(TM) i7-5500U CPU @ 2.40GHz). I also have an Asus CN60 Chromebox (Celeron) that runs stock ChromeOS. I use this second box to stream web content (mainly sports from some nefarious sources).
And then it dawned on me...
Why not just install genuine Google Chrome (no need for Chromium) on the RetroPie box and create a launcher for it in Ports. It works BEAUTIFULLY!!! I can stream 4K content from Youtube without a single hiccup and I can now retire a piece of equipment.
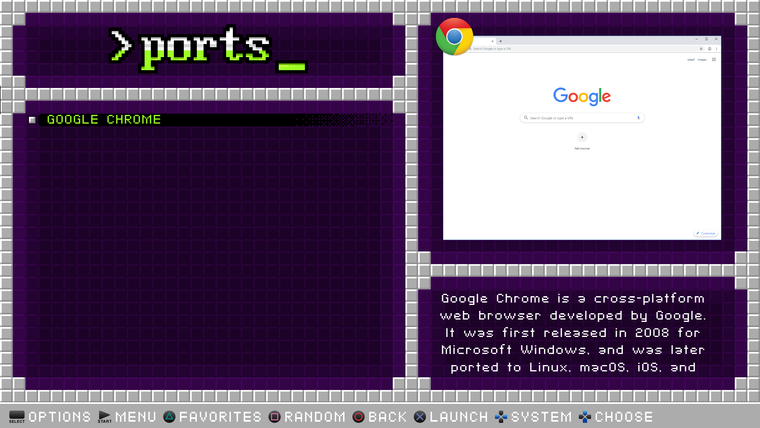

If anyone wants to do this, all I did was download the current stable release and install it using apt:
wget https://dl.google.com/linux/direct/google-chrome-stable_current_amd64.deb
sudo apt install ./google-chrome-stable_current_amd64.deb
If not already done, add 'Ports' to your /opt/retropie/configs/all/emulationstation/es_systems.cfg:
  <system>
    <name>ports</name>
    <fullname>Ports</fullname>
    <path>~/RetroPie/roms/ports</path>
    <extension>.sh .SH</extension>
    <command>bash %ROM%</command>
    <platform>ports</platform>
    <theme>ports</theme>
  </system>
Create a ~/Retropie/roms/ports/Google Chrome.sh script with the following in it:
google-chrome &>/dev/nullCreate a ~/Retropie/roms/ports/gamelist.xml:
<?xml version="1.0"?>
<gameList>
	<game>
		<path>./Chrome.sh</path>
		<name>Chrome</name>
		<playcount>2</playcount>
		<lastplayed>20200906T151625</lastplayed>
	</game>
	<game>
		<path>./Google Chrome.sh</path>
		<name>Google Chrome</name>
		<desc>Google Chrome is a cross-platform web browser developed by Google. It was first released in 2008 for Microsoft Windows, and was later ported to Linux, macOS, iOS, and Android where it is the default browser built into the OS. </desc>
		<image>./images/Google Chrome-image.png</image>
		<video>./images/Google Chrome-video.mp4</video>
		<marquee>./images/Google Chrome-marquee.png</marquee>
		<rating>0.85</rating>
		<releasedate>20080902T000000</releasedate>
		<developer>Google</developer>
		<publisher>Google</publisher>
		<genre>Web Browser</genre>
		<playcount>1</playcount>
		<lastplayed>20200906T153421</lastplayed>
	</game>
</gameList>
And of course add some images and video if you like.
John
-
Nice find. 👍 I'm curious, though. Why use Chrome from an external source when there is Chromium only one
sudo apt install chromium-browserfrom the official Ubuntu repositories away? Is there a technical reason or just by habit? -
@Clyde said in Retropie Installation on Ubuntu Server x64 18.04.1:
Nice find. 👍 I'm curious, though. Why use Chrome from an external source when there is Chromium only one
sudo apt install chromium-browserfrom the official Ubuntu repositories away? Is there a technical reason or just by habit?I remember when I was messing with ChromiumOS, widevine wasn't officially supported. I assumed the same was tru for Chromium browser.
External source? Meaning not using 'apt'? The Chrome download is directly from Google.
-
External meaning not from the distribution's own software repositories. On Linux, using the official repo is the preferred way to install software, as it has has several benefits to "the Windows way", i.e. downloading every application from a different website.
Every package from the repo is checked against tampering by its cryptographic signature, and it also will be automatically updated with the rest of the system. Simply put, Linux' repository system is a decades-old super app store for the whole system and its applications.
Since security updates are especially important for web browsers, your prime benefit of using Chromium from the repo would be the auto-updates – if it has the functionality that you need for your project, of course.
Just my two cents triggered by your description, as I see many new Linux users (don't know if you are one) who keep using the installation method they're used to from their former OS. 🧐
edit: two single-word changes for better wording.
-
After all of this, I ended up installing Firefox instead due to screen tearing issues in Chrome. The process is the same except Firefox can be installed via apt and naturally a new launch script needs to be created to start
firefox.FYI...Firefox also displayed the same tearing issues, however there is a fix that worked for me:
https://askubuntu.com/questions/1141291/screen-tearing-ubuntu-18-04
John
Contributions to the project are always appreciated, so if you would like to support us with a donation you can do so here.
Hosting provided by Mythic-Beasts. See the Hosting Information page for more information.