[Tutorial] "Almost" perfect amiga emulation - UAE4ARM and WHDLoad images [Amiga]
-
Hello there
First of all sorry for my bad english
I would like to help all AMIGA lovers to make their favorite games runs as fast as possible and to be able to select them nice via emulation station gui.Please keep in mind that this is my first tutorial, i’ll do my best to make it as easy as possible even for a new amiga emulation fans.
Let’s start:
To achieve the goal we are going to use optional RetroPie emulator UAE4ARM (which is the best option as for now). All amiga games will be stored as *.hdf files (runing games via harddrive using the build-in installers or WHDLoad images is way faster then runing from *.adf files. Also you will forget about disk swaping).
Each amiga hdf file (each game) going to have its own UAE4ARM *.uae config file which is very important. Thank to it every game will have an unique configuration which is as much compatibile with a specify title as possible.Following tutorial was made on the latest version of RetroPie 4.2 running on RaspberryPi 3b.
Most operations we are going to do using windows and Total Commander.
As an example we are going to use whdload image of a great freeware amiga game called SQRXZ (WHDload image attached) developed by RetroGuru. Please give a hug and see more amazing games here http://www.retroguru.com/.What we need:
RetroPie:
-
UAE4ARM emulator – it can be downloaded from optional packages in RetroPie > RetroPie setup > Manage packages > Manage optional packages.
-
Amiga bios files – Highly recommended to buy Amiga Forever (https://www.amigaforever.com/). For only 30$ you can get Plus Edition which constain every legal kickstart rom you need. Its also nice to support this amazing project, as it keeps amiga alive and thats what we want ;) otherwise use google to find it. We have to place 2 bios rom files inside a RetroPie BIOS folder (/home/pi/RetroPie/BIOS ):
Kickstart v2.05 r37.299 (1991)(Commodore)(A600)[!].rom (rename it to kick20.rom)
Kickstart v3.1 r40.63 (1993)(Commodore)(A500-A600-A2000)[!].rom (rename it to kick31.rom) -
HDF image files – follow tutorial.
-
Mouse and keyboard – i know that most of you would like to use only controler but you still have to press F12 and Q to exit an emulator. To be honest: be serious guys, you are about to emulate a computer, and computer needs its keyboard and mouse. Lots of games use keyboard for highscores, passwords, cheats ets, a lot was made for mouse also.
Windows
- WinUAE emulator whit working workbench (can be loaded from ADF) – www.winuae.com. I will not explain how to use it since it would take a lot of time. In this tutorial i’ll try to use it as less as possible, but if you are real amiga lover you should learn how to use it, its like amazing.
Quick begginers tutrial can be found on youtube here
.- WHDload – the one and only (now finally for free) HD games loader. Lha archive can be found here http://www.whdload.de/.
- Total Commander with AmigaDX plugin. Test version can be found here http://www.ghisler.com/ and the AmigaDX plugin here http://www.ghisler.com/plugins.htm.
We could use only WinUAE but its demands advanced knowledge about it and about a real amiga itself, thats why i recommend to use TC with AmigaDX plugin since its way faster and easier for noobies.
Why TC with plugin ? It allowes us to easly copy and remove files from within a hdf files (as well as all most common amiga files like *.adf *.dms *.lha etc) which are a base for our games. - WHDLoad images – here will be difficult. Making a WHDload images from scratch its for advanced users only (you can find many tutorials on internet). You have to use Amiga OS for it, you need game disks images stored as IPF files, you need to know how amiga works which can take a time (i highly recommend to go deep in it since its very beautiful machine). Of course if you own your amiga game but you simply unable to do it, you can search google for WHDLoad collections.
Preparing HDF image.
(If you are lazy or really noobie you can skip point 1 and 2 and download my preconfigured HDF files with all (freeware) stuff you need inside)
-
First we have to create HDF file using WinUAE. Lets call it SQRXZ.hdf. Nice tutorial can be found here http://amiga.amedia-computer.com/document/Minimig/HDF_Creation_Minimig_English.pdf.
Before u set a size of your hdf image let me tell you something about hdf files. HDF image will be used for load a content as well as save a content. It means that all games which supports saving will store data within the hdf file itself thats why i highly recommend to use like 1mb – 2mb bigger hdf file then a specify whdload image. In our case we have like 1mb whdload image so for this game we are going to use 2mb hdf file. Thanks to it game has a space for additional save data.
Before we can use it, it must be formated under amiga OS (Use amiga workbench under WinUAE).
Insert workbench adf file into DF0 and mount hdf file as DH0 (while mounting hdf file is important to uncheck the „bootable” option, otherwise emulator will try to boot from our hdf file which is empty instead of load workbench from floppy image).
In workbench desktop simply right click your hdf icon and select format, put a nice name for your image (SQRXZ in our example) and continue. After this our hdf file is ready to be edited in Total Commander. -
Prepearing hdf folder structure.
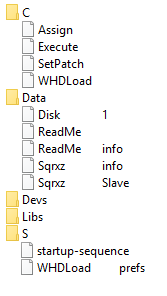
Open total commander and find your SQRXZ.hdf file which you created. Thanks to AmigaDX plugin you should be able to easly browse image (just like zip files). Open your hdf file and create folder structure like this:
C
Data
Devs / Kickstarts
Libs
SC – in this folder we’re going to store some importent tools including whdload launcher itself.
Data – here will be a place for our whdload image files
Devs / Kickstart – some games require additional rom files to work which if needed will be stored here. Every whdload image contains „read me” file with additional info about requirements. Highly recomended to read it. All kick roms can be found on your workbench disk in same folder (devs/kickstarts) or Amiga Forever cd.
Libs – some titles require additional libraries (kind of DLL file on windows) which if needed will be stored here. very rare, but if really necessary you can search huge legal amiga repositorium http://aminet.net/.
S – this is the place for startup-sequence. In startup-sequence we specify what and how will be loaded.- Coping files into hdf image.
Folder C:
in total commander navigate and open adf file with workbench image and copy following files from C folder to your C folder on hdf: Assign, Execute, Setpatch.
Next, open whdload package and copy WHDLoad to you C folder on hdf file.Folder Data:
here we unpack our sqrxz game data from wdload package. Open SQRXZ.lha (total commander) and copy content of sqrxz folder into data folder of your hdf file.Since sqrxz dont need addtional kickstarts file and libraries we can go direct to folder S
Go into S folder (on your hdf file) and create text file (without extension) named „startup-sequence”. Copy/paste this into startup sequence and save
C:SETPATCH quiet
C:Assign > NIL: ENV: RAM:
C:Assign > NIL: T: RAM:
cd Data;
Whdload Sqrxz.slave PRELOAD QUITKEY=89;in our case we use Sqrxz.slave (slave its a main boot file used by whdload launcher) but you can use this sequence for other titles, just place a correct slave name.
Next open again whdload package and copy WHDLoad.prefs to S folder also.If you did everything good you should have file structure like this:
Sound pretty complicated but if you get used to it you can prepare a game in less then 10 mins.
Copy your hdf file to your retropie amiga roms folder.Prepare retropie:
Our first hdf image is ready to go, now we have to prepare our retropie and emulator.
The main file for our game list will be a config file *.uae created directly in UAE4ARM. Default emualtion station settings do not support this extension thats why we have to add it by hand to our es_systems.cfg file.In retropie open console (F4) and type following:
sudo nano /etc/emulationstation/es_systems.cfg
find amiga and add .uae extension in <extension> ... </extension> field
ctrl+x to save your file and then type „reboot” to restart machine.thanks to it emulation station will show our uae „roms” on the list (i wrote „roms” because technicly those are only configuration files for UAE4ARM)
Second thing we have to do is to let UAE4ARM run our uae file direct without poping up gui. Latest instance of UAE4ARM support this feature as default but if for some reason something is not working follow this:
Open termianl (F4) and type:sudo nano /opt/retropie/configs/amiga/emulators.cfg
wipe out entire text and put this one instead:
uae4arm = "pushd /opt/retropie/emulators/uae4arm/; ./uae4arm -f %ROM%"
default = "uae4arm"thanks to this all games will start automaticly direct from ES gui.
Now we’re going to configure the UAE4ARM. We have to set the paths for our bios files and config files. To do it we start UAE4ARM. In the menu we choose „Paths” and set paths like this
System ROMs:
/home/pi/RetroPie/BIOS/Configuration files:
/home/pi/RetriPie/roms/amiga/Now emulator will use kick files stored in BIOS folder (its easy to operate in this folder via samba share etc) and store config files direct in roms folder.
Prepare configuration file:
now when we have our hdf file and configured retropie its time to prepare configuration file for our game. This we do in UAE4ARM itself.Few words about configuration file. Depending on what game we choose we have to set specific configuration to make it work as good as possible. Some games require different kickstarts (2.0 or 3.1), some of them needs more ram memory or chip memory etc, some of them runs with ECS chipset some with AGA, some need powerfull CPU to run smooth and some need slower because otherwise they run to fast. Thers quite a lot possibilities which im unable to write here, you must try by yourself, learn a little bit about it etc. The best way to do this is to practice it using WINUAE coz UAE4ARM is based on it and has almost same options.
Fortunetly (from my experience) most of the games runs very good using the same specs, only some of them need special treatment ;). im going to explain a little bit how to do it and of course attach config file so you can check it, compare it and use it.First of all start emulator using a shortcut +START UAE4ARM. I noticed that latest build of UAE4ARM start direct to amiga boot screen so press F12 to popup gui.
Lets add our first config file in Configurations tab:
In the „Name” field write the name of your game (in our case SQRXZ) and press save. The config file should now appear in the top menu. Now set up my „almost” universal config:CPU and FPU:
CPU = 68040, JIT
FPU = CPU internal
CPU Speed = FastestChipset:
Chipset = AGA
Blitter = Normal
Copper = Fast copper
Collision Level = Sprites and Sprites vs. PlayfieldROM:
Main ROM File = KS ROM v3.1 (A500,A600,A2000) rev 40.63 (512k)RAM:
Chip = 2mb
Fast = 8mbFloppy drives:
DF0 = onInput:
Port1 = here set up your joypad (i use ps3 controller)Save your config. The rest of options you can leave as default (note: when your game wont start or runs not so good you can play with config by changing kickstart, CPU speed, amount of ram etc).
Now add hdf file as your main harddrive. To do this select „Hard drives / CD” and click „Add Hardfile”. In popup menu select path to your game (in our case it will be /home/pi/RetroPie/roms/Amiga/SQRXZ.hdf). Check (if not checked) „Bootable” and click OK.
Now save your config for a last time.Thats it, restart emulation station (so roms appear on the list) and you are ready to go.
If you set everything good your amiga game list should look and work like this (not my video):Good luck ;)
Less then 10 mins method:
if you get familiar with this tutorial and succesfully made your first hdf file you can use those tips to make it even faster.- Pick whdload file (check size)
- pick one of my preconfigured hdfs (select proper size)
- open it in TC and copy whdload game files into data folder and edit startup-sequence by adding only a name of slave
- copy hdf file to amiga roms
- copy and rename the same as new hdf file your config file you just did (SQRXZ.uae in roms folder)
- start UAE4ARM and load your new config
- change hdf file path and save config. Thats it, another game ready
hope i help ;)
Here are attached files:
- Preconfigured hdf images - http://www31.zippyshare.com/v/QppKffxn/file.html
- SQRXZ whdload image - http://www105.zippyshare.com/v/aIiak03i/file.html
- SQRXZ hdf and cfg example - http://www30.zippyshare.com/v/5keg2SME/file.html
-
-
This post is deleted! -
This post is deleted! -
This post is deleted! -
@xFlesk said in [Tutorial] "Almost" perfect amiga emulation - UAE4ARM and WHDLoad images [Amiga]:
ust try b
Thankyou for this guide, I'm going to have to get this running, I paid for WHDLoad when I 'retro-brited' and converted my Amiga 1200 to a usb floppy and compact flash drive.
The only downside of an original 1200, to get a fair few running, RAM, that stuff is a silly silly price,was over £50 for a measly 4 meg!!
-
Wish I could upvote this more. Thanks!
-
@xFlesk thank you so much for this!!!! Not only the guide but the premade images too, legend!
-
@xFlesk First of all many thanks for this! It's really amazing!
I have one Question : I am using a selfmade bartop and retrogame for the Key inputs. Is it possible too load the right keysettings (retrogame GPIO) for every game when starting the Game?
I tried to add a line into emulators.cfg but i think it's not recognized! The only thing i wanna do, is copy the right keyfile (named the same as the ROM only with other extension) to the standard file, for Sqrxz it would be : sudo cp /home/pi/Sqrxz.cfg /home/pi/retrogame.cfg . Is there a way to do this ?
many thanks in advance!
theghostovelvis -
So all is working now . I made it with the runcommand-onstart.sh and runcommand-onend.sh scripts!
runcommand-onstart.sh looks like (example only for 2 systems) :
#!/bin/bash
system="$1"
full_path_rom="$3"rom_file="${full_path_rom##/}"
rom="${rom_file%.}"if [ "$system" == "amiga" ]; then
sudo cp /home/pi/Adafruit-Retrogame-master/configs/retrogame.cfg.$rom /boot/retrogame.cfgelif [ "$system" == "mame-mame4all" ]; then
sudo cp /home/pi/Adafruit-Retrogame-master/configs/retrogame.cfg.mame /boot/retrogame.cfg
fiIn the end script i copy only the retropie GPIO setting back...
So i can set the GPIO Mapping for every Amgia Game extra, its perfect for my Bartop which is specially designed for playing Pinball Games like Slamtilt, Pinball Illusions....
greets
the ghost ofelvis -
Thanks for the guide!
Is this libretro/retroarch based? I have an iPac setup, that maps buttons as a USB keyboard does. So if I could edit a retroarch.cfg file and change button mappings that way, I'd be happy..?Or is button mappings done via some kind of menu in the emulator?
Edit: a quick google search shows older topics that state that UAE4ARM doesn't include button mapping at all, meaning that games are unplayable unless you're using a keyboard... Is this still the case? I see your guide recommends this for quitting games etc, but what about game controls?
-
Hi!
Sorry for the late answer!
I can set the complete button mappings (through GPIO ports incl. in game keys) for each game separately for UAE4ARM! You just have to know which keyboard keys are used by the game and map them to the GPIO Ports!
I don't know if it's possbile with the iPac!
-
@theghostofelvis iPac functions as a USB keyboard, not connected via GPIO pins.
So with retroarch based emulators, I edited the CFG to map every controller input to button presses on a keyboard. So if the mapping for the UAE4ARM can do keyboard inputs, that'll work.. But the job has to be done for every game then? -
Nearly every Amiga game has its own control keys, so yes it has to be done for every game !
-
sorry for my noob question:
I tried to follow through on this, but I Total Commander will not let me copy anything to the Data SubFolder - it says that this is not possible within an archive.
I tried to look around but did not came across a solution to this.
-
All,
I've found an even better method, even simpler. Please have a look at this post:
https://retropie.org.uk/forum/topic/12656/amiga-amiberry-whdload-holy-grail
-
@nemo93 said in [Tutorial] "Almost" perfect amiga emulation - UAE4ARM and WHDLoad images [Amiga]:
All,
I've found an even better method, even simpler. Please have a look at this post:
https://retropie.org.uk/forum/topic/12656/amiga-amiberry-whdload-holy-grail
At this point people need to remember that RetroPie now supports multiple boards and systems. Amiberry is Raspberry Pi hardware specific.
-
@nemo93 said in [Tutorial] "Almost" perfect amiga emulation - UAE4ARM and WHDLoad images [Amiga]:
All,
I've found an even better method, even simpler. Please have a look at this post:
https://retropie.org.uk/forum/topic/12656/agency-amiberry-whdload-holy-grail
Thanks! This method is simpler and faster but the best thing is all packages being versioned.
Contributions to the project are always appreciated, so if you would like to support us with a donation you can do so here.
Hosting provided by Mythic-Beasts. See the Hosting Information page for more information.