(WIP) Starting my first case mod. PS2 slim. Help and feedback greatly appreciated!
-
@Sturo I used this guide for the IR and I never had any problem, it works with any remote (including the PS2 one) and you don't need any any additional board. I don't know if LIRC (the software needed to configure the remote) it's included RetroPie, but if it isn't it could be installed.
-
@Sturo in the gpio block diagram shown in the gpio-specifications link previously posted, it shows that there is a diode that will forward bias, connecting the pin to the 3.3V supply, when the voltage to it is slightly greater than 3.3V. The voltage will go to the diodes before the resistors, and at 5V, you should be forward biasing both the LED and the diode connecting the GPIO pin to the 3.3V supply line. With your resistor lowering the current from the remaining voltage not dropped by both LED and diode, you might not have enough power to damage the pi (right away) or you might. If you do this, there is no guarantee that you won't damage the pi, and it is most highly probable that using the pi for something that it was not specified to do will void any warranty.
-
@Sage-Freke is there any difference in GPIO pins becuase that is an older Pi? (Thanks for the guide!)
@Wulf Alright, I will hook the LEDs up to the 3.3v and see how they look.
-
Thanks again for all your help!
-
@Sturo will are you create a splashscreen like ps2 splashscreen ?
-
-
@godhunter74 Yes I will probably do a custom splashscreen with a PS2-like intro but with a raspberry pi logo or retropie logo.
@Sage-Freke ok cool, I will follow that tutorial when I figure out how I am going to wire the IR to the GPIOs.
-
@Sturo i'll follow your thread waiting for that...
I'm a recalbox user but i like retropie because there is a fabulous community !!! -
@Sturo looks like it's starting to come together!
-
So I am working on the IR sensor, I got it all hooked up to the GPIO, but when I go to test the functionality, it is receiving a constant signal from something. I checked all the wires, nothing is crossed, the LIRC service is stopped, and the lights are off. Weird. Maybe the IR sensor just isn't supposed to work when directly wired to a Pi. Any suggestions?
EDIT: After some research, I had a wireless mouse right next to the IR sensor, and that was giving it a false signal. Moved it away and yay it works!
-
We have success! Got the remote working properly! Wasn't too fun but it's doing its thing.
-
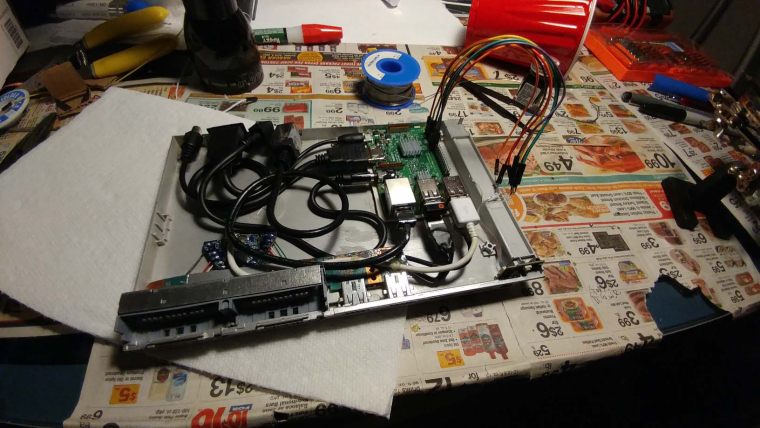
Just a quick pic.
Getting the fitment down, looking good though!
-
Nice! Keep up the great work!
-
man, and i had just decided to do a similar build. i wasn't planning on re-purposing and original parts of the ps2. I was going to purchase a purple clear ps2 slim case and just stuff the pi 3 into it and run the cables out of it and maybe fill in any unused holes. i just dont think im skilled enough to do the soldering or anything you are doing.
-
@Eastwind4869 Nahman, I am not particularly skilled at soldering or anything, just determined I guess. If you need any tips on wiring or anything, hit me up, I'm a pro now! J/K. I also got the snail shaped fan to work as well, but I don't have any room for it.
ANYWAYS, now comes my favorite part of the build, design and painting. The pieces of the case are currently in the garage drying, as I have painted them as close to the original silver color I could find at the hobby store. Now that I will soon have a clean slate, I am thinking on how I want to address the logos and stuff. I whipped up a few concepts in Photoshop, let me know what you think and which one you like best!
-
@Sturo a couple suggestions. First is to to turn your cpu heatsink the other direction. The wifi and bluetooth seem to have more interferance with the heatsink faced that direction. The other thing is that you cut off the airflow to the ram on the bottom. It gets quite hot. You might want to find a way to get airflow to the bottom of the pi.
-
@edmaul69 Wow I never knew the heat sink orientation was an issue, crazy! I've used the Pi pretty extensively, both the Wifi and bluetooth and haven't run into any huge problems with interference, so I may leave it as is for now.
As for the ram, there is a gap underneath the board to allow it to breath a little. If it becomes an issue, I can find a place for the PS2 fan, and/or drill holes underneath the Pi's location for more breathing. Thanks for the suggestions!
-
@Sturo yeah not everyone has issues with their heatsink acting as an antenna, but some people do. I would definitely put some holes under the pi. As your ram starts to heat up it will also start heating everything above it if the heat cant escape fast enough.
-
@Sturo this is what i think :
Concept1 is look like very to the original that is BIT funny
Concept2 is beautiful this is my best choice
Concept3 is weird i don't like it. -
Painting is going slow! I managed to make a splashscreen video. It's not perfect, I had to learn how to use a new software and I trudged through it, but I like it. It has that awesome sound!
Contributions to the project are always appreciated, so if you would like to support us with a donation you can do so here.
Hosting provided by Mythic-Beasts. See the Hosting Information page for more information.