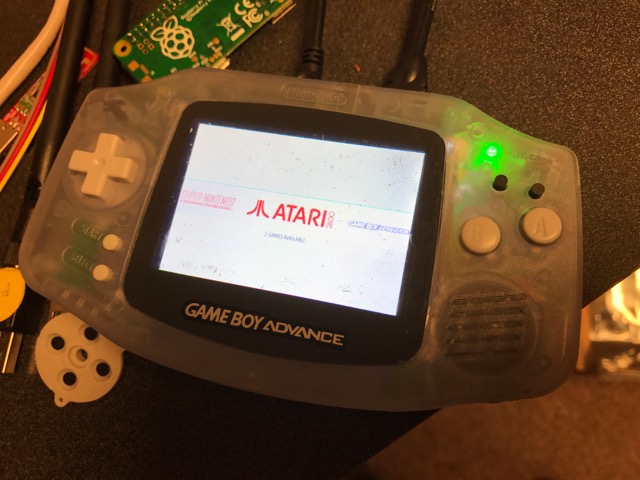
NeoPiGamer
-
@mrvanes - Congrats on completing your build. It looks great. Nice to know the NeoPiGamer has a spiritual cousin out there.
@moosepr - There are benefits to using a good quality 2500mah lipo vs AA cells with capacity and the ability to safely charge directly in the unit being some of them. The pi zero is very energy efficient so 2500mah should get you many many hours of continuous play (6-8+ to be exact).
@Flavor - Keeping the AA holder sounds nice, but it takes up valuable space. Removing it will actually give you space for a bigger better battery with adequate breathing room.
-
I updated the wiki with some storytelling and comments.
http://wiki.mrvanes.com/wiki/mrvanes/view/Raspberry+Pi/Advance+Zero/I am very dissapointed in the so-called 2900mAh 14500's I ordered so I'm doing a second attempt using 900 Trustfires I found at AliExpress. Hope they're more honest and supply better stamina than what I get now. Will do a constant-load stamina test (using some game demo mode) from full charge to Pie lights down before and after to compare.
-
@mrvanes Nice update, thanks. I did some research on 14500s, too. It seems that most people claim the Sanyo UR14500P cell is the best. I believe the P is for PROTECTED. You can find them on eBay, but they probably won't be as cheap as the ones you already tried.
After having played with it for a while now, how do you like the X/Y being microswitchy (as opposed to the A/B being rubber pads)?
-
I have no issues using the microswitches as opposed to the rubber pads whatsoever. And my kids (who have never used the original) neither ;)
The Sanyo's seem to be great indeed!
http://www.dampfakkus.de/akkutest.php?id=20This is the Trustfire (2012)
http://www.dampfakkus.de/akkutest.php?id=19 -
With some drilling, 3 new wires, and a fair bit of brainstorming/planning, we were finally able to add X and Y buttons to the Game Pie Advance.

-
Awesome build man!
-
I would love to see a step by step tutorial on how to do this. I want to breath new life into my old gba.
THanks.
-
Hi, I'm sorry if you've already answered this question but I can't find it anywhere. I know you replied awhile back to someone asking about how you connected the screen. I understand how you modified it up until what you connect directly to the pi. I'm really just trying to finish up my schematic of my own project like yours so if you have a picture of the connections, that would be extremely helpful. Thank you and wonderful build!
-
The link in my previous post has all the pinout information for the display I used at the bottom of the page. Use the image in this post to match the display pins to the corresponding raspberry pi GPIO or SPI pinouts.
-
Here are the results of the long overdue AA stamina tests of the Trustfire 900's:
Load: NES Donkey Kong Classics Demo mode (start, then leave it alone).
GBA Zero (2 AA's, 3.2" PiTFT, USB hub + USB audio)
Old pack: 1.37:08
Trustfires: 3.21:00 (207%)GB Zero (4 AA's, 2.8" PiTFT, USB hub + USB audio + USB Teensy + USB Wifi)
Old pack: 2.16:54
Trustfires: 4.36:00 (202%)So, conclusive it's safe to say that over 3 hours of gameplay are possible on a GBA Zero using 2 Li-ion AA's.
-
@mrvanes Excellent. I recently bought a couple Sanyo cells, so I plan to do some similar testing when they arrive. This is very encouraging!
I added your info along with some battery test info that I generated over at http://forum.freeplaytech.com/thread-4418.html
-
BTW, I updated the aforementioned forum post with a new result. While I was previously getting less than 1.5 hours out of 2 14500 cells (which were the cheapest I could find), I now got almost 3.5 hours out of a new pair of the Sanyo UR14500 cells.
This almost perfectly matches mrvanes' test with the 3.2" TFT (which is also what I'm using) with Trustfire batteries.
-
Hello @Tekkaman_Slade,
I just recently became fascinated by the idea of playing SNES games on a GBA. So much so that I supported Freeplaytech's Kickstarter for Freeplay Zero, a custom board kit for RaspberryPi Zero in a GBA shell.
A few questions:
Is it possible with your build to use the default plastic/glass cover instead of having it exposed as shown?
Would this project be too difficult for a completely new person to modding? I know that's why I got the kit because beside putting it in a shell and modifying some space in the shell for the board, it's pretty simple.
Would you do this project again?
Lastly, about how much money did you put into this? And if you were to build these how much would you sell it for? After exciting talking about this idea I spoke to some friends who would be interested in having me build one if I do one for myself.
Thanks so much!
-
Hey I know this is an old thread but WOW!
I've been planning on doing something similar to this but how did you attach the buttons?? I get that you used the old Gameboy Advance motherboard but how did that work? If you could explain to me in detail that would be awesome! -
Wow. That's INCREDIBLE! Sign me up - where do I get one?!
Contributions to the project are always appreciated, so if you would like to support us with a donation you can do so here.
Hosting provided by Mythic-Beasts. See the Hosting Information page for more information.