Overclocking discussion
-
@quicksilver said in Overclocking discussion:
Is it only lr-mupen64 that the changes dont work?
Thanks for asking I just tested and save/load doesn't work. Shoot something else is wrong. I did a rebuild from scratch image 4.3 and updated RetroPie to 4.1.6, updated Retroarch (current from yesterday), Emulationstation (2.7.5RP) & lr-mame2003. I left everything else the same. I am sure it was working prior. I will test at lunch with an old build I have. My test emulators are lr-mame2003 & lr-fbalpha running under the Arcade folder. Save doesn't seem to be working. I have no idea what to look at but that's copied and pasted directory from my all/retorarch.cfg. The arcade/retroarch.cfg is blank except for 2 shader lines.
# Saves state.
input_save_state = "up"
# Loads state.
input_load_state = "down"
EDIT: Player controls from all/retroarch.cfg
input_player1_up = "up" input_player1_down = "down" -
@quicksilver I spent some time last weekend doing some overclock testing and came up with some interesting results. It took several hours of reboots through out the weekend but last Saturday afternoon I hit my magic numbers finally.
I had no crashes for about 9 to 10 hours straight. The frag count on all 8 characters (9 including my character which was zero frags ;) was around 2000 to 2200 each. They are surprisingly evenly matched. :)
It seems there's some wiggle room. If I lowered the sdram freq low enough I could get a bit more from the arm freq or vice versa but with Quake 3 there was no wiggle room on the gpu freq. Q3 beats the hell out of the GPU. It was somewhere between 500 to 525 but I haven't nailed down the exact number yet. It's not exact science but a lot of playing with high/low numbers, different voltages, etc. really changed things up.
Also of note I have a good quality HP 2.0A 5.3V power supply that tested perfect with Q3 for about 4 to 5 hours. It's uses a standard USB detachable cable on the power supply side.
Another interesting thing is I also tested a 10 foot/3 meter USB cable and it wasn't stable. Even at stock clocks I was getting low voltage warnings. The longer the cable the bigger the vdroop.
I used a Pi 3, Cana-Kit 2.5A power supply and G. Skill 64GB Class 10 micro SD card.
100% stable overclock settings running Quake 3:
# CPU Overclock
arm_freq=1325
over_voltage=6

# GPU Overclock
gpu_freq=500

# RAM Overclock
#over_voltage_sdram = 6
sdram_freq=550
sdram_schmoo=0x02000020
over_voltage_sdram_p=6
over_voltage_sdram_i=4
over_voltage_sdram_c=4

# SD Card Overclock
#dtparam=sd_overclock=100
After that I tested 3 cases on Sunday idle and under load. The standard open case (posted below), BIQU and Flirc 2. The BIQU and Flirc 2 are easy to look up online but I wanted to post the open case pics so you can see exactly which one. It has a fan and also heatsinks on the SoC, ethernet and underside memory chip.
The ambient was roughly 69F/20.6C. The "burn in" for idle and load were about 30 minutes each. Also I did not have original thermal tape for the Flirc 2 and used a 3M piece I had on hand. This is worth noting in case the original tape had potential to perform better.
Air is more resistant then metal so the open Pi case never really got hot due to the fan but does run slightly warmer under load then the BIQU case. I tried to read the temp of the BIQU case with an ear thermometer but it the read only 'HIGH' on the display and not the actual number.
I wish I had an IR infrared thermometer to read the actual temp. For all it's heat it was the coolest running case and the next day after the 9 to 10 hour burn in it was a full 2C cooler under load. My guess is the thermal grease was settled in and curing as the ambient was the same and in the same location.
You have to hit that sweet spot of not to much grease but enough as some of it oozes around the very thin columns of the BIQU case and covers more of the chip surface. Like a beveled edge up the column. I am not sure how to explain it but application is another topic entirely.
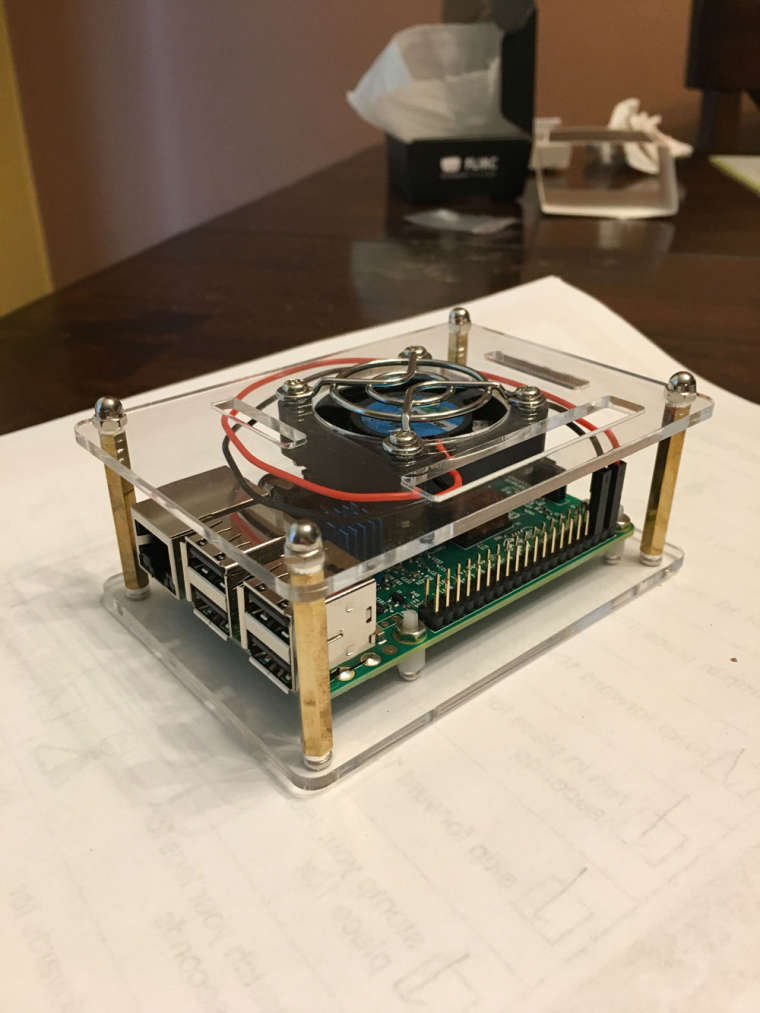
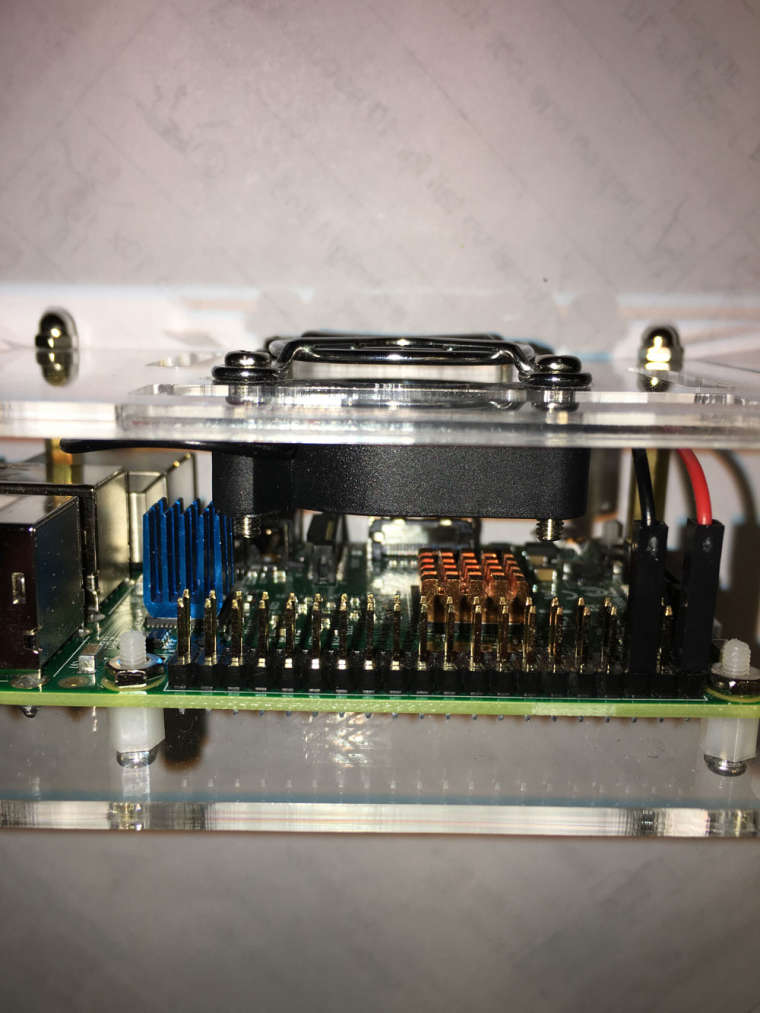
Idle was sitting at the Emulationstation selection screen.
Load was running Q3 with 8 players (9 total including my character). The main (first) map and selecting 1 of each character plus a few duplicates.BIQU Case:
- Idle - 37-38C
- Load - 62-63C
Open Case:
- Idle - 39-41C
- Load - 67-68C
Flirc 2 Case (tape):
- Idle - 45-46C
- Load - 80-82C
Flirc 2 Case (grease):
- Idle - 39-40C
- Load - 70-71C
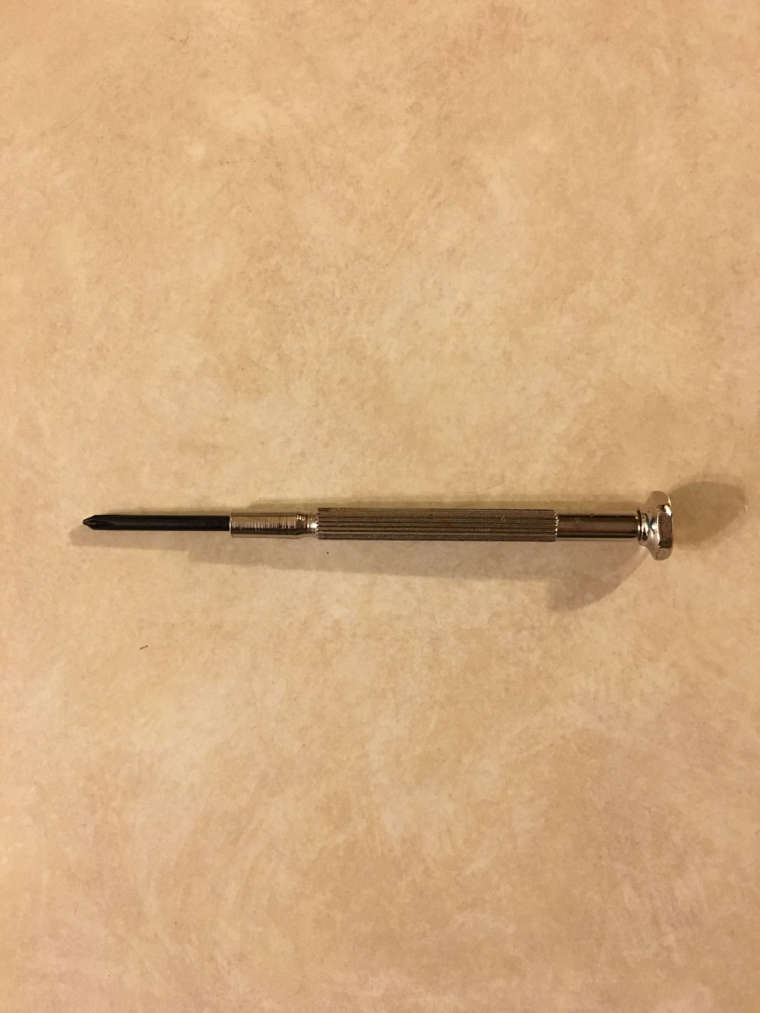
Screwdriver:
- Idle - N/A (not tested)
- Load - 81-84C
After that I decided to have a little fun and found some surprising results. What I did was remove the tape from the Flirc 2 and replaced it with thermal grease, a lot! It's the only way to bridge the monster gap between the column and SoC. I am sure the PC guys will have a coronary looking at the pic.
The numbers actually surprised me both idle and under load. A pic of how much grease I used is posted below. Both the Pi and case had equals amount but only the Pi is shown below. If you look close you can see where it heated up and ran to the edges of the chip. It's smooth around the edge of the pile of thermal grease.
Looking at the numbers I think there's a design flaw with the Flirc 2. The gap needs narrowed to utilize thinner tape or grease. It's idle temps with grease were as good as the BIQU and open case and a bit higher under load than the open case. It still performed the worst but way closer to the other two with grease vs. tape.
The other note on the Flirc 2 was I figured it would run a few degrees cooler with the top off and uncover the hollow heatsink column but surprisingly it was only about 1 maybe 2 degrees Celsius cooler that way.
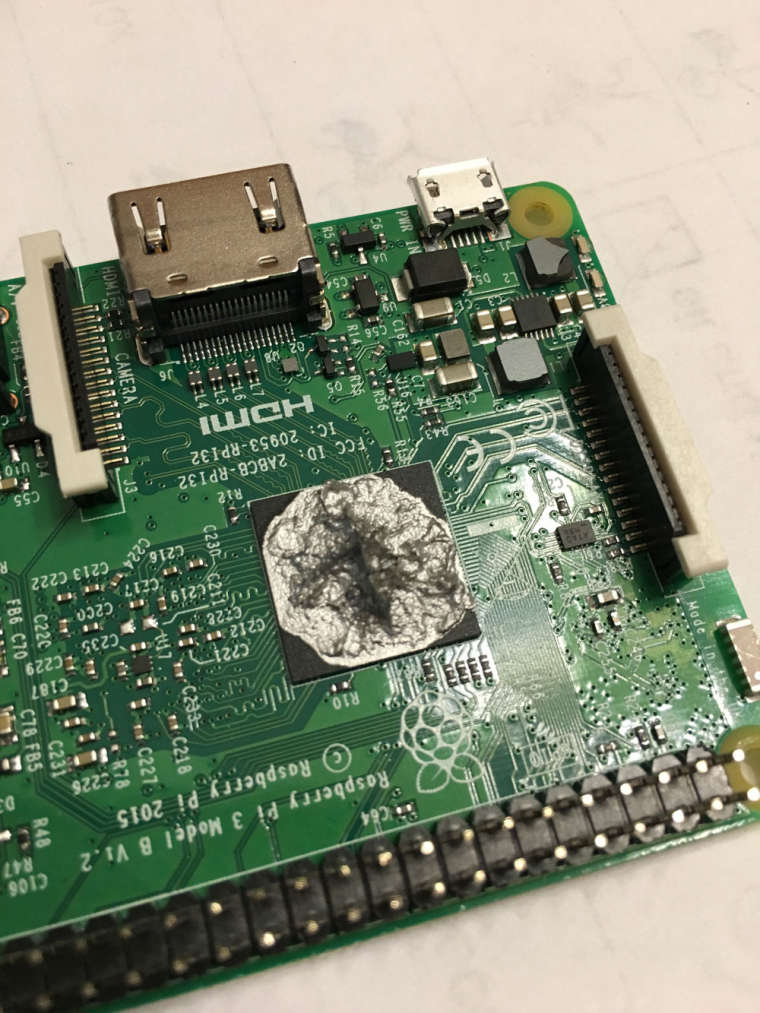
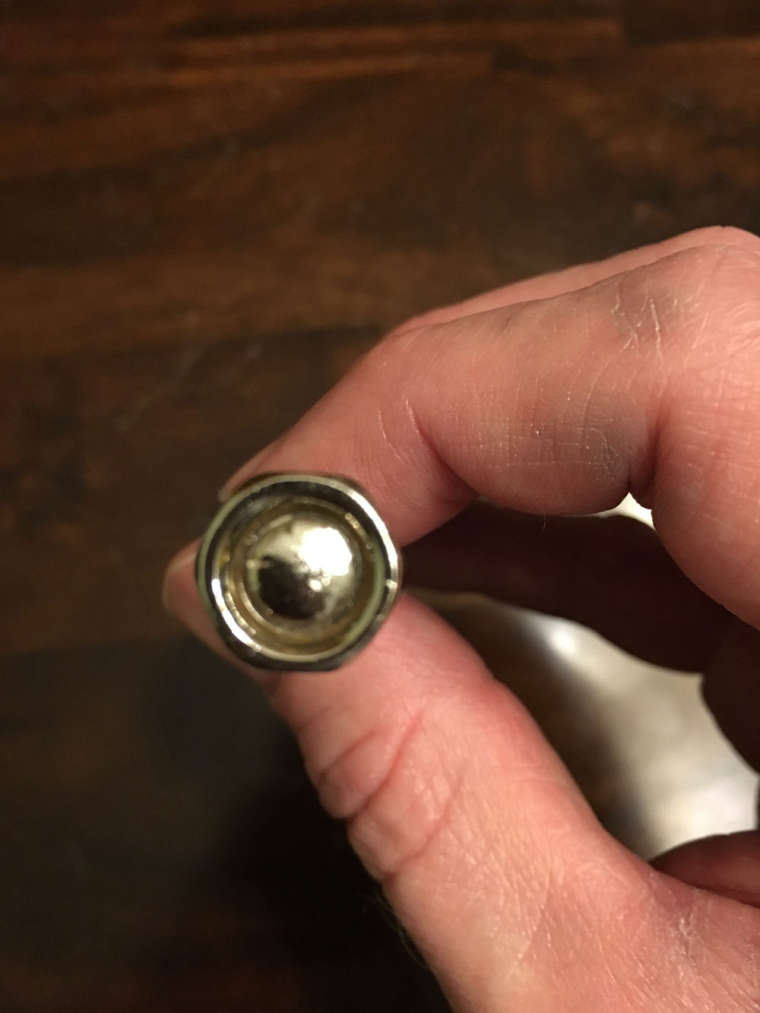
My final test was a completely open Pi, no case, no heatsinks and no fan. Just a screwdriver! Pictures of the scredriver are below. I wasn't sure if I would overheat and throttle in seconds but it turned out ok.
I only did the test for about 25 minutes just to see if I could pull off the Q3 test on a bare Pi and a screwdriver. All I did was hold the screwdriver end cap on the chip. I felt the heat slowly rise up the screwdriver and heat my hand up. As you can see from the pics the end of the screwdriver only makes partial contact around the edge and in the dead center. I think it would have run much cooler with a flatter screwdriver that has more direct contact on the chip.
I started the Q3 test under load and leveled off somewhere between 81-84C. It didn't overheat & downclock. Surprisingly the screwdriver does remove a lot of heat and you fingers in turn dissipate it from the screwdriver which allowed the Pi to run Q3 at very high temps. I think some grease, a flatter head, removing the chrome plating or all would have driven down well below the Flirc 2 with tape. Maybe even close to the top. I think the take away is the single most important thing is good contact with the SoC to dissipate the heat.
I will still use tape in certain scenarios but grease gets the nod on this one.
Of the 3 cases the BIQU performed the best but I prefer the look of the Flirc 2. The open case was the first one I owned and I don't know if there's much improvement. It's biggest drawback is it's loud which doesn't bother me except when it sits just right it vibrates and "rattles" but it's also the most affordable at around $10 US.
The Flirc 2 needs improvement, possible columns that contact the ethernet and memory chip. Also making them solid metal would help but it's a really nice looking case. It performed the worst and also was the most expensive at around $16 US.
The BIQU needs to improve the mounting holes/bracket so screws don't ground out on the bottom of the board. They could also widen the heatsink columns to cover more of the chip (it would run even cooler) and lastly add some external indicator lights would be great. With a few improvements it would be a perfect case and came around $12 US. It's cheap, cool and quiet.
-
@riverstorm wow this is a lot of interesting data! I'm shocked at how well the screwdriver performed. It makes me wonder what other household items could be used as a heatsink? (I feel like there is a YouTube channel opportunity in there somewhere)
Its interesting the results you got when testing GPU frequency. My Pi's GPU is stable at 505mhz, anything higher than that and eventually quake 3 will crash a few hours in. Surprisingly, the core frequency (GPU core) I am able to overclock to 560mhz and achieve stability. I might be able to push it a little higher but I eventually get crashes past 575mhz or so. I also have arm frequency set to 1350mhz, again I might be able to go a little higher but I don't see much reason to since I'm not really seeing major performance gains by boosting the CPU speed (extra N64 performance is my goal, which is also the reason the pi3b+ didn't interest me).
My pi enclosed in my super kintaro 9000 case with heatsink while running quake 3 test will top out at about 70°C (ambient temperature in my basement is 17.5°C). I have a small case fan I could also use but haven't installed it yet since my pi hasn't come close to throttling, and because I prefer to use passive cooling if able.
Definitely post any other tests you run. Your findings are very intriguing.
-
@riverstorm A really good test, thank you for all your insight. There are some suprises and I am happy to own the BiQU too and its cheap (pricely wise). But on the testing for the Flirc2 case, you used a lot of thermal paste, right? But is this not counter productive? If you use too much thermal paste, this will not perfectly transfer the heat to the heatsink/case. Normally there should only be a "thin" layer of thermal paste, as this will just close the microscopic holes between chip and heatsink. Maybe a better idea is to get a very thin and small heatsink between?
Hopefully I didn't misunderstood you here.
A general question: Do you guys cool down after one test? I mean, if the case is already hot, then it will not last as the first test right? And tests are going 3 hours, that would mean a sort of 6 hours test for the second one.
-
I am currently testing and experimenting with some settings; it started to be a lot of fun too and SSH/Putty is working too, I can finally measure the temps while benchmarking. And thanks to the patience of quicksilver in the other thread, I manage to get higher settings.
But what I wanted to say is, using thermal paste on BiQU case made a BIG difference, up to -20°C!? I am not 100% if this can be true. Do you use any thermal paste or are you using tapes or nothing (like me before). This case rocks!
Btw, I found this part in the documentation and it worries me a little if some recommendations have any effect if this one is in not use:
"
By setting avoid_pwm_pll=1 (which negatively affects 3.5mm audio quality) you can overclock the individual GPU components with the parameters:v3d_freq - speed of OpenGL 3D graphics processor isp_freq - speed of Image Sensor Pipeline h264_freq - speed of x264 video decoder (not used by emulators, used by Kodi)"
Source: https://retropie.org.uk/docs/Overclocking/Does that mean, without avoid_pwm_pll=1 the setting v3d_freq will have no effect? The v3d_freq is recommended in many websites without the mention of avoid_pwm_pll=1. Btw, as I am using the 3.5mm audio jack, I can't disable this.
Another thing from the documentation on same page. What does the setting total_mem=1024 do? At the (official?) page for Raspberry Pi 3 config file https://www.raspberrypi.org/documentation/configuration/config-txt/overclocking.md, I cannot find total_mem.
-
@thelostsoul I'm not sure you need to set avoid_pwm_pll=1 anymore. You can test by running a game, then ssh and type:
vcgencmd measure_clock v3d -
@quicksilver I did this while Quake 3. The result is:
frequency(43)=525000000
What does this tell me? -
@thelostsoul it tells me you set your v3d frequency to 525mhz
-
@quicksilver Ah yes haha, I did. So that means its in effect and the other setting is not needed? Maybe the documentation needs a change there.
-
@thelostsoul said in Overclocking discussion:
@quicksilver Ah yes haha, I did. So that means its in effect and the other setting is not needed? Maybe the documentation needs a change there.
Yea it would seem so unless there is something I'm missing.
-
@thelostsoul said in Overclocking discussion:
@riverstorm But on the testing for the Flirc2 case, you used a lot of thermal paste, right? But is this not counter productive?
Yeah it is [way to much grease]. At home I have an old Ivy Bridge I have overclocked to 5GHz using air in a push/pull configuration. The amount of thermal grease I used about the size of a piece of rice.
With the Flirc 2 the tape that ships is somewhere between 1 to 2 MM and I believe it gets slightly compressed when applied and the case screwed closed. It's very difficult to take them apart once that tape takes hold. It's a slow process of prying with a thin screwdriver around the edges working the Pi up and out.
I figured I would try grease vs. tape just to see how if it would perform and was surprised it was around 10C lower. That gap is huge and the OEM thermal tape thickness is a bit ridiculous so I had to use a ridiculous amount of grease to fill the gap. I cold pressed it and would lift to view it until most of the chip was covered (nothing like conventional PC rules). To me the take away is even a thick layer of thermal grease blows away thick thermal tape.
I agree you could maybe use thermal glue with a piece of copper, etc. to lower the case column so only a thin layer of grease or tape is all that's needed would make all the difference. It would take some trial and error to get a piece of metal of the proper thickness. I was more going for testing out of the box.
A general question: Do you guys cool down after one test? I mean, if the case is already hot, then it will not last as the first test right? And tests are going 3 hours, that would mean a sort of 6 hours test for the second one.
Yes my test was very informal and I didn't do a full cool down in between even though they drop quickly when you exit Q3. It was basically for fun. If you do any testing definitely post any results.
20C cooler seems to be on on par. The BIQU and open case performed similar. One being grease and one tape even. I used grease on the BIQU and tape on the open case.
The Flirc 2 I tried both tape and grease. The Flirc 2 contacts only the main chip but the BIQU contacts all 3 main chips. Once grease was applied to the Flirc 2 it dropped 10C which bought it within 10C or of the other 2 cases.
Also I sanded the paint off the case columns to make better contact with the chip.
The cases run very warm. My ear thermometer I knows goes to at least 105F/40.5C but it read 'high'. It has a nice round flat contact point that I would put right on the flat part of the case. When you think about it the whole case is basically the heatsink so it just radiates heat.
@quicksilver - I definitely need to do some more testing but man it can go for days. A few times the settings I was testing made it over an hour or more before crashing. Other settings would crash back to the game selection screen. I figured if it crashed even once it was to high. When I did hit the stable numbers it was a straight 9 to 10 hours of perfection.
I figure I have room for improvement since those exact numbers worked on 3 other Pi's I have on hand. The burn in was only about 1 hour each for those Pi's so they might be unstable. The final numbers on the main Pi might be slightly conservative but they are rock solid. I will try and bump a little higher and see if I can find the 'absolute' cap.
Here's a script I like to use. It converts the temps of the CPU and GPU to nice and easy to read Celsius. I use this script in conjunction with the watch command so it updates every few seconds. Basically "watch temps.sh"
#!/bin/bash cpuSpeed0=$(cat /sys/devices/system/cpu/cpu0/cpufreq/scaling_cur_freq) cpuSpeed1=$(($cpuSpeed0/1000)) cpuTemp0=$(cat /sys/class/thermal/thermal_zone0/temp) cpuTemp1=$(($cpuTemp0/1000)) cpuTemp2=$(($cpuTemp0/100)) cpuTempM=$(($cpuTemp2 % $cpuTemp1)) gpuTemp0=$(/opt/vc/bin/vcgencmd measure_temp) gpuTemp0=${gpuTemp0//\'/°} gpuTemp0=${gpuTemp0//temp=/} echo echo CPU Speed: $cpuSpeed1" MHz" echo echo CPU Temp: $cpuTemp1"."$cpuTempM"°C" echo GPU Temp: $gpuTemp0 -
I am currently still running benchmark to find the limits. It seems to be that I am a bit lucky. My current settings are:
arm_freq=1400
core_freq=525
fpu_freq=525
v3d_freq=525
sdram_freq=575
sdram_schmoo=0x02000020
sdram_over_voltage=6
over_voltage=6It is running Quake 3 with 8 bots for 1h and 10 minutes now (2h test now success). The temperature is constantly between 60°C and 62°C. I only saw it once after 15 minutes going back to 0.6ghz and never again. And if it did, why did this happen at this degree of heat? I hope the internal calculation for the temp is not broken. Otherwise, I feel thats ok happening once per hour. it runs so cool, I just feel there must be some room for going even further.
Edit:
I am currently testing 1.45ghz and it seems to be working too at around 61°C -- whats going on here?! I'll let it run for at least 2h now. With my previous case I had heat issues even without overclocking.@riverstorm said in Overclocking discussion:
20C cooler seems to be on on par. The BIQU and open case performed similar. One being grease and one tape even. I used grease on the BIQU and tape on the open case.
Just to be on clear side, I was meaning that I used BiQU case without thermal paste for the first few days and when I applied thermal paste, it reduced another whopping -20°C on top of what BiQU did on its own.
-
deleted
-
@thelostsoul it's possible your pi can handle a fair amount of overclocking. My pi will eventually crash Q3 if I set GPU to anything higher than 505mhz. Also, gpu_freq sets core freq and v3d freq. So if you are setting them to the same value, you only have to set GPU freq.
-
@thelostsoul said in Overclocking discussion:
Just to be on clear side, I was meaning that I used BiQU case without thermal paste for the first few days and when I applied thermal paste, it reduced another whopping -20°C on top of what BiQU did on its own.
Ah ok, I see what you were saying now.
only saw it once after 15 minutes going back to 0.6ghz and never again.
This sounds like the governor potentially. I had a game that kept stuttering and the issue was the governor setting. If you set it to 'performance' it will use the overclock settings until you exit the game. Even though as you said it only happened once maybe it is more frequently but Q3 is so busy you hardly notice but enough to keep it cooler. Here's the link to the governor settings if you don't have it.
That script was really helpful for me in catching that also as it shows the current speed. I create a bin directory off my home directory or wherever you like, I created an alias for it so I can run it anywhere. You also need to
chmod +x <script>to make it an executable. I use it with Putty.I'll ditto what @quicksilver was pointing out some of your settings are redundant and unneeded as the GPU setting sets several with the one command. Yep you definitely can get more speed out of your Pi than mine if you test stable.
-
@riverstorm @quicksilver About the redundant settings, it started with different settings and when I experienced problems with too high overclocking, I reduced it to same settings and then I will go upwards slightly. So, its just a placeholder for now.
For the governor setting, I was also wondering what it does. Now that I know it, I am not sure if I will use it. I think it is ok, if it goes down when not fully needed, so the cpu is not 100% of the time under full stress, even if it sits there and doing nothing or if I play undemanding games (most of the time). The games where I get stuttering don't already doing full stress on cpu (I'll watch it through Putty too). In which game did it help, where you had stuttering and governor was the solution?
Btw, I deleted my above message, but now I rethink about to repost it again. Can you guys play N64 Yoshi's Story? Without the overclocking, it was unplayable slow and stuttering. With the overclocking settings, its smooth, but on some point, the game gets crazy and everything glitches out until nothing works anymore. I could test this over and over again with different overclock and emulator settings, but I think its easier for me, if you guys already know the answer. The glitch happens in first level at the guy with stop sign. Stomping on the ground starts the glitch and then it gets worse every second.
-
Now that I know it, I am not sure if I will use it. I think it is ok, if it goes down when not fully needed, so the cpu is not 100% of the time under full stress, even if it sits there and doing nothing or if I play undemanding games (most of the time).
You're in luck. The 'performance' setting starts at game launch and resets at game exit so it will throttle and sit idle at game exit. Check the speed during game and on game exit to see in action.
I'll have to defer the N64 games to @quicksilver as I don't them very well.
-
@riverstorm said in Overclocking discussion:
You're in luck. The 'performance' setting starts at game launch and resets at game exit so it will throttle and sit idle at game exit.
Oh, thats an important information! So, then it makes really sense to use this setting. But for now, I will first play and watch Putty.
-
@thelostsoul said in Overclocking discussion:
@riverstorm said in Overclocking discussion:
You're in luck. The 'performance' setting starts at game launch and resets at game exit so it will throttle and sit idle at game exit.
Oh, thats an important information! So, then it makes really sense to use this setting. But for now, I will first play and watch Putty.
Yeah the way I understand it is when the game launches it will use the setting specified by the governor setting and then it goes back to the default and throttles to 600 on game exit while sitting at the game selection or in Emulationstation, etc. That way you get maximum performance while gaming only and save a little wear and tear when not playing. I set this option always but I think it's a good option to set while overclock testing for stability and heat testing.
-
@thelostsoul which emulator/plugin are you using for Yoshi's story? There is a know issue right now with mupen64-glide on the pi right now that is bugging games out after about 10-20 minutes of playtime. It's currently being investigated.
Edit: Just tested Yoshi's story. This is a different issue than the one I mentioned above. Yoshi's story must be on the mupen64 config blacklist because no matter which plugin I pick it reverts to using mupen64-glide. I tested using lr-mupen64 (which doesn't look at the blacklist) and was able to get past the glitch. However just a little further into the game, the glitch occurred and it froze the emulator.
I was able to force Yoshi's story to use mupen64-rice by disabling the mupen64 compatibility check. There are some visual glitches using rice but it doesn't have that same gamebreaking bug that glide does.
Contributions to the project are always appreciated, so if you would like to support us with a donation you can do so here.
Hosting provided by Mythic-Beasts. See the Hosting Information page for more information.