Nespi case+ Reset works power doesnt
-
@randypi Let us know how it works out.
-
@thedatacereal ok so I entered this in on the pi after watching a 7:38 YouTube video. Wget -o - “https://raw.gethubusercontent.com/RetroFlag/retroflag-picase/master/install/sh” then pushed enter then typed. Sudo bash and it ran some code for a few minutes. The YouTube video looks like his power and reset button work, so I assume I have the right version, but I couldn’t figure out how to check, my phone can’t find that website (https://raw.gethubusercontent.com).
-
@cyperghost I don’t know what PCB means, and what command do I type in to get that to come up? Also I don’t know how to upload photos to this site.
-
@randypi printed circuit board, PCB
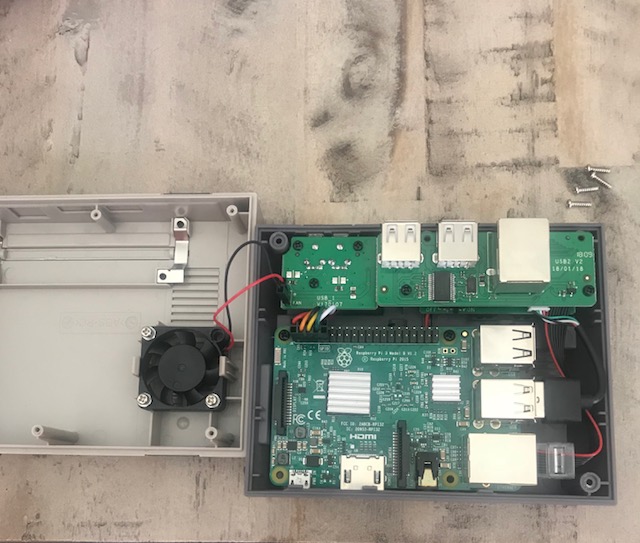
A photo of the PCB with the switches would be niceI think I can write a script that will perform a proper shutdown.
But it would be helpfull to see some photos of the plug that you set on top of the Pies GPIOs - no commands ;)Later I can add the NESPI+ to this script, too and you will have a safe shutdown. With reset (emulator and ES) and power off function (like before).
But as I said... this case will never shut off power completly! It lacks of some electrical components needed.
-
@cyperghost
 nespi case plus is pre wired I just plugged the 3 things in. The block on the 40 pin, the usb thing, and the Ethernet thing. I purchased a fan seperate, that wasn’t part of the build and plugged it into “fan”. Basically all I want is the power button to do a safe shutdown, and turn off the red LED, and turn off the fan. Also I may have a raspberry pi 3b not a 3b+? (I don’t know the difference)
 -
@edmaul69 said in Nespi case+ Reset works power doesnt:
@randypi try a different tv. Your tv is probably feeding 5v back to the pi through the hdmi cable. My tv does this if i try to power through the gpio.
This is interesting. I may have a similar situation with my setup. I actually have a Mausberry circuit, but I noticed in some situations that I can shutdown, and even unplug the USB cable, but the Raspi case LED stays lit until I pull the HDMI. You have seen this before? I am definitely powering the Pi via GPIO.
I don't want to hijack the thread, but a quick comment or maybe a link might give me something to read (doing a search for HDMI power loopback now).
EDIT: How soon I forget.
-
Here is the actual python script from retro flag
#!/usr/bin/env python3
from gpiozero import Button, LED
import os
from signal import pause

powerPin = 3
resetPin = 2
ledPin = 14
powerenPin = 4
hold = 1
led = LED(ledPin)
led.on()
power = LED(powerenPin)
power.on()

#functions that handle button events
def when_pressed():
 led.blink(.2,.2)
 os.system("sudo shutdown -h now")
def when_released():
 led.on()
def reboot():
 os.system("sudo reboot")


btn = Button(powerPin, hold_time=hold)
rebootBtn = Button(resetPin)
rebootBtn.when_pressed = reboot
btn.when_pressed = when_pressed
btn.when_released = when_released
pause()
Seems we can replace the os.system(“Sudo shutdown -h now) with one of the many scripts that we used for the mauseberry for a good shut down.
-
@randypi here is the full single command:
wget -O - "https://raw.githubusercontent.com/RetroFlag/retroflag-picase/master/install.sh" | sudo bashI am still learning about linux and not sure if breaking it up into two commands would cause the issue. Perhaps someone can instruct me.
@lostless Is the Nespi script a safe and worthy script to use for the New Nespi case or does it lack any major components for retropie ? i.e saving metadata, etc.
"If you're gonna play the Game Boy, You gotta learn to play it right" - https://www.youtube.com/watch?v=FYLGl92ETNQ
-
@thedatacereal doing just a straight shutdown will just hault what’s going on and not save sram in a game, if you’re running a game. If in emulation station, metadata like favorites and last played will not be saved. A script that I use for my mayseberry circuit actually exits the emulator properly and goes back to emulation station, waits 5 seconds to make sure the emulator has quit. Then it uses emulation stations shutdown instead of just a forced shutdown. If you’re not in a game or emulation station, it just does a forced shutdown.
Try using emulation stations shutdown and see how it effects the nespi+ case and see if you can recover from it. I don’t think that case does a hard turn off, but puts the pi in a wait mode. If you can restart, the script I use should work. It was written by @meleu and he has a thread around here that has it posted. -
@lostless @randypi
I think I'm able to integrate a safe shutdown with--nespi+parameter into this script here wait for next release (0.40 or higher). It a kind of swiss army knife for ES related shutdowns and gives a interface for python scripts as it outputs state of EmulationStation and RUNCOMMAND (as inidicator for an emulator running or not) -
@lostless @randypi
Version 0.40 of Multi Switch Script is released. I've added support for NESPI+ caseTo install:
- Login with SSH
- Type in commands
mkdir /home/pi/RetroPie/scripts && cd /home/pi/RetroPie/scripts - DL:
wget https://raw.githubusercontent.com/crcerror/ES-generic-shutdown/master/multi_switch.sh && chmod +x multi_switch.sh
3.1 If there is an older version please remove this one withrm multi_switch.sh
3.2 Otherwise the current downloaded version will get a .sh.1 filename! - Now edit ES autostart with
nano /opt/retropie/configs/all/autostart.shand add script to like .... /home/pi/RetroPie/scripts/multi_switch.sh --nespi+ &but BEFORE the last line emulationstatio #auto
5.1 NESPiCase @Yahmez -Mod and NESPi Case + makes use of internal PullUp Resistors, thereforeraspi-gpiois needed
5.2 Install raspi-gpio withsudo apt install raspi-gpio(only for NESPiCase and Yahmez-Mod needed!)- Give me some feedback ;)
Please remove the old python script
Therefore editsudo nano /etc/rc.localand remove/mark with # the python line with the old NESPi+ script. Save the edited file. Now typekillall pythonto terminate all running instances of the old script.That's all
If this doesn't work you've likely raspi-gpio not installed. You can call also the script via SSH. Therefore
cd /home/pi/RetroPie/scripts, now type./multi_switch.sh --nespi+For trouble shooting:
- check if you installed
raspi-gpio - check if the switch in the case is setted to
On - Please disable any other shutdown script before and terminate the process
- Try to start the script manual so you've got the chance to read error messages
If you have problems --- use this thread
-
@cyperghost so I’m going to try it this weekend and I’ll let you know how it goes. One question, “login with ssh”. What does that mean?
-
@randypi ssh is a way to remotely control a terminal mainframe from another computer. so when you look at the command line on retropie, you can remotely log in from another computer and do commands as if you are actually at the the mainframe computer. The pi acting as mainframe server. First you have to enable Ssh under raspiconfigs. Its off by default. If you are on a Mac or Linux you can just use the terminal app. You need to find a terminal emulator for windows. first command to log in is
ssh pi@pis ip address
password is raspberry by default. -
@randypi Yes it is like lostless said! SSH is a terminal programm so you can access your Pie from annother PC.
You can use putty or kitty as terminal programm (for your windows or mac PC) and connect to your Pie. The big advantage is, that you don't need to type the commands manual (and it's very likely that you make mismatches here). So just copy and paste and execute with enter.
To enable SSH, go to RetroPieSettings, Rasperry Pie Config. A bash menu opens, select "Interfacing Options" and then Enable SSH
Read more about here
https://github.com/RetroPie/RetroPie-Setup/wiki/SSH
edit
I also used the original python method. But I think alongside the bash is a bit more generic ;)
To install use this:
- Login with SSH
- Got to installed directory with
cd /opt/RetroFlag - download the multi_switch script with
sudo wget https://raw.githubusercontent.com/crcerror/ES-generic-shutdown/master/multi_switch.sh - Make script executable
sudo chmod +x multi_switch.sh - Remove old script with
sudo rm SafeShutdown.py - Get new script with
sudo wget https://raw.githubusercontent.com/crcerror/retroflag-picase/master/SafeShutdown.py
-
@cyperghost just a heads up, I was powering my nespi case+ off of a sarbrent usb hub while I waited for my new canakit power cord to come in and now my pi is dead... so I have been reading forums to bring it back to life, but it’s gone. I am ordering a new one tonight (I heard they are dual band WiFi!) and I’ll try the script above. I realized I use SSH to transfer my roms from my laptop to the pi. I think I use winshp. That will make life a whole lot easier entering code exact. Again sorry it’s taking me so long but I will try this code and let you know how it goes! Thanks everyone
-
This post is deleted! -
@cyperghost Just got here after buying a 2nd hand case and losing my mind a little.
Wanted to say that your instructions and script worked perfectly first time, absolutely over the moon :)
Thankyou, thankyou :) (I even signed up here to say ta ;) )
Contributions to the project are always appreciated, so if you would like to support us with a donation you can do so here.
Hosting provided by Mythic-Beasts. See the Hosting Information page for more information.