RetroPie forum home
    • Recent
    • Tags
    • Popular
    • Home
    • Docs
    • Register
    • Login

    Pi in a Sega Genesis USB Hub Build

    Scheduled Pinned Locked Moved Projects and Themes
    sega genesisgenesis usb hubbuildconsoleproject
    237 Posts 23 Posters 187.9k Views
    Loading More Posts
    • Oldest to Newest
    • Newest to Oldest
    • Most Votes
    Reply
    • Reply as topic
    Log in to reply
    This topic has been deleted. Only users with topic management privileges can see it.
    • K
      Koji Kenshiro
      last edited by

      @eulogy

      https://www.amazon.com/gp/product/B01K7EF2XS/ref=ox_sc_sfl_title_1?ie=UTF8&psc=1&smid=A3DV0CVGW4L6E5

      1 Reply Last reply Reply Quote 0
      • E
        eulogy
        last edited by

        as long as its 5v 2.5 amp id say its fine..both u linked might even be the same.

        1 Reply Last reply Reply Quote 0
        • K
          Koji Kenshiro
          last edited by

          @eulogy

          I think the second one that I linked has a much longer cord than the first one does. I'm thinking of using the second one for that fact and that it is advertised to work with the Pi.

          E 1 Reply Last reply Reply Quote 0
          • E
            eulogy @Koji Kenshiro
            last edited by

            @Koji-Kenshiro the block itself i think is similar...id go longer cord myself

            1 Reply Last reply Reply Quote 0
            • K
              Koji Kenshiro
              last edited by

              @eulogy @obsidianspider @adamspc

              That's the one I'm leaning towards as well for the same reason. If I have any more questions, I'll be sure to ask. Thank you all for being patient with me. Have a good day. :)

              1 Reply Last reply Reply Quote 1
              • obsidianspiderO
                obsidianspider
                last edited by obsidianspider

                Today I decided to upgrade the internal storage of the Genesis Pi.

                Best Buy had 256GB Sandisk USB drives on sale for $65. I got two. One for the Genesis hub and another for my Super Famicom.

                0_1489353818491_sandisk-in-package.jpg

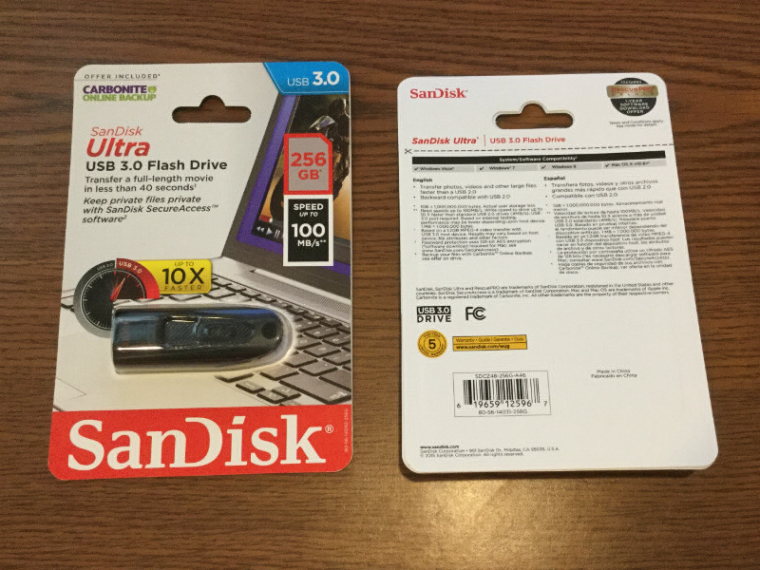
                They're small, but not as small as the Sandisk Ultra Fit drives that are known to get so hot you can't even touch them. They're also well-reviewed.

                0_1489353914800_sandisk-top.jpg

                0_1489354058099_sandisk-bottom.jpg

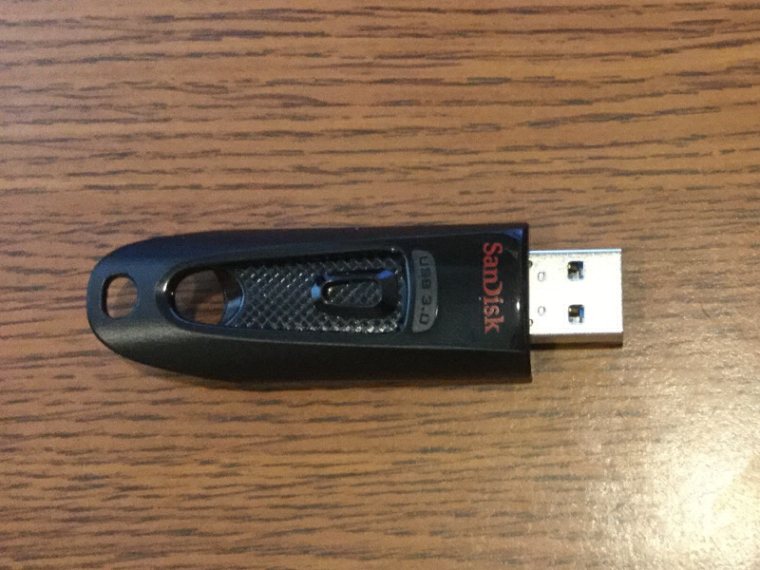
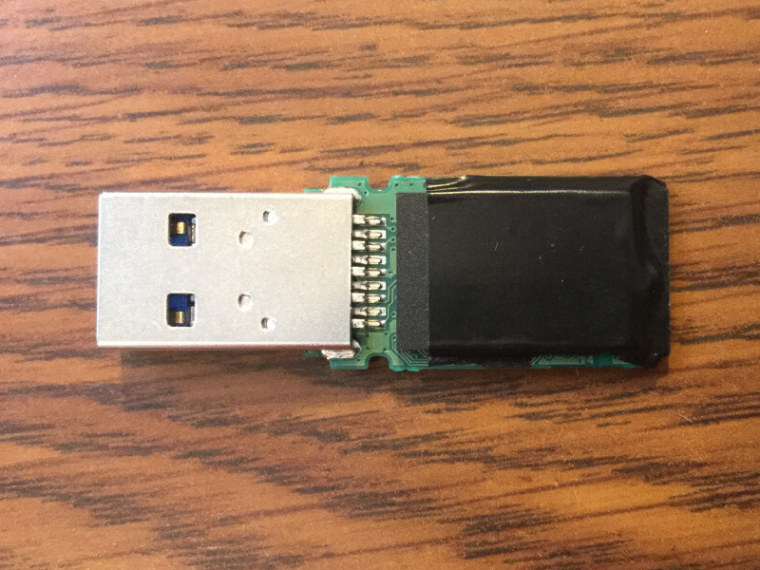
                Unfortunately, while small, the drive was a bit too big to fit inside.

                0_1489354086707_sandisk-plugged-in-test-fit.jpg

                No worries, I knew that the plastic case had a lot of "extra" to it, so I took the plastic off and was left with a much smaller device.

                0_1489354130178_sandisk-apart-top.jpg

                0_1489354140582_sandisk-apart-bottom.jpg

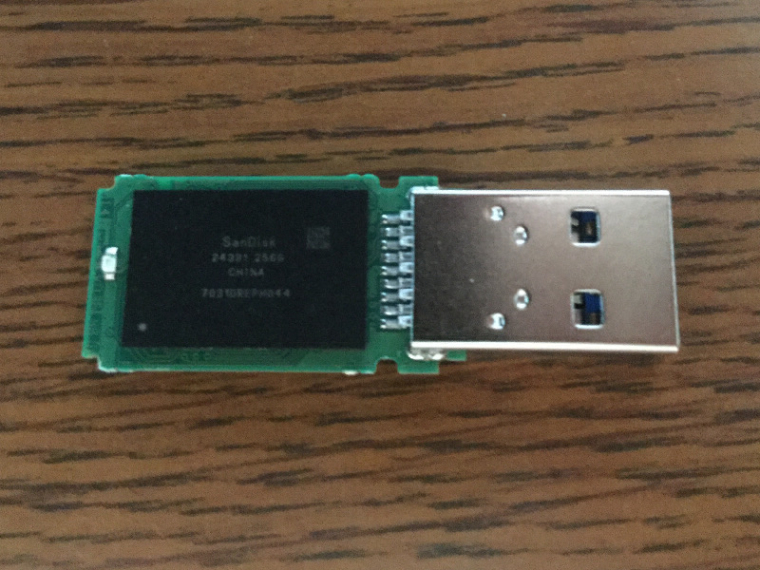
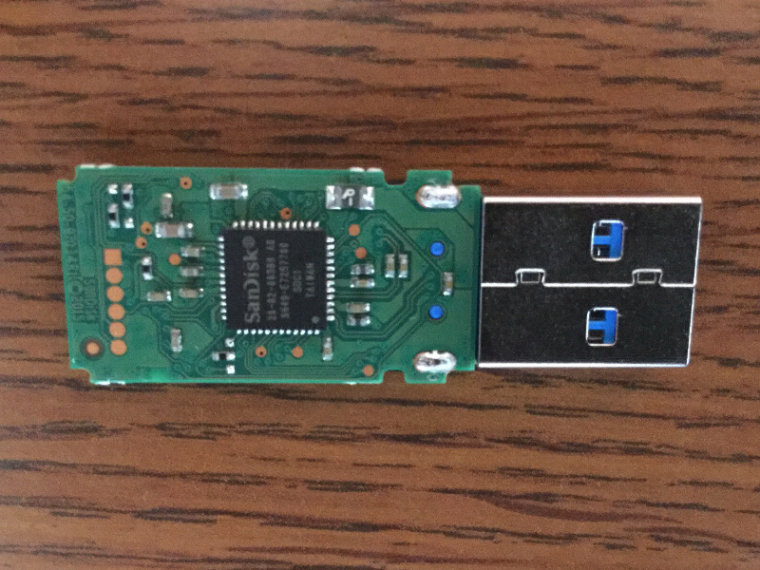
                You can't see it quite from this angle, but the edge of the PCB is just about flush with the edge of the case when plugged in. That said, the case was a bit in the way, and was putting pressure on the board.

                0_1489354217556_test-fit-before-case-mod.jpg

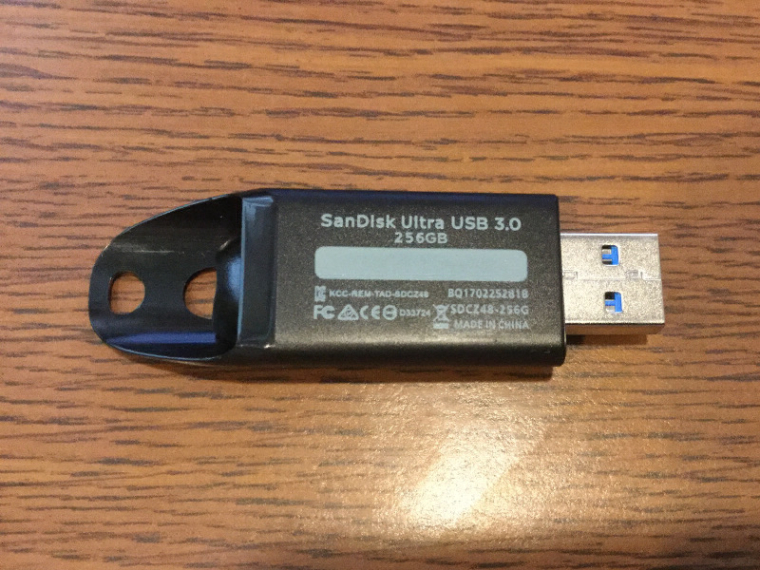
                Using a file I made a notch for the PCB and its LED. I didn't want the case to put pressure on the board when it was closed.

                0_1489354270040_case-mod-side.jpg

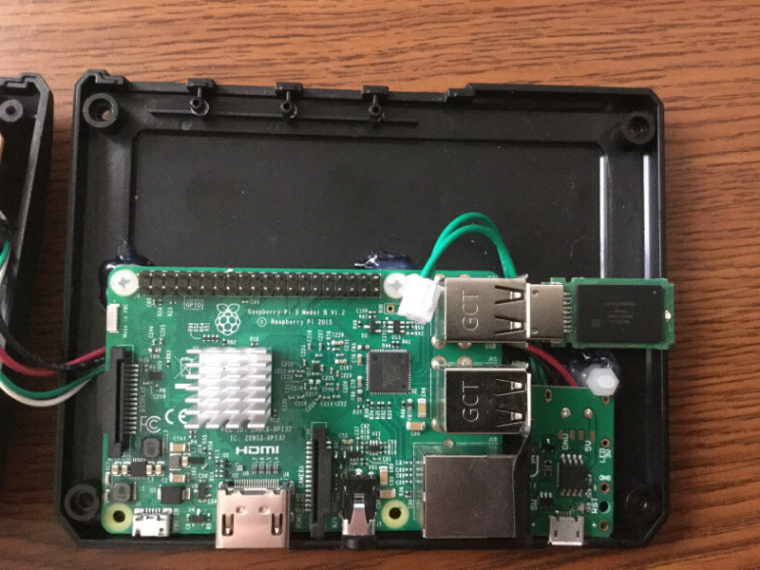
                It fit well, but after screwing things shut and powering up the Pi, the blue light from the LED was pretty annoying.

                0_1489354313379_blue-light.jpg

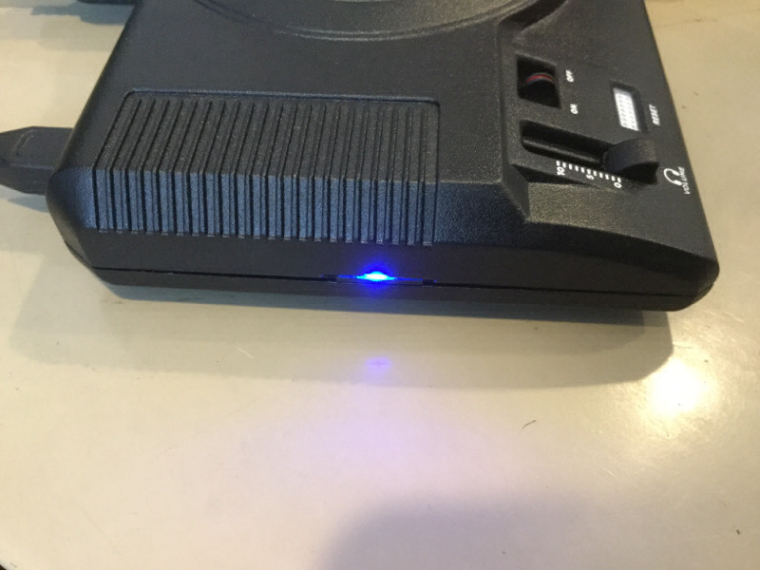
                To remedy the situation I put a piece of black tape over the LED, and also to help the board blend in with the case, I colored the edge with a black Sharpie.

                0_1489354833366_tape-on-board.jpg

                0_1489354361473_case-side-black.jpg

                Now when it's powered up, if you aren't looking for it, you really can't see that the drive PCB is there.

                0_1489354401728_genesis-pi-powered-on-no-blue-led-showing.jpg

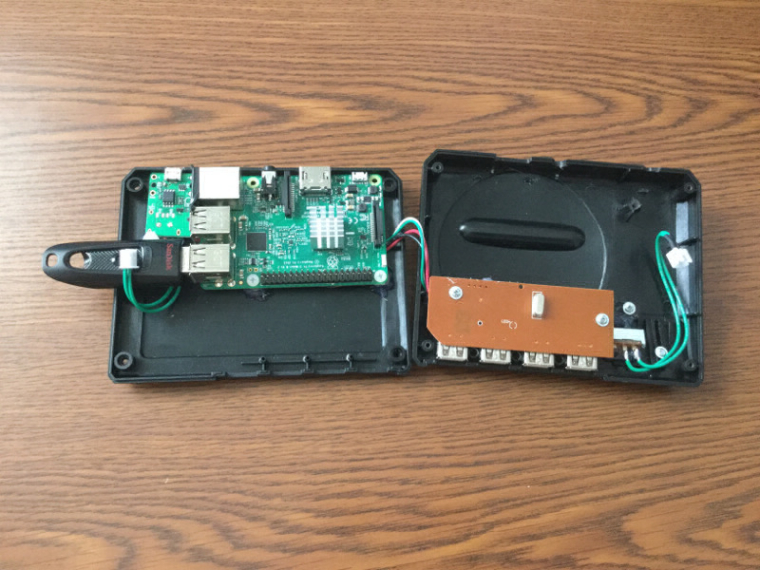
                I followed the instructions on the documentation site for how to set up the drive, and I found that while the directory structure and default BIOS files were copied over, the ROMs were not, and the contents of the retropiemenu folder weren't, so when I rebooted I got a message from EmulationStation that I had no systems installed. Removing the USB drive allowed the Pi to use the SD Card's data in the RetroPie folder and things worked, so to get things working I manually copied a the data from the RetroPie directory from the micro SD card to the USB drive. I then removed all of the ROMs from the Micro SD card except one, so that way it would be very obvious if the USB drive was dead when I booted, because I'd only have one game available.

                SSHing in to the Pi doesn't show the USB drive, but df -h shows it's alive and well.

                     .***.     Sunday, 12 March 2017,  5:08:24 pm EDT
                     *****     Linux 4.4.50-v7+ armv7l GNU/Linux
                     `***'     
                      |*|      Filesystem      Size  Used Avail Use% Mounted on
                      |*|      /dev/root        29G  4.5G   23G  17% /
                    ..|*|..    Uptime.............: 0 days, 00h00m31s
                  .*** * ***.  Memory.............: 590408kB (Free) / 752856kB (Total)
                  *******@@**  Running Processes..: 137
                  `*****@@**'  IP Address.........: 
                   `*******'   Temperature........: CPU: 32°C/89°F GPU: 32°C/89°F
                     `"""'     The RetroPie Project, https://retropie.org.uk
                
                
                $ df -h
                Filesystem      Size  Used Avail Use% Mounted on
                /dev/root        29G  4.5G   23G  17% /
                devtmpfs        364M     0  364M   0% /dev
                tmpfs           368M     0  368M   0% /dev/shm
                tmpfs           368M  5.2M  363M   2% /run
                tmpfs           5.0M  4.0K  5.0M   1% /run/lock
                tmpfs           368M     0  368M   0% /sys/fs/cgroup
                /dev/mmcblk0p1   57M   21M   37M  36% /boot
                /dev/sda1       232G  267M  232G   1% /media/usb0
                

                📷 @obsidianspider

                1 Reply Last reply Reply Quote 0
                • T
                  tpuhlmann @jackal123uk
                  last edited by

                  @jackal123uk , can you tell me which is positive and which is ground on your picture? Or is it necessary? I broke my micro usb and would like to try what you did.

                  1 Reply Last reply Reply Quote 0
                  • B
                    briandamico @hansolo77
                    last edited by

                    @hansolo77 said in Pi in a Sega Genesis USB Hub Build:

                    https://www.amazon.com/gp/product/B00GSE2S98/

                    by chance do u have a link for those slider switches?
                    are they able to capture a full slide to ON and then OFF or is it all one way and then half of the other way.

                    have not seen much sliders in various sizes

                    obsidianspiderO 1 Reply Last reply Reply Quote 0
                    • B
                      briandamico @edmaul69
                      last edited by

                      @edmaul69 looks like we do a lot of the same stuff ED!

                      tell me, do u have a link for those sliders? i wanna compare to the ones i got and see if they may be better or same

                      edmaul69E 1 Reply Last reply Reply Quote 0
                      • edmaul69E
                        edmaul69 @briandamico
                        last edited by

                        @briandamico i posted a link somewhere but i couldnt find it. I need to contact my buddy to get a link as he was the one that ordered them.

                        B 1 Reply Last reply Reply Quote 0
                        • obsidianspiderO
                          obsidianspider @briandamico
                          last edited by obsidianspider

                          @briandamico this is the link from @edmaul69 's earlier post for the switches he used.

                          this is a link to the switch I used in my build.

                          📷 @obsidianspider

                          1 Reply Last reply Reply Quote 0
                          • B
                            briandamico @edmaul69
                            last edited by

                            @edmaul69 ed does your switch open and close all the way on the hub? meaning can u push the toggle all the way to the ON side and all the way to the OFF side evenly?

                            edmaul69E 1 Reply Last reply Reply Quote 0
                            • edmaul69E
                              edmaul69 @briandamico
                              last edited by

                              @briandamico almost. it is really close. reeally close.

                              alt text

                              alt text

                              B 1 Reply Last reply Reply Quote 1
                              • hansolo77H
                                hansolo77
                                last edited by

                                I couldn't get the switches to work right when I did my build. I wasn't able to get the original switch to stay attached to the switch underneath. I've got another hub in a box I'm waiting for some free time to try and do this mod again. Does anybody have any suggestions on the best way to mount the new switch so the old one still works with it?

                                Who's Scruffy Looking?

                                obsidianspiderO 1 Reply Last reply Reply Quote 0
                                • obsidianspiderO
                                  obsidianspider @hansolo77
                                  last edited by

                                  @hansolo77 Mine has been working great this whole time. I'm just using hot glue.

                                  📷 @obsidianspider

                                  1 Reply Last reply Reply Quote 0
                                  • B
                                    briandamico @edmaul69
                                    last edited by

                                    @edmaul69 got the switch today they are indeed PERFECT and if yours is not going all the way to the left and right you may need to adjust but looking at your photos i think you are all the way over one each side. i aligned the tab in the center of the on off switch and i get full movement left and right. thanks for the tip!!!

                                    1 Reply Last reply Reply Quote 1
                                    • V
                                      VanZan
                                      last edited by

                                      I'm late to the party. Listen I have a fairly basic problem and it's the usb cable. Before I found this thread I watched a Youtube vid which advised to trim the tail. I did so but just could not get it trimmed enough to fit. I kept cutting but got scared when the black rubber started revealing clear plastic stuff. Anyway I squeezed the whole lot in there, re-assembled and it worked somehow!!

                                      Thing is I didn't put any heat sinks on and am unsure whether to go back in. It's the sodding usb cable that's the problem and I'm unhappy with how I left it. My question is would the best course of action be to completely remove all the black rubber from it and insert it into the Pi's usb port OR just cut it off, buy a soldering iron and make my first go at soldering the four wires to the Pi?

                                      edmaul69E 1 Reply Last reply Reply Quote 0
                                      • edmaul69E
                                        edmaul69 @VanZan
                                        last edited by edmaul69

                                        @VanZan once you get to clear you can rip the black off. It isnt needed since this will stay hidden keeping the cable away from being moved back and forth thousands of times. But i definitelu would put in a heatsink.

                                        V 1 Reply Last reply Reply Quote 0
                                        • FlyingTomahawkF
                                          FlyingTomahawk @eulogy
                                          last edited by FlyingTomahawk

                                          @eulogy said in Pi in a Sega Genesis USB Hub Build:

                                          -Removed splash screen and rainbow on boot screen

                                          How did you do that?

                                          edmaul69E 1 Reply Last reply Reply Quote 0
                                          • edmaul69E
                                            edmaul69 @FlyingTomahawk
                                            last edited by edmaul69

                                            @FlyingTomahawk open up /boot/cmdline.txt and delete the entire contents and replace it with this:

                                            dwc_otg.lpm_enable=0 console=ttyAMA0,115200 console=tty3 root=/dev/mmcblk0p2 rootfstype=ext4 elevator=deadline fsck.repair=yes rootwait quiet loglevel=3 consoleblank=0 logo.nologo plymouth.enable=0
                                            
                                            FlyingTomahawkF 1 Reply Last reply Reply Quote 1
                                            • First post
                                              Last post

                                            Contributions to the project are always appreciated, so if you would like to support us with a donation you can do so here.

                                            Hosting provided by Mythic-Beasts. See the Hosting Information page for more information.