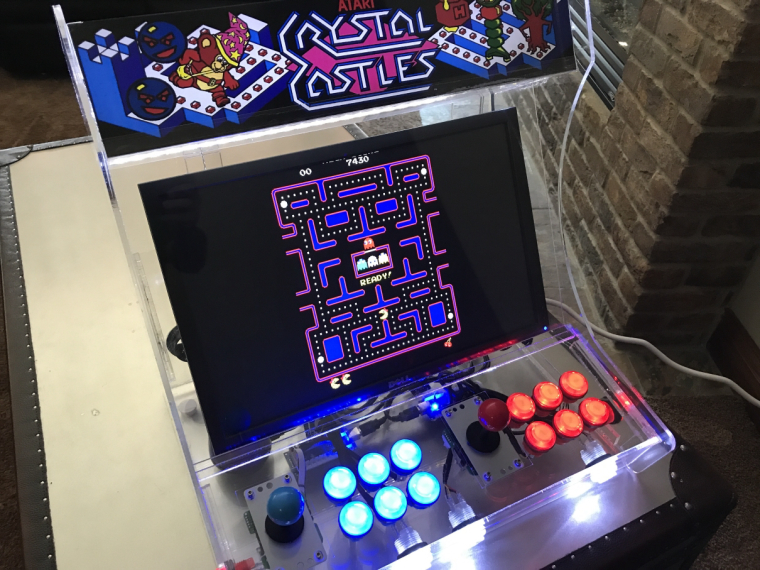
Acrylic Laser Cut Bartop Project
-
So this started out as a bit of a random project.
I found plans on thingiverse, but they used 16mm mdf. My laser (60w co2 laser) cant really cut 16mm that well, so I decided to modify it to use 6mm acrylic. This turned out to be a LOT more work than I had expected.I ended up having to modify about 80% of the dxf files to get the fit right. Altered the button controls. Made a back panel opening that I used magnets to close. micro sd card slot, fan mounted in the door, and a handy handle at the top.
The entire case is put together with NO screws of any kind. just acrylic cement. The only screws in the entire thing are those holding the joysticks in.
I had to buy a bunch of short length cables (usb, vga, power etc) to keep the wiring nice and tidy.
To my surprise, everything just came together in the end and worked perfectly. Not sure what ill do with it now that its done. I dont really need it , as I already have a cocktail cabinet. Just another reason to get the laser cutter burning :)
Happy to address questions as well.
thanks for reading, and looking :)
please click the link for the album of shared photos.
Photos of bartophere is 1 teaser

-
@dunginhawk Beautiful cab!
I found it hard enough trying to make my cab look passable from the OUTSIDE, I dread to think of the work involved in keeping the INSIDE as neat as that in a transparent cab.
Very nice.
-
@dunginhawk Love it! And a Crystal Castles marquee--daring move without a trackball! I get it though: Crystal, clear acrylic. Very nice.
-
@dunginhawk said in Acrylic Laser Cut Bartop Project:
I had to buy a bunch of short length cables (usb, vga, power etc) to keep the wiring nice and tidy.
Something worth considering for future projects is making a transition to custom cables (at least for USB). That's what I did. It was way cheaper in the long run just building my own cables, as I could size them custom for a perfect fit. To do so, I ended up buying all of the little USB parts off sellers on ebay and via Amazon. You would be looking for parts like the ones from this kit for example:
https://1upkeyboards.com/diy-no-solder-usb-cable-kit-3.html
It's not too hard, and once you do a few, you will be fixing lightning cables for iphones, using paracord sheaths, etc. Not a bad little investment in parts if you do more projects.
-
Very nice, and well done!
But the sound is only from one speaker ?
-
caver01, ill look in to that... Although I have a job that allows me to expense this stuff because I end up making these for customers and partners of mine.
Thanks for the compliments. Its weird, Ive never been a patient person, but for some reason I was super patient to take the time to do this thing right... I dont know why haha.
Working on a single player mini cab now.
Also I just did the CC marquee because a buddy of mine LOVES that game.. Im going to make him a trackball bartop soon. I can print my own marquees, so its no big deal :)
thanksEDIT - yeah the sounds out of one speaker is fine for me. Nothing in this cab is good enough to really require channels... it sounds just fine... I had that speaker laying around, so it was just easiest :)
-
this is beautiful! I'd love to do something like this using my 60W cutter. Would you be willing to share your plans?
Thanks,
Mat. -
Hello @dunginhawk
is it possible to have the DXF file
Contributions to the project are always appreciated, so if you would like to support us with a donation you can do so here.
Hosting provided by Mythic-Beasts. See the Hosting Information page for more information.