Retropie Installation on Ubuntu Server x64 18.04.1
-
UPDATE: See MisterB's post below (https://retropie.org.uk/forum/post/190169) for an automated script to complete all of these tasks (+ many improvements). This is the preferred method of install of RP on Ubuntu Server/Mini 18.04/20.04.
Direct link to his scripts: https://github.com/MizterB/RetroPie-Setup-UbuntuServer
This post and the remainder of this thread can be used for additional info and troubleshooting tips.
Many thanks to all the individuals who have contributed to the idea of running Retropie on an Ubuntu server distribution. Most of the discussions regarding this topic can be found in these threads:
https://retropie.org.uk/forum/topic/12037/building-on-ubuntu-server-16-04
https://retropie.org.uk/forum/topic/9346/retropie-on-ubuntu-without-unityI welcome any/all feedback and will incorporate as needed. I will post some video of the installation as well and the end product as soon as I have them. This is a 'living' how-to that is divided into 3 sections:
Required Steps: The necessary components/configuration for Retropie to run on Ubuntu Server.
Optional Steps: Additional components/configuration to make Retropie more 'appliance-like' (i.e. hiding terminal windows)
Troubleshooting: Some issues to look out for and how to correct.Disclaimer:
- I tested ONLY on Ubuntu Server x64 18.04.1 (I will update as new baseline media is released and tested)
- I tested ONLY keyboard and USB connected arcade stick.
- I DID NOT test gamepads (wired or wireless).
- I tested on 3 different physical HW and a few VMs.
- Your HW will be different and may present unknown challenges.
"Look Mom...no terminal windows or mouse pointer!" :) Here is a short video to show transitions (or lack thereof) from ES to gameplay...
Required Steps
1. Install Ubuntu Server x64 (version outlined above)
- I perform a vanilla install
- Language = English
- Keyboard/Variant = Engish (US)
- I use 'pi' for name and username and 'raspberry' for password so I can transfer settings easily from a Pi install
- I partiton the entire disk (no LVM)
- I do not install any server snaps
I perform all steps outlined below in a remote SSH session so I can copy/paste
2. Add 'pi' user to sudoers (password required first time)
sudo sed -i -e '$a\pi ALL=(ALL) NOPASSWD:ALL' /etc/sudoers3. Enable Universe repo, update/upgrade and install dependencies
sudo apt-add-repository universe && sudo apt-get update -y && sudo apt-get upgrade -y && sudo apt-get install xorg openbox pulseaudio alsa-utils menu libglib2.0-bin python-xdg at-spi2-core libglib2.0-bin dbus-x11 git dialog unzip xmlstarlet --no-install-recommends -y4. Create Openbox autostart script to launch ES using gnome terminal
mkdir ~/.config && mkdir ~/.config/openbox && echo 'gnome-terminal --full-screen --hide-menubar -- emulationstation' >> ~/.config/openbox/autostart5. Create .xsession file
echo 'exec openbox-session' >> ~/.xsession6. Add startx to .bash_profile
echo 'if [[ -z $DISPLAY ]] && [[ $(tty) = /dev/tty1 ]]; then' >> ~/.bash_profile && sed -i '$ a\ startx -- -nocursor >/dev/null 2>&1' ~/.bash_profile && sed -i '$ a\fi' ~/.bash_profile7. Configure 'pi' user to autologin
sudo mkdir /etc/systemd/system/getty@tty1.service.d && sudo sh -c 'echo [Service] >> /etc/systemd/system/getty@tty1.service.d/override.conf' && sudo sed -i '$ a\ExecStart=' /etc/systemd/system/getty@tty1.service.d/override.conf && sudo sed -i '$ a\ExecStart=-/sbin/agetty --skip-login --noissue --autologin pi %I $TERM' /etc/systemd/system/getty@tty1.service.d/override.conf && sudo sed -i '$ a\Type=idle' /etc/systemd/system/getty@tty1.service.d/override.conf8.. Get Retropie Setup script and run it
git clone --depth=1 https://github.com/RetroPie/RetroPie-Setup.git && sudo RetroPie-Setup/retropie_setup.shThe following steps are performed in the Retropie Setup script GUI.
9. Accept disclaimer
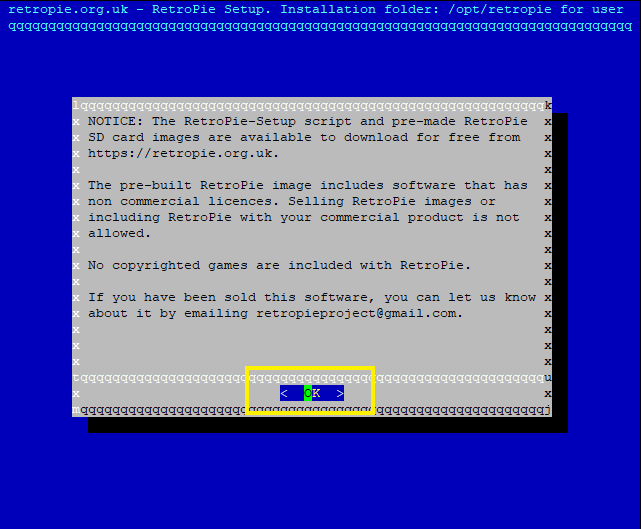
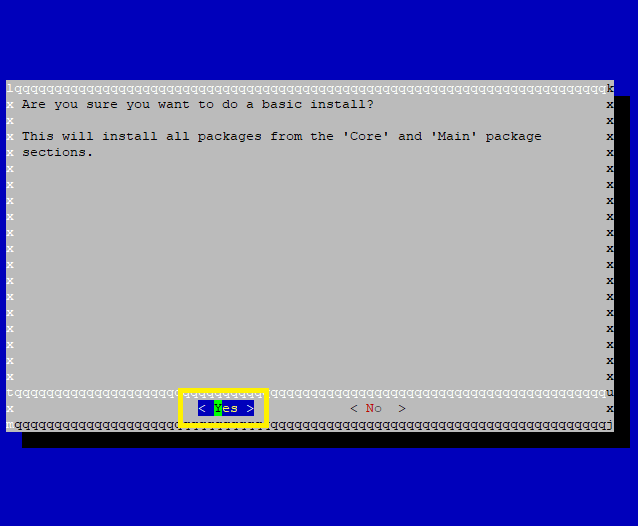
10. Basic install --> OK --> Yes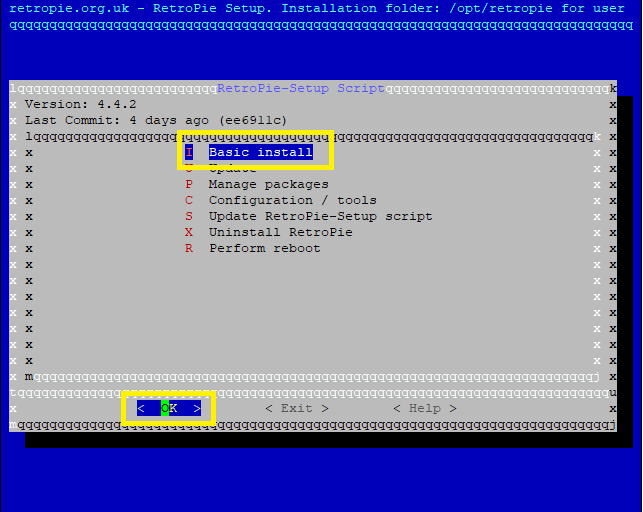
11. Perform reboot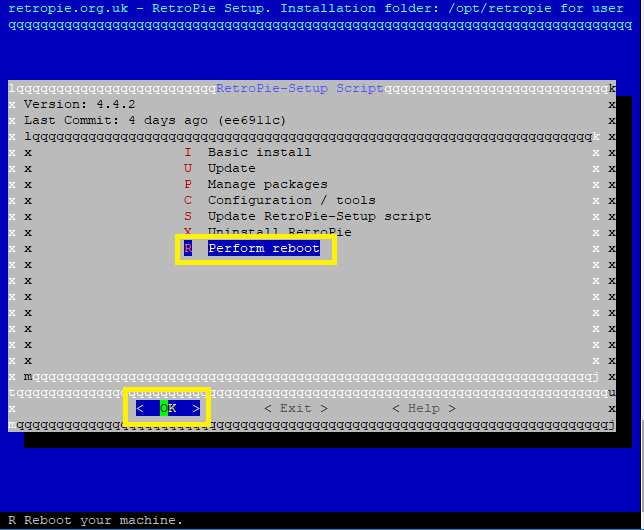
Retropie should now be up and running. Copy some ROMs to the system and update RP as you see fit.
Optional Steps
- Install Herb Fargus boot themes (Plymouth)and set retropie-pacman as default
sudo apt-get update && sudo apt-get install plymouth plymouth-themes plymouth-x11 -y && git clone --depth=1 https://github.com/HerbFargus/plymouth-themes.git tempthemes && sudo cp -r ~/tempthemes/. /usr/share/plymouth/themes/ && rm -r -f tempthemes && sudo update-alternatives --install /usr/share/plymouth/themes/default.plymouth default.plymouth /usr/share/plymouth/themes/retropie-pacman/retropie-pacman.plymouth 10 && sudo update-alternatives --set default.plymouth /usr/share/plymouth/themes/retropie-pacman/retropie-pacman.plymouth && sudo update-initramfs -u && sudo cp /etc/default/grub /etc/default/grub.backup && sudo sed -i -e 's/GRUB_TIMEOUT=10/GRUB_TIMEOUT=2/g' /etc/default/grub && sudo sed -i -e 's/GRUB_CMDLINE_LINUX=""/GRUB_CMDLINE_LINUX="quiet splash"/g' /etc/default/grub && sudo update-grub- Hide last login dialog displayed during boot
sudo sed -i -e 's/session optional pam_lastlog.so/#session optional pam_lastlog.so/g' /etc/pam.d/login && sudo sed -i -e 's/session optional pam_motd.so motd=\/run\/motd.dynamic/#session optional pam_motd.so motd=\/run\/motd.dynamic/g' /etc/pam.d/login && sudo sed -i -e 's/session optional pam_motd.so noupdate/#session optional pam_motd.so noupdate/g' /etc/pam.d/login && sudo sed -i -e 's/session optional pam_mail.so standard/#session optional pam_mail.so standard/g' /etc/pam.d/login- Completely hide gnome terminal
sed -i '1 i\dbus-launch gsettings set org.gnome.Terminal.Legacy.Profile:/org/gnome/terminal/legacy/profiles:/:b1dcc9dd-5262-4d8d-a863-c897e6d979b9/ use-theme-colors false' ~/.bash_profile && sed -i '1 i\dbus-launch gsettings set org.gnome.Terminal.Legacy.Profile:/org/gnome/terminal/legacy/profiles:/:b1dcc9dd-5262-4d8d-a863-c897e6d979b9/ use-theme-transparency false' ~/.bash_profile && sed -i '1 i\dbus-launch gsettings set org.gnome.Terminal.Legacy.Profile:/org/gnome/terminal/legacy/profiles:/:b1dcc9dd-5262-4d8d-a863-c897e6d979b9/ default-show-menubar false' ~/.bash_profile && sed -i "1 i\dbus-launch gsettings set org.gnome.Terminal.Legacy.Profile:/org/gnome/terminal/legacy/profiles:/:b1dcc9dd-5262-4d8d-a863-c897e6d979b9/ foreground-color '#FFFFFF'" ~/.bash_profile && sed -i "1 i\dbus-launch gsettings set org.gnome.Terminal.Legacy.Profile:/org/gnome/terminal/legacy/profiles:/:b1dcc9dd-5262-4d8d-a863-c897e6d979b9/ background-color '#000000'" ~/.bash_profile && sed -i "1 i\dbus-launch gsettings set org.gnome.Terminal.Legacy.Profile:/org/gnome/terminal/legacy/profiles:/:b1dcc9dd-5262-4d8d-a863-c897e6d979b9/ cursor-blink-mode 'off'" ~/.bash_profile && sed -i "1 i\dbus-launch gsettings set org.gnome.Terminal.Legacy.Profile:/org/gnome/terminal/legacy/profiles:/:b1dcc9dd-5262-4d8d-a863-c897e6d979b9/ scrollbar-policy 'never'" ~/.bash_profile && sed -i '1 i\dbus-launch gsettings set org.gnome.Terminal.Legacy.Profile:/org/gnome/terminal/legacy/profiles:/:b1dcc9dd-5262-4d8d-a863-c897e6d979b9/ audible-bell false' ~/.bash_profile && cp /etc/xdg/openbox/rc.xml ~/.config/openbox/rc.xml && cp ~/.config/openbox/rc.xml ~/.config/openbox/rc.xmlbackup && sed -i '/<applications>/a </application>' ~/.config/openbox/rc.xml && sed -i '/<applications>/a <maximized>true</maximized>' ~/.config/openbox/rc.xml && sed -i '/<applications>/a <decor>no</decor>' ~/.config/openbox/rc.xml && sed -i '/<applications>/a <layer>below</layer>' ~/.config/openbox/rc.xml && sed -i '/<applications>/a <iconic>no</iconic>' ~/.config/openbox/rc.xml && sed -i '/<applications>/a <fullscreen>yes</fullscreen>' ~/.config/openbox/rc.xml && sed -i '/<applications>/a <application class="*">' ~/.config/openbox/rc.xml
Troubleshooting
-
RA hangs/freezes or you get a black screen when launching a ROM
-
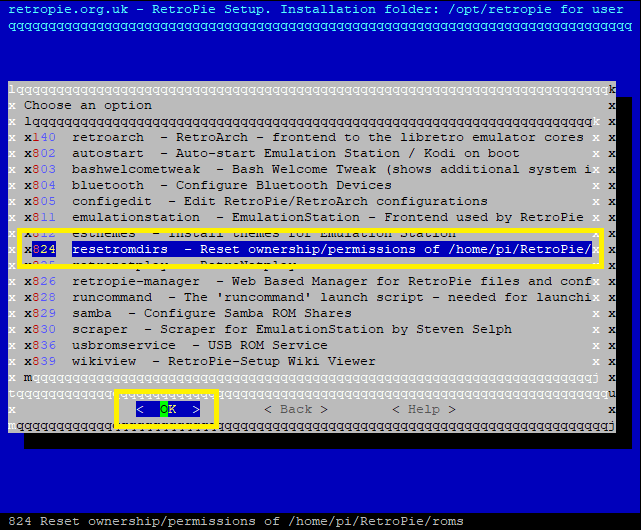
Try running 'resetromdirs' from the Configutation / Tools section of the Retropie Setup script.
-
-
No sound in ES or RA
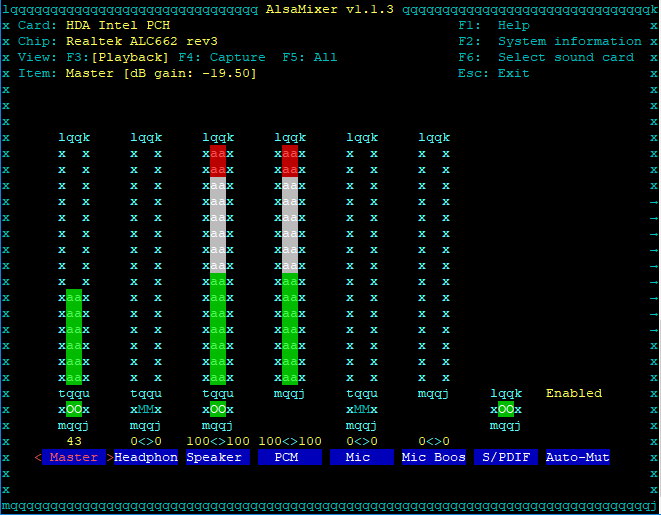
- Run
alsamixerand unmute channels-
Press F6 to select the correct sound card (if not already selected)
-
Use the arrow keys to move left/right
-
Press the M key to mute (MM) or unmute (##) the selected channel
-
Press the ESC key to exit
-
- Run
-
No sound in ES or RA using HDMI
- Run
pacmd list - Scroll to bottom and look for Profiles
- Check to see if the active profile (blue bold below) is wrong and replace with the profile you wan to use for HDMI (black bold below):
- Run
profiles:
input:analog-stereo: Analog Stereo Input (priority 60, available: no)
output:analog-stereo: Analog Stereo Output (priority 6000, available: unknown)
output:analog-stereo+input:analog-stereo: Analog Stereo Duplex (priority 6060, available: unknown)
output:hdmi-stereo: Digital Stereo (HDMI) Output (priority 5400, available: unknown)
output:hdmi-stereo+input:analog-stereo: Digital Stereo (HDMI) Output + Analog Stereo Input (priority 5460, available: unknown)
output:hdmi-surround: Digital Surround 5.1 (HDMI) Output (priority 300, available: unknown)
output:hdmi-surround+input:analog-stereo: Digital Surround 5.1 (HDMI) Output + Analog Stereo Input (priority 360, available: unknown)
output:hdmi-surround71: Digital Surround 7.1 (HDMI) Output (priority 300, available: unknown)
output:hdmi-surround71+input:analog-stereo: Digital Surround 7.1 (HDMI) Output + Analog Stereo Input (priority 360, available: unknown)
off: Off (priority 0, available: unknown)
active profile: output:analog-stereo+input:analog-stereo- Remove cloud-init to supress boot messages
sudo apt-get purge cloud-init -y && sudo rm -rf /etc/cloud/ && sudo rm -rf /var/lib/cloud/ -
To-Do
Still seeing some 'cloud-init' lines during boot. Need to figure out how to suppress.Added to Optional Steps above.- Test wired/wireless gamepads.
-
resrerved
-
What i was looking for tbh. A big thank you for your trouble and one question. Isnt https://en.wikipedia.org/wiki/Twm a more light weight wm than openbox and is the standard window manager for the X Window System so it will be almost using no resources if any at all
-
@demetris said in Retropie Installation on Ubuntu Server x64 18.04.1:
What i was looking for tbh. A big thank you for your trouble and one question. Isnt https://en.wikipedia.org/wiki/Twm a more light weight wm than openbox and is the standard window manager for the X Window System so it will be almost using no resources if any at all
I'll take a look but I am FAR from a linux expert. I only gathered the information that I found and ran with it.
-
Also since we are dependable on how good the gpu performs under linux i would recommend to update mesa from one of these ppa's for maximum performance, especially on 3d systems like dreamcast/wii/gc/N64 and so on :)
https://launchpad.net/~ubuntu-x-swat/+archive/ubuntu/updates?field.series_filter=bionic
https://launchpad.net/~paulo-miguel-dias/+archive/ubuntu/pkppa?field.series_filter=bionic
-
And also about those wired/wireless gamepads support i can ask xanmod to provide a gaming kernel especially for use in this distro you started here :) would be awesome i think lets see what he thinks about this.
https://xanmod.org/ -
@demetris said in Retropie Installation on Ubuntu Server x64 18.04.1:
Also since we are dependable on how good the gpu performs under linux i would recommend to update mesa from one of these ppa's for maximum performance, especially on 3d systems like dreamcast/wii/gc/N64 and so on :)
https://launchpad.net/~ubuntu-x-swat/+archive/ubuntu/updates?field.series_filter=bionic
https://launchpad.net/~paulo-miguel-dias/+archive/ubuntu/pkppa?field.series_filter=bionic
Is all that is required is to add the PPA and do a dist-upgrade? Any configuration changes need to take advantage?
-
nope will replace the current mesa driver with the new one
-
@demetris said in Retropie Installation on Ubuntu Server x64 18.04.1:
nope will replace the current mesa driver with the new one
OK...just did it. My own use case was only ever intended for arcade games so I probably won't see any improvement.
-
Depends on GPU.When mesa 18.2 stable arrives some users might get opengl v4.3 support from v3.2 etc
-
btw what you did with vsync issues? Last time i tried this i had screen tearing all over and was an unpleasant experience
-
And is done ;) Lets wait and see
https://github.com/xanmod/linux/issues/12
I closed the issue :)
See here
https://github.com/xanmod/linux/blob/a092df697fa6bd600ac9e3d0b548fdf9603dbff7/.config#L6424
All gamepads are enabled and supported already so we can freely use that kernel and everything will work just fine ;) -
@demetris said in Retropie Installation on Ubuntu Server x64 18.04.1:
btw what you did with vsync issues? Last time i tried this i had screen tearing all over and was an unpleasant experience
I haven't experienced this. Do you see it with specific games?
-
@johnodon said in Retropie Installation on Ubuntu Server x64 18.04.1:
@demetris said in Retropie Installation on Ubuntu Server x64 18.04.1:
btw what you did with vsync issues? Last time i tried this i had screen tearing all over and was an unpleasant experience
I haven't experienced this. Do you see it with specific games?
No, issue was all over the place. In emulationstation when you swap around systems or in games.You could see a screen tearing issue and was very pita.
If you have it or not you will know as is very obvious to catch it with your eyes.
I will test soon this installation and get back to you. -
Added a video to the OP that shows game launching without terminal windows, mouse pointers, etc.
-
Out of interest, given that an installation on Ubuntu (on an x86 system) effectively sidesteps the performance limitations of the Raspberry Pi, would it be feasible to install and use one of the newer MAME versions?
I understand that it'd have to be called directly, rather than through retroarch, so there might be a bit more fiddling to get controls working, but it could potentially allow for running of some of the newer arcade games that MAME 2003 and 2010 don't support, right?
-
@andrewh said in Retropie Installation on Ubuntu Server x64 18.04.1:
Out of interest, given that an installation on Ubuntu (on an x86 system) effectively sidesteps the performance limitations of the Raspberry Pi, would it be feasible to install and use one of the newer MAME versions?
I understand that it'd have to be called directly, rather than through retroarch, so there might be a bit more fiddling to get controls working, but it could potentially allow for running of some of the newer arcade games that MAME 2003 and 2010 don't support, right?
There is an
lr-mameexperimental package that is used for current MAME.I'm using current MAME (0.200) right now and it works wonderfully. However, the core that is compiled using the experimental package crashes. I still use the package to install the bits and pieces, but I download a nightly core from the Libretro buildbot page and copy it to /opt/retropie/libretrocores/lr-mame.
Be aware that the file you download will need to be renamed to
arcademame_libretro.so.John
-
@johnodon said in Retropie Installation on Ubuntu Server x64 18.04.1:
There is an
lr-mameexperimental package that is used for current MAME.I'm using current MAME (0.200) right now and it works wonderfully. However, the core that is compiled using the experimental package crashes. I still use the package to install the bits and pieces, but I download a nightly core from the Libretro buildbot page and copy it to /opt/retropie/libretrocores/lr-mame.
Be aware that the file you download will need to be renamed to
arcademame_libretro.so.John
Thanks for this tip!
I reecently added lr-mame2003 to my Peppermint OS desktop build and today decided to upgrade to Mame 0.200. I am using the RetroPie Setup Script and after adding lr-mame, it would attempt to load a game but then dump me back to EmulationStation.
I added the latest nightly of lr-mame from the buildbot but I had to rename it 'mamearcade_libretro.so' as that is what the one from the setup script installed. Works like a charm now, thanks again!
-
@00ninja said in Retropie Installation on Ubuntu Server x64 18.04.1:
@johnodon said in Retropie Installation on Ubuntu Server x64 18.04.1:
There is an
lr-mameexperimental package that is used for current MAME.I'm using current MAME (0.200) right now and it works wonderfully. However, the core that is compiled using the experimental package crashes. I still use the package to install the bits and pieces, but I download a nightly core from the Libretro buildbot page and copy it to /opt/retropie/libretrocores/lr-mame.
Be aware that the file you download will need to be renamed to
arcademame_libretro.so.John
Thanks for this tip!
I reecently added lr-mame2003 to my Peppermint OS desktop build and today decided to upgrade to Mame 0.200. I am using the RetroPie Setup Script and after adding lr-mame, it would attempt to load a game but then dump me back to EmulationStation.
I added the latest nightly of lr-mame from the buildbot but I had to rename it 'mamearcade_libretro.so' as that is what the one from the setup script installed. Works like a charm now, thanks again!
Quite welcome!
John
Contributions to the project are always appreciated, so if you would like to support us with a donation you can do so here.
Hosting provided by Mythic-Beasts. See the Hosting Information page for more information.