X-Arcade Right side button issue
-
I have an issue with playing PS1 pinball games on my raspberry pi 3 b+ (Retropie 4.2). I'm trying to use the side buttons on my X-Arcade "Tankstick" for the right and left flipper, but I'm having an issue with the RIGHT SIDE BUTTON.
When I press the RIGHT SIDE button (right side flipper) down nothing happens. However, when I LET GO of the right side button, the flipper flips. So I know the button itself works, but for the life of me I can't figure out why it doesn't work like LEFT SIDE.
The LEFT SIDE button works like it's supposed to; I press the button and the flipper flips and stays that way until I take my finger off the button. I've tried different games, I even replaced the button and trigger unit inside the tankstick, but the result was exactly the same. I press the RIGHT SIDE button and nothing happens until i release the button.
It seems like a software issue rather than a hardware issue.
The games are using whatever the default PS1 emulator is on Retropie.
Has anyone else ever come across this problem?
Thanks :)
-
That is odd, but I wouldn't rule out a loose wire/short. I have experienced button issues and this had similar issues.
X-Arcade still support the tankstick even if you take it apart. Unscrew the bottom and check to make sure your wires are connected properly. They even have a tutorial on their site on how to do this.
As I recall they even have a software tool on their site for testing buttons on a PC. -
Not sure what style buttons are inside but some have variations such as “Normaly Open” and “Normaly Closed”. If the wire was attached to the wrong spot in your case the “Normaly Closed” post, then it would open when pressed and then activate when it is released (closed).
I had the same problem when building my custom control panel.
-
@chuckyp I agree.
That behavior is what you would see if the button was wired as Normally Closed (NC). You should be able to see a wire connected to a pin with "NC" near it and near it an empty pin with "NO". Move the wire from NC to NO and you should be good. If it doesn't work check to make sure you didn't move the ground wire by accident.
...
"So I want to move the pin to No?"
"Yes."
"Yes? or No?"
"First Base" -
@lurker I checked and see the "NO" and "NC", but I can't find a separate metal pin for each. It looks like there's one pin for "NO" and the other is for "COM". All the button components are the same. Am I so cross-eyed from all these wires that I'm missing something in plain sight?
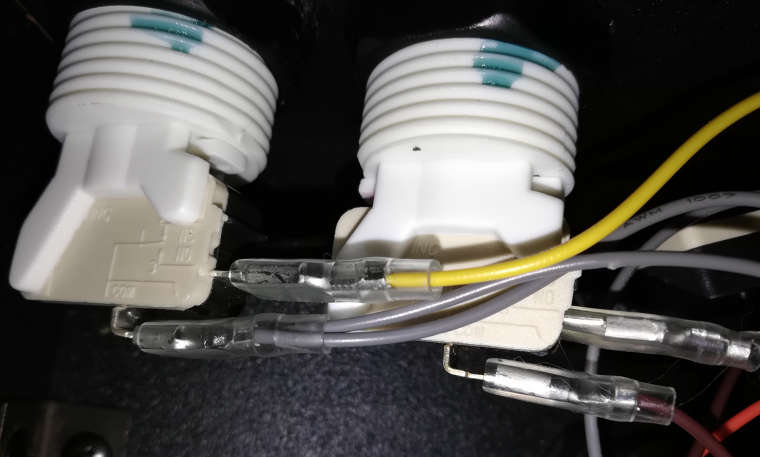
-
@fuzznuzzbit I checked and can assure you that everything fits tightly together. Also, I used that x-arcade software tool you were talking about. Everything checked out just fine. It seems that on a PC I don't have this button problem. When I press down on any button, it registers that the respective button is being pushed AND being held down. Emailing x-arcade support didn't help either. They determined that it's most likely a software/OS issue rather than hardware.
-
@chuckyp I only see 1 pin next to the markings "NO" and "NC". The other pin is to the "COM". All the switch components are like this.
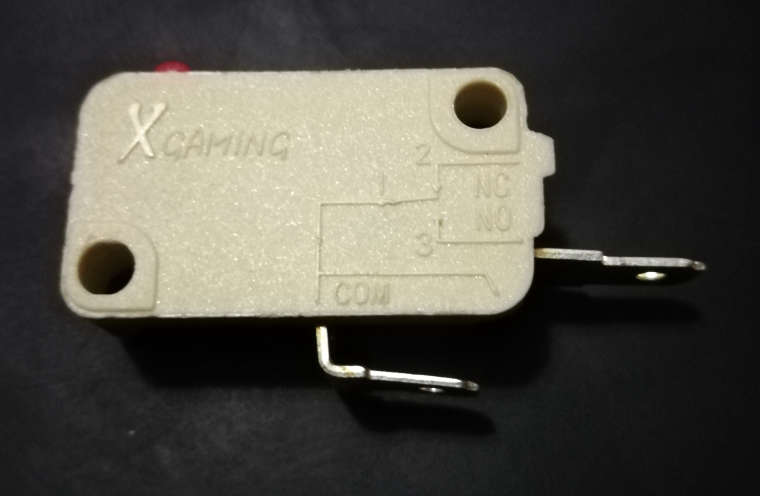
-
test the swich with a multi meter is should only have continuity when pressed. I did notice on the picture your other com wires are grey please confirm you ground wires are all going to common they are usually the same colour
-
Everything looks correct to me, the NC post has been removed so that’s not an issue. I agree the next step is to put a multimeter to test the continuity.
You may have a bad microswitch or a bad connection from the button plunger to the switch... or possibly a flaky connection from the button wiring to whatever board you are using for the controls.
It’s simply a low voltage signal you are sending so the problem is simple but sometimes elusive. I would double check all connections, couplers, and wiring for continuity.
-
Upon another look at your photos it looks like you are using a single red wire for the Common (com) connection. This may need to be reversed. The common wire needs to be a daisy chain from button to button.
The single wire will always go to the NO post.
Hard to tell from the picture though since I can’t see the wiring on the other buttons NO post.
EDIT: I also see what appears to be a nick in the insulation leading to the common post on the left button in the pic above.
-
@chuckyp said in X-Arcade Right side button issue:
Upon another look at your photos it looks like you are using a single red wire for the Common (com) connection. This may need to be reversed. The common wire needs to be a daisy chain from button to button.
The single wire will always go to the NO post.
That may be different in the Tankstick, as you can see in these modding guides:
- Replacing X-Arcade Joystick with Mag-Stik Plus (third picture)
- My Complete Illustrated Experience to Mod X-Arcade TankStick (Part 2) (ninth picture)
In both cases, the daisy chains connect to the NO ports and differently coloured single wires connect to the CO ports. To my limited understanding of electrics, it should be all the same which way the current flows, or am I mistaken?
-
Well technically speaking, as long as the same standard is kept throughout you can do either. But in sovereign120’s picture above it appears there are 2 different connection styles being used at the same time.
The button on the left is daisy chained on common, and the button on the right “appears” to be single wire on the common. By hard to tell from the photo.
And some don’t “daisychain” the commons at all but it saves a ton of wire if you do.
EDIT: I may be mistaken, but I don’t think you can put a wire from a common post to a NO/NC post. I believe you need to keep it consistent. But... I’ve been wrong at least once before.
-
@chuckyp said in X-Arcade Right side button issue:
Well technically speaking, as long as the same standard is kept throughout you can do either. But in sovereign120’s picture above it appears there are 2 different connection styles being used at the same time.
Right, and since the buttons are not at their original places in the stick, they could be (re-)connected in any way.
And some don’t “daisychain” the commons at all but it saves a ton of wire if you do.
I have both, actually. My buttons have single wires on both ports, because my zero delay encoders came with dual wires out-of-the-box. The common wiring of of their LEDs is daisy-chained, though.
EDIT: I may be mistaken, but I don’t think you can put a wire from a common post to a NO/NC post. I believe you need to keep it consistent. But... I’ve been wrong at least once before.
I wonder how that should be possible, since the buttons can't "know" how the others are connected. Thus, if it doesn't matter how one button is connected, it neither should overall. But I've been wrong before, too, so … ;)
-
EDIT: I may be mistaken, but I don’t think you can put a wire from a common post to a NO/NC post. I believe you need to keep it consistent. But... I’ve been wrong at least once before.
I wonder how that should be possible, since the buttons can't "know" how the others are connected. Thus, if it doesn't matter how one button is connected, it neither should overall. But I've been wrong before, too, so … ;)
Flipping the wires on one button should not be an issue IF each button is wired on its own. IE one wire to NO and one wire to common. If you daisy chain the commons AND flip the wires on one button then you create a false signal of that button being pressed because the daisy chain is connecting the NO pin to com along with the com pin. I had to draw it out to make sure my logic was correct.
It is not the buttons that "know" anything it is the system as a whole that is responding to what it sees.
Looking at this image I would write out where does each strand of the daisy chain we see here go? If one leg of that chains connects to an NO pin of the next button but then the next leg of the chain connects down to the NO (or active, positive, or what have you) pin of the board then that would cause an issue.
As a guide line, though you can daisy the common, I tend to only use it for LEDs and not the button action.
Let me see if I can diagram what I'm talking about;
1 button... no problem
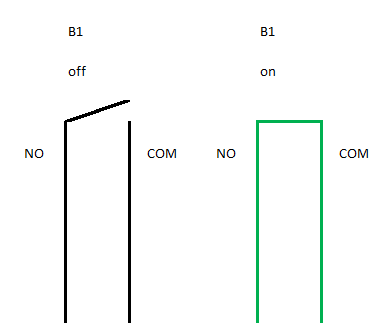
2 buttons even if you flip everything on one button 100% your are technically okay.

BUT accidentally daisy chain the common to the NO pin and you got issues.
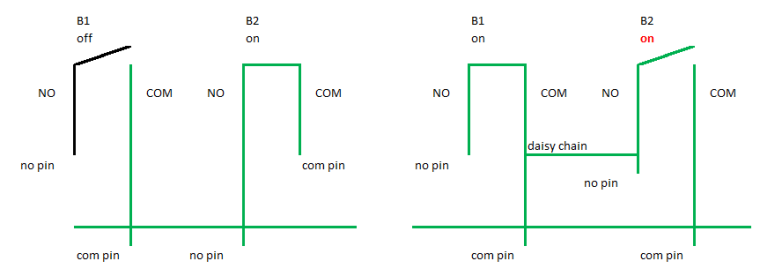
-
@lurker I may misinterpret your pictures, but I think that the third image below the line "2 buttons even …" pictures the setup I meant: Two buttons, B1 with NO connected to the current, and COM connected to common, while B2 with NO connected to common, and COM connected to the current. edit: That should work to my understanding.
Your last image however (the one with the red "on") seems to show both pins connected to common. That wouldn't work, of course.
Did I understand your pictures right?
-
@Clyde You have it right.
The last image is a case of miss-wiring. In that example our theoretical person wires button 1 and then takes the next leg of the common daisy chain and wires it to the NO on the button. Then thinking "this is the NO wire" connects it to the "active" pin on the controller and wires com to com. This creates an issue effect of when ever any other button is pressed B2 would be active as well.
I mentioned all this for two reasons.
-
being that the image of the buttons in this case shows a daisy chain and a mix up there may be the source of the issue.
-
From a paradigm perspective, when we talk about button connections, even though we look at the buttons it is really the connections to the circuit board /encoder that we are trouble shooting. It kind of goes to answering why flipping the wires on a button would mater when you think about it as a simple switch it shouldn't mater.
-
-
-
@grant2258 I used my tester and this is what I got...
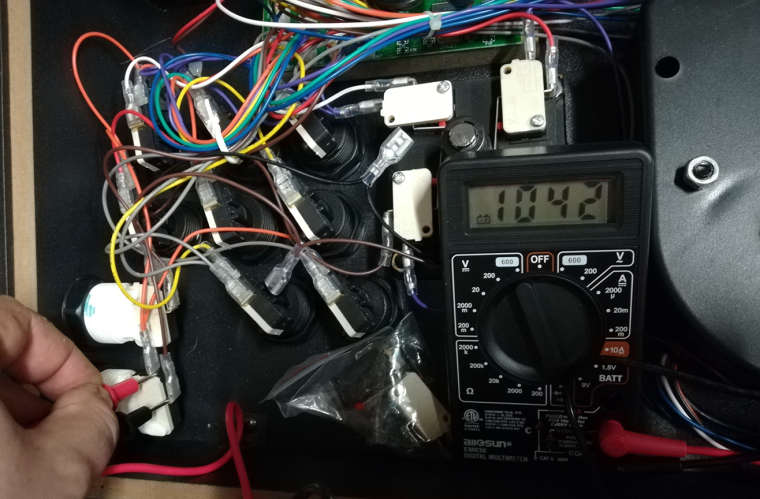 In the first picture I AM NOT pressing the side button...
 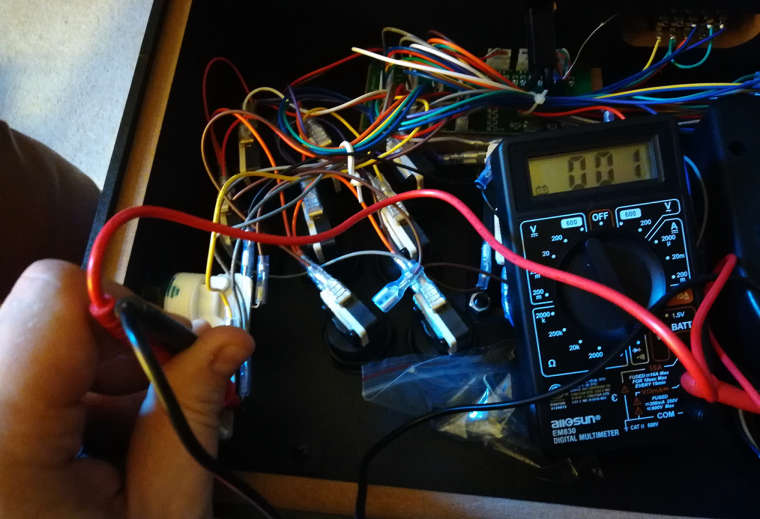 In the second picture I AM pressing the side button and hearing the continuous high pitched beep of the tester.
I tried this with identical results to other buttons on the board.
-
@chuckyp From all the pictures of the Tankstick's wiring I've seen in other pictures around the web, it's all in line. I wonder if it's an emulation issue. The hard part is finding someone with who uses the Tankstick for pinball so I can pick their brain. :)
-
I am sorry that I can't be more help in with this issue, but it is still baffling to me that the NO pin on the buttons is daisy chained.
As we discussed before if it is done consistently flipping the pins does not mater. I am willing to bet if you traced the orange daisy chain it will lead to a ground pin on a circuit board somewhere.
I looked up another tank stick wiring image and sure enough I guess they just like tossing convention out the window and doing their own thing as it was wired the same.
You have shown the button works, so the next question is where is the signal going. Trace the brown wire on the com pin of that button.
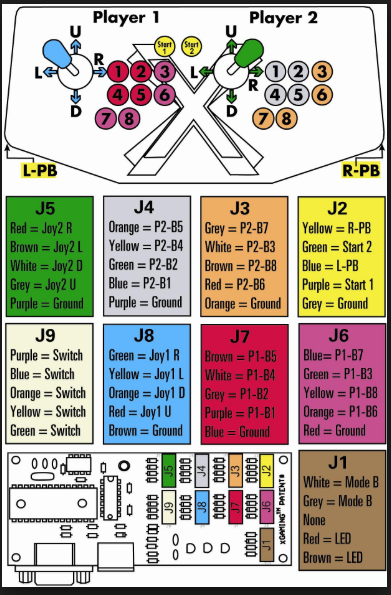
If they flipped everything consistently then that wire should go to a slot designated for that pin. I did a little more digging and it should run to the middle pin of J2 on the board.
I found this image, which may not match exactly your unit as it is for a tank without a track ball and your unit has the track ball and two side buttons but hey it is something.
Contributions to the project are always appreciated, so if you would like to support us with a donation you can do so here.
Hosting provided by Mythic-Beasts. See the Hosting Information page for more information.