How to make Gameboy Zero
-
@omission229 There are a lot of resources (including videos) detailing how to connect a button to a Raspberry PI via GPIO and how to read when the button is pressed/released (see [1], [2]).
As @lostless said, just connecting the button is not enough, the inputs need to be translated into something meaningful for an emulator - usually this is done with a Python script, but it can also be handled with a driver (see [3], [4] or [5]).You can also take a look at complete builds including RetroPie for similar Gameboy-like handheld devices in (see [6] or [7]).
[1] https://raspberrypihq.com/use-a-push-button-with-raspberry-pi-gpio/
[2] https://thepihut.com/blogs/raspberry-pi-tutorials/tutorial-tactile-switch[3] https://github.com/mholgatem/GPIOnext
[4] https://retropie.org.uk/docs/GPIO-Modules/
[5] https://github.com/recalbox/mk_arcade_joystick_rpi[6] https://learn.adafruit.com/pigrrl-raspberry-pi-gameboy
[7] https://learn.adafruit.com/super-game-pi -
Yeah but most people use button pcb's which is way different than just using seperate buttons
-
 found it here: https://www.instructables.com/DIY-Raspberry-Pi-Zero-Handheld-Game-Console/ the dude used recalbox but I don't think it will really make a difference
 -
https://www.instructables.com/GameBoy-Pi/ This is more acurate >:V
-
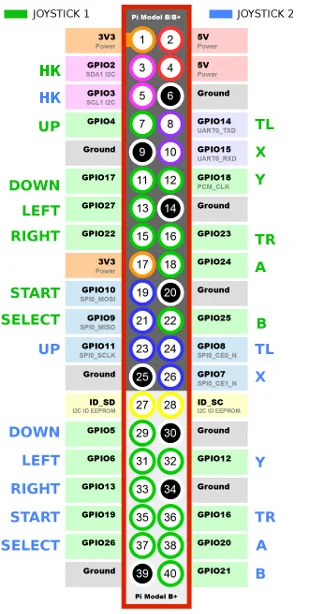
@omission229 looks like your on your way to learning how all this works. As you can tell there is more than 1 way to achieve this project. And is why no one here can just tell you what to do. Just FYI, to help you on your way, the wiring chart you posted is for recalbox and will not work on retropie. It looks like recalbox has already added gpio support and from what I could find, you have to edit a config file to enable it. The second method you posted uses a script you have to download and has a different wiring diagram. Good luck and have fun.
-
now im really raging 😡
-
This is from the second link and this guy uses retropie
LEFT 4 # Joypad leftRIGHT 19 # Joypad right
UP 16 # Joypad up
DOWN 26 # Joypad down
LEFTCTRL 14 # 'A' button
LEFTALT 15 # 'B' button
Z 20 # 'X' button
X 18 # 'Y' button
SPACE 5 # 'Select' button
ENTER 6 # 'Start' button
A 12 # Left shoulder button
S 13 # Right shoulder button
-
@lostless said in How to make Gameboy Zero:
@omission229 looks like your on your way to learning how all this works. As you can tell there is more than 1 way to achieve this project. And is why no one here can just tell you what to do. Just FYI, to help you on your way, the wiring chart you posted is for recalbox and will not work on retropie. It looks like recalbox has already added gpio support and from what I could find, you have to edit a config file to enable it. The second method you posted uses a script you have to download and has a different wiring diagram. Good luck and have fun.
How could you say that? This is not even fun at all.
-
@omission229 if you are raging and not having fun, then maybe this project is not for you. And thats OK.
As I said before, the raspberry pi was created to help teach computers and electronics to people. Something cheap to mess around with. It’s not a premade, build it yourself kit. It’s just a generic dummy computer that you program. And to do what you what you want, there are several ways to achieve that. Either you buy a premade kit like the retro flag, or you learn how to do different ways to achieve this. And you can tinker and mess around to get the result you want. And that requires learning the ins and out of the pi and Linux, and small amounts of scripting. And you will fail and mess up and retry over and over. Like I didn’t with my first retro pie project. And over time I learned how it works. But Between me and @mitu and your little research, you have some ideas to work with. -
I don't care what you say im doing things my way >:(
-
I have an idea. I can get a cheap nes handheld from Amazon and replace the main board with the pi
-
@omission229 said in How to make Gameboy Zero:
I don't care what you say im doing things my way >:(
No one here is saying you can’t. ??????
@omission229 said in How to make Gameboy Zero:
I have an idea. I can get a cheap nes handheld from Amazon and replace the main board with the pi
Good. Sounds like a project you can work on.
-
but will it work?
-
@omission229 The question should not be will it work, in electronics the question should be how can I make this work? The only limiting factor is your drive to learn and how much work you want to put into a project.
Contributions to the project are always appreciated, so if you would like to support us with a donation you can do so here.
Hosting provided by Mythic-Beasts. See the Hosting Information page for more information.