Pi in a Gameboy Advance Build - WIP
-
@jb32647
I might have seen that same video. I even asked him about it and he confirmed it was a pi 3 with a powerboost 1000. I really don't know what to make of that either. I tested it myself and it doesn't work, the Adafruit technicians confirmed it doesn't work. Maybe he had a pi2 instead and didn't know? they look the same. -
@diegzumillo the Powerboost 1000 is different than the Powerboost 1000c. From what I understand, the Powerboost 1000 Basic can output a lot more than the Powerboost 1000c but the C can do charging.
-
@obsidianspider
Yes, but it can't charge. That's a bummer. You could have it so it switches between charging and powering with a toggle I guess. In the video I'm talking about it was definitely a chargeable powerboost as well. Even though he didn't show or gave the parts list you can zoom in and see the ports.I don't know. I also noticed with mine that a lot of power is lost on the wiring. A surprising amount of it! I used to have the rainbow square blinking occasionally, then I increased the wire just to be able to move things inside the casing a little bit, and now the rainbow square is always there. So maybe if you keep your wires as short as possible it could even work with the 1000c.
-
@diegzumillo Part of the problem with the power is the size of the wire used for power. When I would mock up a build and have everything spread out on my bench using thin jumper wire I would have the low power square all the time. But on the final build I would tighten everything up and increase the gauge on the power feed it was fine.
-
Hi @obsidianspider, Just wanted to say how useful your notes of your build process have been. Also, It's been one of the more interesting build logs I have read.
I was also planning on doing a GBA build (after I finish the 2 other handhelds I am working on) and I was going to use a composite screen, however having read your feedback on the Sainsmart 3.2" I decided to bite the bullet and purchase one. I was originally apprehensive because I previously used an Adafruit 2.8 tft and I wasn't that happy with it, but the Sainsmart is indeed very good! Even better was that I followed your instructions to the letter (almost*) and I had no issues setting it up, so thanks again for the useful information you have posted here.
*had to cross-compile it with Cmake and copy it over to the Pi because I hadn't set up wifi on it.
Cheers!
-
@Pifan I'm glad it's helping others! I got some more parts in the mail today so I'm hoping to make some progress on things this weekend.
-
My power strip PCBs from OSH Park arrived today (you have to buy a minimum of 3). So hopefully with these and a few days off from work I can make more progress on getting this thing working in the actual case!

I am going to have to see if I can build Camble's graceful shutdown switch. It doesn't look too hard, but I've not had good luck finding the JFET referenced.
-
@obsidianspider OSHpark are great for stuff like that, the 3 board minimum isnt too bad on the smaller ones. I am intrigued why you went for smd style pads rather than through hole pads?
want to get a tft into your project, look no further than here https://retropie.org.uk/forum/topic/7464/ili9341-tft-screen-guide
-
@moosepr Because that's what I saw over at sudomod?
I have no idea how to design my own PCB.
-
@obsidianspider ah right, PCB design is a bit of a dark art. You could use Fritzing for a slightly easier start, although i find eagle to be better when you have to start designing your own parts.
I have been playing with Eagle quite a bit, so if you ever need a hand, just let me know
-
Wow, you know it's been a while if the forum is asking if you're really like to reply to this topic.
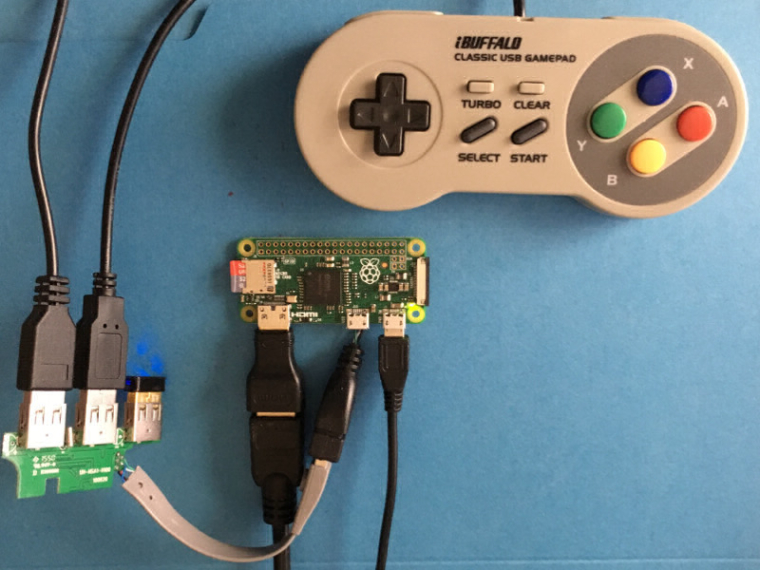
I'd lost my motivation to work on the project for a while, but today I'm slowly getting back to it. I'm still not sure how I'm going to fit all of this in the case, and my notes from when I got the screen and "buttons' working weren't that great, but I've taken the next step of downloading RetroPie for the Zero and am installing it on my test Zero (it has a standard-sized USB port soldered to it) and I'm using my trimmed down hub (I removed the fourth port) with a controller, keyboard and USB Wifi dongle to do some updating and such before I get to hooking things up to it like the screen or soundcard, or anything, really. The good thing is that the Zero seems to tolerate all three things connected to the hub without resetting, but it did lock up once when I plugged in the keyboard while it was already booted, so it may have been a power fluctuation, I'm not sure. Retries didn't have the lockup, but I also don't want to cook my SD card by sending random power surges through anything.
I'm also already thinking about making a Pi 3 portable, probably in a Gameboy Pocket, but first I have my two current projects to work through!
It feels good to get back to making something.
-
@obsidianspider yeah I found that old thread warning scary! You don't realise how the months tick on
Good to see this one resurrected! 😀
-
I soldered a 40-pin header to the test Zero so I could work on connecting everything before I try to cram it all into the Gameboy Advance case. In doing so, I managed to break off one of the solder joints where I had a short USB dongle connected. Even though I reconnected it, something is "off" because I lose wifi periodically. Using an OTG connector it's working, so I'm thinking maybe my re-solder job wasn't as neat as it should have been, or the dongle is just messed up (which is possible, considering I got it from a cheap USB cable with miscolored wires).
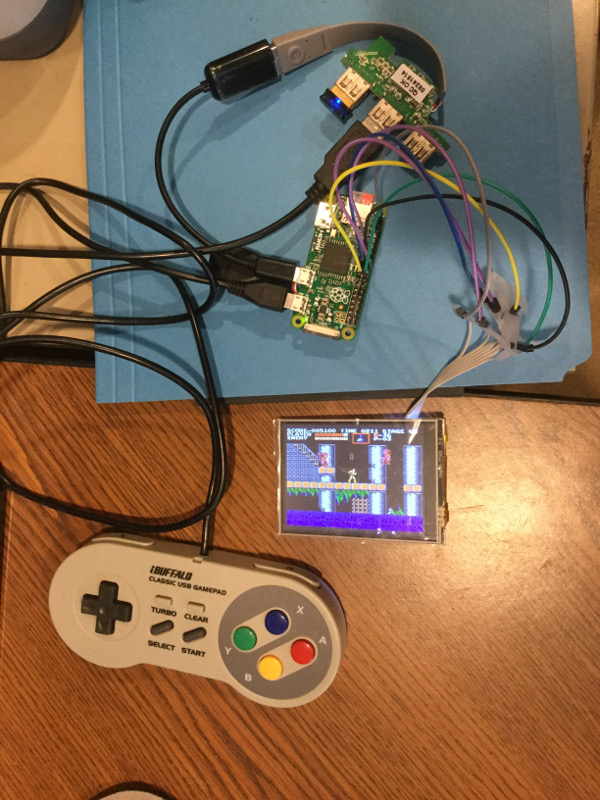
I installed the dtoverlay and framebuffer files to the Zero and connected the screen and it looks like it's working now on the Zero. I can now retire my test Pi 2 to whatever else may come up as things are basically back to where i was a few months ago, but now on a Zero.
-
@obsidianspider was that a 240x320 screen or 320x480? And have you played with the speed and FPS parameters?
want to get a tft into your project, look no further than here https://retropie.org.uk/forum/topic/7464/ili9341-tft-screen-guide
-
Thanks to this post I found over at Adafruit my wifi seems more stable, but it's still not perfect.
Create and edit a new file in /etc/modprobe.d/8192cu.conf
sudo nano /etc/modprobe.d/8192cu.confand paste the following in
# Disable power saving
options 8192cu rtw_power_mgnt=0 rtw_enusbss=1 rtw_ips_mode=1
Then reboot with
sudo rebootThat didn't seem to correct the issue. For whatever reason this Pi will disconnect, and then not reconnect. My other Pis don't have this issue, but per this blog post, I tweaked
/etc/network/interfacesallow-hotplug wlan0 iface wlan0 inet manual wpa-roam /etc/wpa_supplicant/wpa_supplicant.conf iface default inet dhcpThat seemed to fix the problem, but I'm going to leave the Pi sit for a while to see if it disconnects.
-
@moosepr It's a 3.2" Sainsmart (Waveshare clone) at 320x240. I'm using the instructions I posted above. From what I understand, the screen is running at 60fps, but fbcp can only copy at 25fps due to CPU cycles, or the laws of gravity, or something. It's very playable. Minor tearing, but nothing terrible.
-
@obsidianspider you could probably push the speed up a little, but I don't think you would see any improvement.
You may actually be getting the full 60fps. What does it say if you turn on the frame rate in the emulationstation UI menu?
want to get a tft into your project, look no further than here https://retropie.org.uk/forum/topic/7464/ili9341-tft-screen-guide
-
@moosepr it says 60, but that's what's going to fb0, fpcp is copying that to fb1, so that's the limitation.
-
I noticed that when I would go to play a game I was getting this error listed a bunch of times:
ALSA lib pcm.c:7843:(snd_pcm_recover) underrun occurredI'd not encountered this before, but I've also not done a whole lot with a Zero and RetroPie. I'm on 4.1.15 (2498322) so it's a current as it can get.
Some Googling found mentions of the error on other versions of Linux, but nothing that I could apply to Raspbian. Has anyone else encountered this? I'm probably going to start a separate thread for it.
Since things seemed to be working OK otherwise, I decided to plug in my USB soundcard and configure it using the instructions I found over at Sudomod from user chiz.
For those who's considering to go the USB audio route (vs. the PWM method), I've prepared this guide to help anyone who's at a loss on how to configure their Retropie installation for USB audio use. Note you'll need a USB keyboard attached or you can SSH into your system assuming you have configured it already for access within your home network.
Steps:
- Attach the USB audio dongle into one of the USB ports connected the RPi. Reboot the system.
- Once EmulationStation has loaded, exit from it by pressing F4. This will take you to the terminal.
- Check if your USB audio has been detected by Raspbian Jessie by typing the command below:
pi@retropie:~ $ lsusbOutput should be:
Bus 001 Device 007: ID 0d8c:0014 C-Media Electronics, Inc.
Bus 001 Device 004: ID 0424:2517 Standard Microsystems Corp. Hub
Bus 001 Device 003: ID 0424:ec00 Standard Microsystems Corp. SMSC9512/9514 Fast Ethernet Adapter
Bus 001 Device 002: ID 0424:9514 Standard Microsystems Corp.
Bus 001 Device 001: ID 1d6b:0002 Linux Foundation 2.0 root hub
The C-Media Electronics, Inc line shows that the USB audio device is detected.
4. Once we're sure the USB audio device is detected, let's check the order of priority of the sound cards being used by the system. Do so by typing this command:pi@retropie:~ $ cat /proc/asound/modulesOutput should be:
 0 snd_bcm2835
 1 snd_usb_audio
As you can see from the output above, the
snd_bcm2835is the built-in sound card but we want the system to usesnd_usb_audio- We can change and force the system to load the sound cards in a different order by creating a sound configuration file. Create the file by using the command below:
pi@retropie:~ $ sudo nano /etc/modprobe.d/alsa-base.confYou will then enter the Nano editor environment and type the following lines:
options snd_usb_audio index=0
options snd_bcm2835 index=1
options snd slots=snd-usb-audio,snd-bcm2835
Afterwards, press
Ctrl+Xto exit and answerYeswhen prompted to save.- Reboot the system, exit EmulationStation once again to go to the terminal.
- If you've successfully completed all the above steps, you should see the output below when you type the command:
CODE: SELECT ALL
pi@retropie:~ $ cat /proc/asound/modulesOutput should be:
 0 snd_usb_audio
 1 snd_bcm2835
Notice that the order has changed and it's now the snd_usb_audio that's on top of the list with an index of 0
- Test the sound by going to EmulationStation and playing a game. You should immediately hear EmulationStation sounds when you go select from the list of games.
Load EmulationStation by typing the following command:
pi@retropie:~ $ emulationstation -
@obsidianspider I had a zero running on a HDMI monitor earlier and it said 45! You can run some debug messages and get the true driver speed, but it doesn't really matter. Like you say, other than the tearing, the screens are really good
Contributions to the project are always appreciated, so if you would like to support us with a donation you can do so here.
Hosting provided by Mythic-Beasts. See the Hosting Information page for more information.