Pi in a Sega Genesis USB Hub Build
-
Thanks for the feedback. Can I ask what the difference is between the 2pin Spring Header version of the Mausberry is compared to the one I had for my NES?
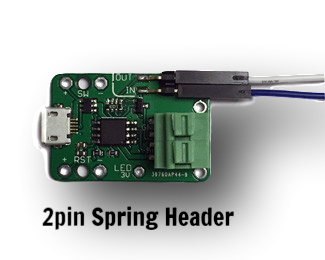
Is it just a different method of attaching the switch to it? I guess I'm confused because in the picture it shows the pin holes for SW +/- and RST +/- so I don't know what the green box is for.
Who's Scruffy Looking?
-
@obsidianspider i would leave that round hole as a vent hole and place the mauseberry somewhere else. That thing will probably get pretty warm.
-
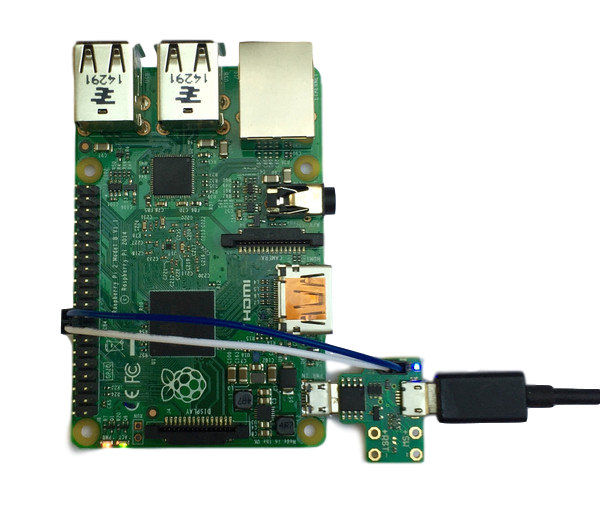
@hansolo77 The 2 spring header replaces the micro USB that would've plugged into the Pi. What @obsidianspider is doing means this is wired to the power pads rather than using micro USB so it doesn't need that on the Mausberry.
-
It's a cool project. But I always thought that the first generation of Genesis was just ugly-as-sin (The Master System had the same problem). The second all-black Genesis was gorgeous by comparison. Also, the second had no slider switches, and might have been an easier project from that perspective (although the case was also smaller, which I'm sure presents other challenges).
Still, the primary reason for using an old VG case is nostalgia, and you can only have nostalgia for what was familiar to you. Really great job on everything you've done so far!
-
@obsidianspider said in Pi in a Sega Genesis USB Hub Build:
I got things mostly done this weekend.
Nice one!
I am having a heck of a time finding a slide switch locally, and I'd really rather not order one from China. I really thought that would be easier to locate. I do have a tiny one, but I want one with a longer action, not the 2mm throw like on the one I have now.
How about a magnet that is clued down the switch and a Reed contact?
I think that could work.
-
@Lyle_JP This isn't a full-sized Genesis you know, it's a mini USB hub styled like one. They haven't made any others like this for each generation of console, but the idea is to produce a companion to the new Mini NES as this is similar in design, though not function til @obsidianspider rammed a Pi loaded with RetroPie in there!
Retropie in a NES - Pi 3 with Mausberry circuit shutdown switch wired to buttons and 8bitdo NesPro30 controller
Retropie in a Saturn Controller - Pi Zero, GPIO controls using DB9 driver
Retropie in a PSX - Pi3
https://markyh444.wordpress.com -
@markyh444 Wow, don't know how I missed that.
It did look kind of tiny next to that pi 3. Should have told me something. :)
Like I said, absolutely amazing and clean work. I can appreciate something that "just works", but when something works AND looks fantastic on the inside too, well, that's just engineering porn!
-
@Lyle_JP Tell me about it! The more I see this develop, the more I've already spent my Christmas pennies on the components to make one. Even though I've got 2 RetroPie builds already, and hardly play either of them!
The fun us in the making!
-
@hansolo77 As @markyh444 said, the 2-pin spring header is replacing the male micro USB plug. I am going to connect the wires that are soldered to the pi to the spring header instead of plugging power into the micro USB port on the Pi.
-
@edmaul69 said in Pi in a Sega Genesis USB Hub Build:
@obsidianspider i would leave that round hole as a vent hole and place the mauseberry somewhere else. That thing will probably get pretty warm.
Yeah, that's why I am glad the heatsink seems to fit, but that tiny little hole in the back isn't going to make much difference. We'll see how it works in the real world once I try playing some games on it for a while.
-
@obsidianspider any hole is better than none. Having done nes carts with pi zeros even those get really hot. Having some sort of ventilation helps.
-
I just wish I had better plastic cutting skills. My first project, the NES, is a hellish beast of miscuts. I have a dremel, and use it the best I can, just not well enough. I just made some new cuts in my NES this evening to house 2 DB9 plugs for Atari/Sega controllers. It looks HORRIBLE. I'm ashamed to have done it. I tried using my (work supplied) Box Cutter (essentially a razor blade), but it just doesn't cut deep enough. Lots of multiple passes and it's just scratching the surface. Pulled out the dremel and made a series of drill holes, then tried to razor cut between them, but the blade just won't cut through the hard plastic. So I resorted to using the cutting wheel, which basically melts the plast away. It works, but the wheels are very hard to manuever, especially in tight spaces you need to get them into. When I look at my terrible cuts, and then look at the cut you made for the HDMI plug, they're not even in the same league. You say you're unhappy with the cut. I'd be extactic to get something that clean looking.
Do you have any tips? I'm thinking about looking to see if I can find some kind of cover to put of the edges of my cuts. Something like a rubber ring or something, that can stretch around the outer edge of the plug, but be thick enough to hide where I over-cut the edges.
Who's Scruffy Looking?
-
@hansolo77 best thing to do is get the dremel drill bit set and a set of files. The sell sets of smaller files on ebay and amazon. Draw some lines about where the cut need to be. Then drill holes around the inside of those marks until you have a hole then file it down to size. Never use a dremel disc as your final edge. Too hard to make look good.
-
@hansolo77 my best tip is to go slowly and be patient. I drilled the headphone hole with three increasingly large drill hits going VERY SLOWLY with the drill (drilling in the middle of a seam is a PITA)
The HDMI port hole was marked on either side with a pencil and filed with a flat hand file a little bit at a time. By hand. Slowly. The mods to the Pi and case took a few hours. Yeah, I was tinkering around and measured and mocked up a lot, and I'm not a pro, but it wasn't a quick process.
-
@edmaul69 said in Pi in a Sega Genesis USB Hub Build:
@hansolo77 best thing to do is get the dremel drill bit set and a set of files.
That's how I made the screen hole in my Suprr Famicom cartridge: rough cut inside the outline then hand file up to the line, stopping and checking my work all the time.
-
Another tip is to just practice. When I was making my Super Famicom screen hole I mocked it up on an old plastic light switch plate and made a hole there first to figure out how I was going to attavk the problem.
The important thing is you're trying. Find some scrap plastic and keep at it, then maybe find another broken Nintendo to re-shell your project. Heck, I have three of those Burger King toys for that build. I already messed up one of them when I was figuring out how they come apart.
-
Well, my cuts for the DB9 plugs took hours, like literally 6 of them. And it looks like sh!t lol. I think I need to get the proper tools. A hand file definitely sounds like a something handy to have in the modders' toolbelt. All I have is a dremel with a single drill bit. I have a drill bit "collection" with different sizes, but the bit holder on the dremel can only hold the largest one lol. Seems to me like the hardest part is lining up the cuts for the HDMI AND the composite plug. The only way you can mark where they're at is from the inside, but you cut from the outside. Since I grew up with a Sega Genesis, I'm going to really take my time with this one.
Who's Scruffy Looking?
-
@obsidianspider yeah it was actually a thread on here (forget which one) that made me buy 2 different file sets. I bought the set posted on here and a set of diamond files. Best investment i ever made. Before that i only had a single file to do all my work.
-
@hansolo77 you can never have too many tools. Over the years I've amassed thousands of dollars worth. As a need arises I get a tool and the collection grows.
Do you have a Harbor Freight near you? Their stuff is cheap (not just inexpensive) but for things like files, xacto knives, hot glue gun, and a lot of stuff a casual hobbiest needs, it's fine.
For things like my soldering station I went name brand (Weller WESD51), but for a few files, get some cheap Chinese stuff and you're fine.
-
@hansolo77 they sell a 4 size pack of the collet set for the dremel that lets you use all the drill bit sizes. Its a cheap price for them.
Contributions to the project are always appreciated, so if you would like to support us with a donation you can do so here.
Hosting provided by Mythic-Beasts. See the Hosting Information page for more information.