RetroPie forum home
    • Recent
    • Tags
    • Popular
    • Home
    • Docs
    • Register
    • Login

    RetroPie in a Dreamcast VMU!

    Scheduled Pinned Locked Moved General Discussion and Gaming
    handheldvmu
    50 Posts 10 Posters 18.9k Views
    Loading More Posts
    • Oldest to Newest
    • Newest to Oldest
    • Most Votes
    Reply
    • Reply as topic
    Log in to reply
    This topic has been deleted. Only users with topic management privileges can see it.
    • mooseprM
      moosepr @obsidianspider
      last edited by

      @obsidianspider just be gentle with the heat and you will be fine. Tin the wire, flux the ribbon, and it will soon stick

      want to get a tft into your project, look no further than here https://retropie.org.uk/forum/topic/7464/ili9341-tft-screen-guide

      1 Reply Last reply Reply Quote 1
      • edmaul69E
        edmaul69 @moosepr
        last edited by edmaul69

        @moosepr do you have a link on how to wire it directly?

        Edit: Nm. The page didnt load all the posts. I see it now

        1 Reply Last reply Reply Quote 0
        • A
          ABrugsch
          last edited by

          Hi. Checking in from the other vmu build thread on sudomod ;)
          One of the pieces of my puzzle arrived which was a tiny charge/boost board. I'll be doing a bit more of mine soon,but will probably end up doing a custom pcb for it something like @moosepr's PiCB-tft board.

          obsidianspiderO 1 Reply Last reply Reply Quote 1
          • mooseprM
            moosepr
            last edited by

            just a dump of info for anyone venturing down this rabbithole. the screen will run as a st7735, but the driver is trying to do 128x160, so its not ideal!!

            it will also run as an ili9163. the resolution is correct at 128x128, but the driver is behaving weird!! it technically runs upside down (chip at the top) and the rotation chops off some of the screen at 180 and 270

            http://imgur.com/a/YRp66

            if your interested, if you follow my guide in my signature, but replace the contents of

            /etc/modprobe.d/fbtft.conf

            with

            options fbtft_device name=fb_ili9163 gpios=reset:25,dc:24 speed=40000000 bgr=1 rotate=0 custom=1 fps=60

            then you will have a working screen!!!!!1

            want to get a tft into your project, look no further than here https://retropie.org.uk/forum/topic/7464/ili9341-tft-screen-guide

            obsidianspiderO 1 Reply Last reply Reply Quote 2
            • ?
              A Former User
              last edited by

              Imagine if the VMU itself could be configured to be fit inside a Dreamcast controller and it would be able to recognize the controller.
              Wouldn't that be cool?

              edmaul69E 1 Reply Last reply Reply Quote 0
              • edmaul69E
                edmaul69 @A Former User
                last edited by

                @itsnitro since it doesnt have a select button on the controller you couldnt play super nintendo games. But you could play genesis games.

                1 Reply Last reply Reply Quote 0
                • obsidianspiderO
                  obsidianspider @moosepr
                  last edited by

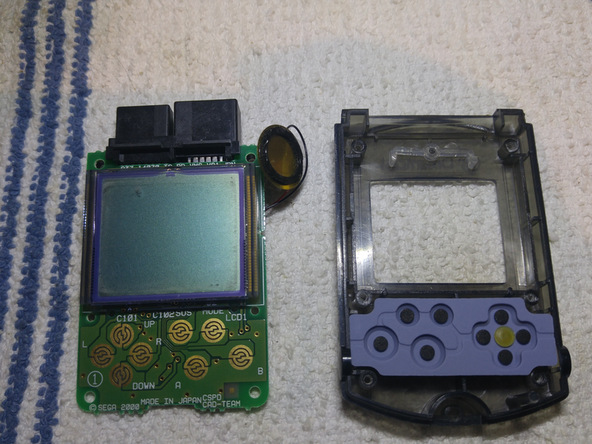
                  @moosepr I think for the VMU having the cable come out the top will work better (0 rotation) anyway since the buttons will bump right against the screen. Here's an image of the VMU from a teardown on iFixit.

                  0_1490583280122_vmu-teardown-medium.jpg

                  📷 @obsidianspider

                  1 Reply Last reply Reply Quote 0
                  • obsidianspiderO
                    obsidianspider
                    last edited by

                    I started a build thread to contain the discussion in one spot as I work on this.

                    📷 @obsidianspider

                    meleuM 1 Reply Last reply Reply Quote 0
                    • meleuM
                      meleu @obsidianspider
                      last edited by meleu

                      @obsidianspider and your signature got another icon! :)

                      • Useful topics
                      • joystick-selection tool
                      • rpie-art tool
                      • achievements I made
                      1 Reply Last reply Reply Quote 1
                      • obsidianspiderO
                        obsidianspider @ABrugsch
                        last edited by obsidianspider

                        @ABrugsch Which charge/boost board did you end up getting?

                        I really need to learn how to make a PCB…

                        📷 @obsidianspider

                        M A 3 Replies Last reply Reply Quote 0
                        • M
                          masteryoer @obsidianspider
                          last edited by

                          @obsidianspider

                          PCB making is easy, if you have the chemicals and materials. You can use either a laser jet printer, or an inkjet printer and use a developer and pcb etchant and make your own using EagleCAD software or something to print the board out.

                          The guy doing this went a bit overboard with the UV lamp and etc, you can do the same thing by sticking the PCB in front of a window during the day:

                          http://www.instructables.com/id/Creating-Printed-Circuit-Boards-with-a-INKJET-Prin/

                          1 Reply Last reply Reply Quote 1
                          • A
                            ABrugsch @obsidianspider
                            last edited by ABrugsch

                            @obsidianspider said in RetroPie in a Dreamcast VMU!:

                            @ABrugsch Which charge/boost board did you end up getting?

                            Uhhhh... A random ebay one that someone in the sudo discord pointed me to. I'll get a link for you but I haven't been able to find a similar one on aliexpress or other shops since.

                            charge/boost with PiCB-tft for scale

                            1 Reply Last reply Reply Quote 2
                            • A
                              ABrugsch @obsidianspider
                              last edited by ABrugsch

                              @obsidianspider
                              here you go: came in about 2 weeks
                              http://www.ebay.co.uk/itm/252442590514
                              I haven't hooked it up yet as it only came the other day, but I reckon once the USB A socket has been removed and I replace the 3.0uH inductor with a flat one, then it'll be good to go

                              obsidianspiderO 1 Reply Last reply Reply Quote 1
                              • obsidianspiderO
                                obsidianspider @ABrugsch
                                last edited by

                                @ABrugsch Thanks! I'm curious as to how it'll work out. I'll keep an eye on your build over at sudomod, and thanks for being one of the first to attempt this.

                                📷 @obsidianspider

                                M 1 Reply Last reply Reply Quote 1
                                • M
                                  masteryoer @obsidianspider
                                  last edited by

                                  @obsidianspider

                                  If you are interested in doing it, I actually need to make a few custom PCBs myself. Perhaps I could make a prototype one for you to start off with and see how you like it.

                                  obsidianspiderO 1 Reply Last reply Reply Quote 0
                                  • obsidianspiderO
                                    obsidianspider @masteryoer
                                    last edited by

                                    @masteryoer It's just a general "I want to learn how to do this one day" kind of thing. I am more curious about how to design them. I'd probably have someone like OSH Park actually make them for me, but I appreciate it. Etching one myself is something I can see me tinkering with at some point in the future.

                                    📷 @obsidianspider

                                    A 1 Reply Last reply Reply Quote 0
                                    • A
                                      ABrugsch @obsidianspider
                                      last edited by ABrugsch

                                      @obsidianspider etching them yourself is overrated now that it's so cheap to get them made by OSHP/PCBway etc.
                                      however for a keyboard PCB I have planned, self etching might be the only way to go for the prototype phase ;)

                                      M 1 Reply Last reply Reply Quote 1
                                      • M
                                        masteryoer @ABrugsch
                                        last edited by

                                        @ABrugsch

                                        $5 a square inch for a prototype board is hardly cheap. Etchant can be made with 'mostly' household materials and costs a lot less when prototyping, and also has the ability for rapid prototyping as you don't have to design, wait 12-14 days to find out it doesn't work, waste the $20-30 it cost to produce it, design another one, spend another 20-30 to find out it's still wrong, etc. I would definitely suggest getting one printed the right way after design is tested and working, but for prototyping it's rather expensive.

                                        A 1 Reply Last reply Reply Quote 0
                                        • mooseprM
                                          moosepr
                                          last edited by

                                          yeah the PCB fab option isnt really really cheap, but i guess you will know for sure that any problems you have are from bad design rather than a bad etch

                                          some of the Chinese ones are reasonable. got 5 of my PiCB boards made for $10 over on "pcb way" but the postage stung me $12

                                          the same boards from OSHpark would have been $42.05 for 3 boards, but no shipping costs

                                          want to get a tft into your project, look no further than here https://retropie.org.uk/forum/topic/7464/ili9341-tft-screen-guide

                                          1 Reply Last reply Reply Quote 0
                                          • A
                                            ABrugsch @masteryoer
                                            last edited by

                                            @masteryoer it depends on how complex and how fine your design is. If you're doing stuff with big through hole components then sure. if you've got fine pitch SMD IC's then good luck getting results first time.

                                            also by the time I've farted about with the noxious chemicals, set everything up in a safe environment, and also disposed of the chemicals in an environmentally safe way, then yeah sure, $5 per sq. in. (x3) is of the more pricy, but PCBway is $10 plus shipping for 10 copies of a 10cm x 10cm board. sure there are pros and cons to both methods, and if ultimate cheap is your goal then self etching is the way to go. but it's now become "cheap enough" that I really am beyond caring to mess about with etchant. been there, done that, got chemical burns in the T-shirt (joke)

                                            ? 1 Reply Last reply Reply Quote 0
                                            • First post
                                              Last post

                                            Contributions to the project are always appreciated, so if you would like to support us with a donation you can do so here.

                                            Hosting provided by Mythic-Beasts. See the Hosting Information page for more information.