My Bartop Arcade Build Is Underway
-
So today I went down to bunnings and got 2 sheets for MDF wood (16mm) for the sides of the bartop arcade. I am also happy to say that my work is letting me use a jigsaw so I am able to cut the MDF board easier AND neater because I cut it on the tablesaw and it looks like a mess. you can see a picture of it here also don't forget to put some tips down in the comments, cheers!
Here is me converting the original Xbox for a case:
https://retropie.org.uk/forum/topic/15232/converting-original-xbox-into-case-for-raspberrypi/15
Check out my GitHub: https://github.com/retro-programmer -
@retroprogrammer As someone who has worked with MDF, I swear it is the nicest shit to work with. If you use a bandsaw, it cuts almost like butter and leaves a smooth edge with no burrs, unlike pine hardboard (which I primarily use for projects.)
Few tips (both arcade and general)
- have some kind of eye protection
- have ventilation in your work area
- pocket holes work wonders, and leave no visible fasteners
- drill pilot holes before cutting bigger holes
- test everything before closing cabinet
- make an access panel of some kind
-
@lilbud Agreed that it is super easy to work with, but holy smokes does it make a mess!
-
I think a good alternative to t-mold is (chrome) decor lists, the kind you get for cars. Theres a ton of different sizes and styles for cheap at ebay etc. That's what I used..
-
@newellj79 on the other hand, it smells really good when cut.
-
@lilbud Thanks for the tips will use them!
@Newellj79 Will remember to have newspapers under work place :)
@Dipkid I will look into Chrome decor -
Hey guys, been a few weeks since posting and have got alout done, now just need to paint and add finishing touches. Here are some pictures of what been happening. I am going to be spray painting, never done before :), tips will be great. Cheers @retroprogrammer
Here is me converting the original Xbox for a case:
https://retropie.org.uk/forum/topic/15232/converting-original-xbox-into-case-for-raspberrypi/15
Check out my GitHub: https://github.com/retro-programmer -
@retroprogrammer Looks good and very clean built so far. How do you access the interior for maintenance after it's finished? The pictures don't show that clearly.
-
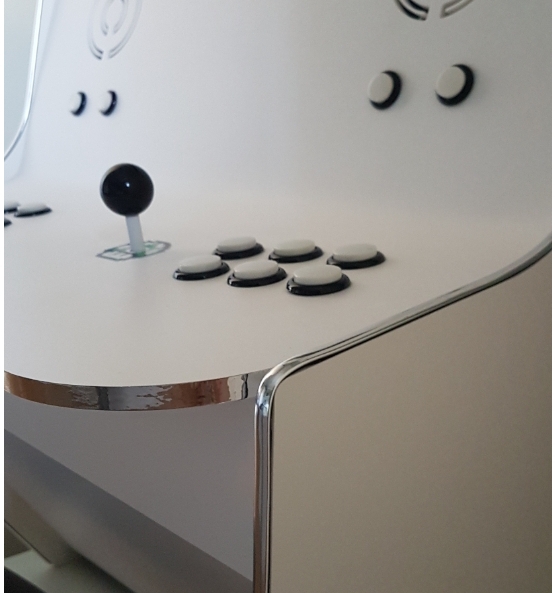
@Clyde here it is: https://imgur.com/a/5zJCJCX
I will be putting magnets so that they attach to each other
-
also @Dipkid is that your on build, it looks clean
-
@retroprogrammer Spray painting tip: Less is more, with more coats of less.
What I mean by that is you should establish a good working distance as described on the can, then give your workpiece passes of spray without being too concerned about total coverage at first. Seriously, if there is one thing I always screw up with spray paint is that I try to do too much.
Everything I read about spray paint confirms this. You should have the right distance which can seem a little further than you might expect, give clean consistent passes, and let the spray fall on the workpiece once. Let that dry. Repeat. Let that dry. Repeat. Over several steps, you will achieve good coverage.
What not to do: Don't spray in one spot. By the time it looks good, you will have sprayed too much and you will get horrible drips. It can be so frustrating because it tests your patience. You want to get it finished, but you can end up using too much paint in one place. It drives me crazy every time.
Take your time, do multiple passes with some drying in between.
-
@caver01 okay, mate will do :) also should I sand MDF before spray paint and put primer on?
Here is me converting the original Xbox for a case:
https://retropie.org.uk/forum/topic/15232/converting-original-xbox-into-case-for-raspberrypi/15
Check out my GitHub: https://github.com/retro-programmer -
@retroprogrammer No sanding. But do put primer on MDF, MDF soaks up paint like there's no tomorrow, so put primer on before and it'll save you from having put 45 coats on.
-
@lilbud okay got it, now to get the spray paint, anyone got any suggestions on colors, my buttons are blue and green. I will not be putting any side art, unfortunately, can't afford, maybe next build :'( I was thinking white or black, or even blue and green together, so many possibility's.....
-
@retroprogrammer Thanks for the pictures about the back side access.
In addition to @caver01's post, always reverse your passes next to the workpiece. If you reverse while spraying on the workpiece, you'll apply too much paint at the turning point.
Watch Youtube videos about spray painting, they helped me a lot in my own attempts.
-
@clyde will do
-
If you are feeling up to it you can make some simple stencils out of painters tape.
Lay down overlapping tape on a wood surface you can scratch like a cutting board. Trace or tape down an image (IE a simple big Pac-Man) Cut the lines with an exacto knife or craft knife.
Then move the stencil (either the positive or negative image to the cabinet. Press it down.
Then to ensure there is no bleed under, brush a very thin layer of paint or primer over the edges going from tape to wood and never wood to tape. Let that dry a little bit and then spray your various coats.
On the last coat remove the tape while the paint is still wet and you should have crisp clean 2 tone art.
Last tip: If you have pieces that are going to move against each other from sliding or rotating you will want to sand them lightly after painting so they slide smoothly against each other.
Good Luck.
-
@retroprogrammer, you should go for a 2.1 speakers. I installed one in my bartop and the sound is amazing, because it enhances the bass.
-
@lipebello , I have already bought some cheap Chinese speakers, and they work pretty good :)
-
@Lurker is their a detailed tutorial of this anywhere?
Contributions to the project are always appreciated, so if you would like to support us with a donation you can do so here.
Hosting provided by Mythic-Beasts. See the Hosting Information page for more information.