Finishing up Bartop, some questions
-
@vermope said in Finishing up Bartop, some questions:
They don't remain defined static. Anyway to get around this?
I wrote a python script for this on my setup. I'll publish it later (not at home right now), not sure how to implement it in retropie though (i'm running my own custom system for flexibility).
-
@barbudreadmon Thanks! Certainly worth a try!
-
@barbudreadmon Any chance for sharing that Python script you've mentioned? Would come of great help. Thanks in advance!
-
@vermope Nice looking cabinet you have there. I’m building one myself right now and by the look of it we are probably following the same instructions on instructables. Is there anything you would do differently if you had to do it all over again? I have especially been thinking about the button layout myself. In the instructions, maybe in your cabinet as well, the buttons are placed so that there isn’t enough room for the palms to rest on the cabinet when you have your fingers on the buttons. This doesn’t feel optimal to me. What do you think? I have a prototype currently where the buttons are at the very top, leaving more room for the hands to rest. It feels good although it looks a bit awkward with the buttons so close to the screen. This definitely means it is impossible to have the select and start buttons on top and they have to go on the front, just like you have. How does it feel to use those buttons? I can’t really prototype that layout but I’m thinking it will be okay to use them with the thumbs. I mostly worry about having the front too cluttered since I have USB ports, separate hotkey, and volume control as well planned for this narrow space.
-
@m2306 Hi, thanks for the compliment. Yes I more or less followed the instructions on instructables. I've used the template to outline the buttons. It's not perfect but certainly playable!
The buttons in front are just perfect, you don't use them that often and it's a fun feeling to 'put in some coins' on the bottom :)Also I've put 2 usb ports on the back, (for 2 extra Xbox controllers) bought this from Aliexpress:
https://nl.aliexpress.com/item/1m-Dual-USB-Socket-Extension-Cable-Car-Van-Dashboard-Flush-Mount-2-USB-Plug-Lead-Panel/32819612088.html?spm=a2g0s.9042311.0.0.27424c4di21fBDThe bartop is definitely a winner at our house. Young and old love to play on the arcade, the youngsters love all the lighting, the older all have a major trip on memory lane :)
-
I found and now use SkraperUI, its by the same guy who wrote UXS and uses ScreenScraper for its sources. You need a ScreenScraper account to scrape his resources but thats free and the website can be in English. I did it from French then realised there is langauge options to change the website to English
https://forum.recalbox.com/topic/10744/soft-new-command-line-scraper
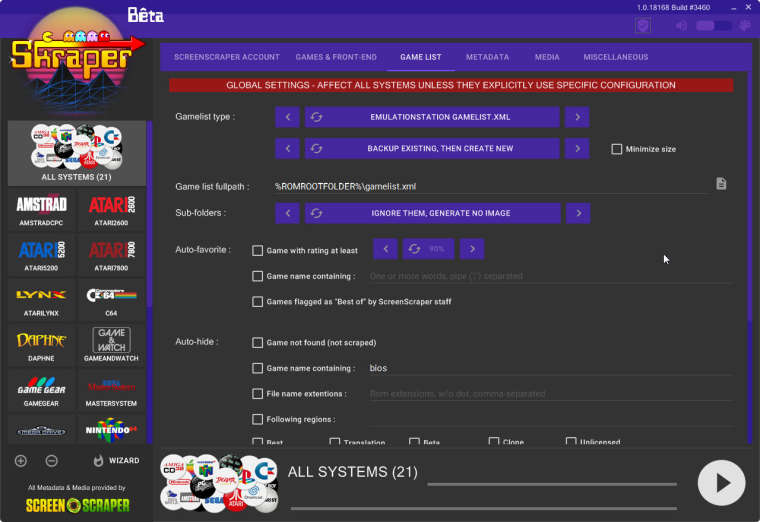
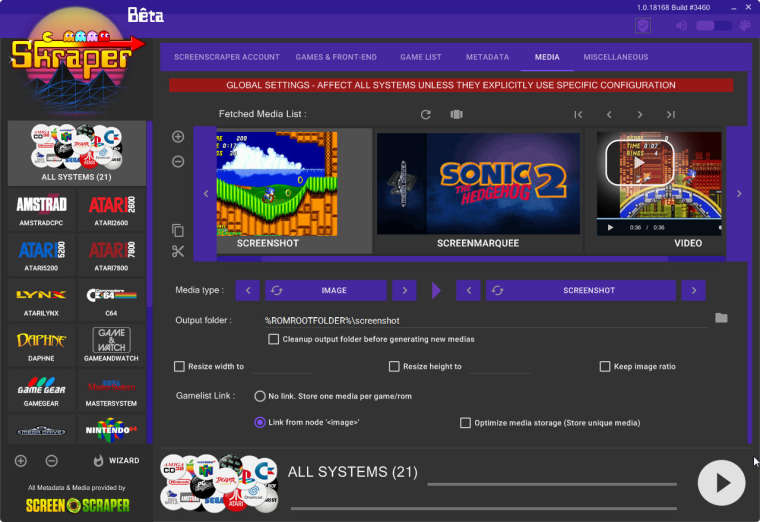
I had to set it up as a generic emulator and basically copy the PI ROM folder and ALL its contents to another folder on the desktop PC, get SkraperUI to run it on those folders and also set the gamelist.xml to be in the ROM folders NOT the default EmulationStation folders. Also, in the MEDIA settings in SkraperUI set the gamelist link to "link from Node" and it should work straight away. You MUST copy the ROM folder back to your PI, but just set it to skip existing files then it will ONLY copy the new images and videos and also gamelist.xml to where it will expect to find them
There is an option to get it to scrape directly from the PI using SSH but I could never get it to work so did it the longer but guaranteed to work way of copying the ROM folder
All images and gameplay videos I've tested worked straight off after plugging the USB drive back in and rebooting the PI
It took me some head scratching to work it all out, but once I figured that out it scraped perfectly and added everything that was missing including all videos and marquee
-
@steptoe Thanks for the tip.
I've ended up using this scraper: https://www.skraper.net/ I think it's developed by the people from ScreenScraper them self. I've scraped over samba shares with almost 100% success rate. -
@vermope I have the exact same USB cable :D. I plan to put it up front for easy access and shorter distance so the controller cables won’t become too short. Do you feel the hotkey volumecontrol is enough or would you have preferred an actual volume control button (or maybe you have one?)? Thinking about where to put the volume control of the amp, up front, on the back or inside and then just use the hotkey..
-
Thats the one I use. Found it by accident looking for a scraper that worked how I wanted it to work
I could never get gameplay videos to work, until I changed the gamelist.xml to the ROM folder for each system, AND set up NODE linking in the options. Had to look at the gamelist.xml and found it wasn't pointing to where the images and video were. I set the NODE option and everything worked straight away
These are my settings and get game screenshots, marquee and gameplay videos for every system that is supported


-
@m2306 Only using the hotkey volume control.... it works, but not for the non-Libretro (lr) emulators like 'Dolphin' and 'Reicast'.
-
I also started off a bartop arcade using the PI3B, it worked but I wanted more systems that the PI will never really support due to speed and also just not possible, so moved over the an Intel/AMD based system with GFX card and using HyperSpin and now use the PI as a KODI box running OSMC with RetroPie on the TV so it wasn't a lost cause more a learning project
I now have FuturePinball and VisualPinball tables when I get around to another burst of enthusiasm and actually build it all up. The USB drive I'm using for the games is connected to the desktop and it all runs off that so I can add more systems very easily. Pinball was what I really wanted so the bartop has extra side buttons for flippers and extra front button launching the ball as well as all the usual buttons and sticks for 2-player arcade
-
@steptoe Started out with my old work laptop that had a Linux on it, installed Retropie just to tinker around and ended up with an arcade machine build around it :-) Since I had most components laying around, the cost was around 100 euro...well worth the price!
Contributions to the project are always appreciated, so if you would like to support us with a donation you can do so here.
Hosting provided by Mythic-Beasts. See the Hosting Information page for more information.