• Recent
  • Tags
  • Popular
  • Home
  • Docs
  • Register
  • Login
RetroPie forum home
  • Recent
  • Tags
  • Popular
  • Home
  • Docs
  • Register
  • Login
Please do not post a support request without first reading and following the advice in https://retropie.org.uk/forum/topic/3/read-this-first

{SOLVED} How to make a momentary push button that exit games and take me back to game menu ?

Scheduled Pinned Locked Moved Help and Support
push buttonretropiepsxscriptnewbie
56 Posts 3 Posters 6.8k Views
Loading More Posts
  • Oldest to Newest
  • Newest to Oldest
  • Most Votes
Reply
  • Reply as topic
Log in to reply
This topic has been deleted. Only users with topic management privileges can see it.
  • M
    mitu Global Moderator @O.M.A.A
    last edited by 11 Apr 2019, 19:14

    @O-M-A-A said in How to make a momentary push button that exit games and take me back to game menu ?:

    would it be fine if u get access to my computed and try it yourself as maybe the way I'm doing it is wrong.

    Can't do that, I'm sorry.

    O 1 Reply Last reply 11 Apr 2019, 19:19 Reply Quote 0
    • O
      O.M.A.A @mitu
      last edited by 11 Apr 2019, 19:19

      @mitu it is okay thank you for your patient,

      I will just summarized what I did so u will have an idea maybe of the mistake I did, when I installed the retropie image, I basically run the link to the script (shudown.py) and this made the power button to work.

      Then I open it with notepad++ and I modified it to install the exit emu button.

      lastly, I downloaded ur file (multi_switch.sh) and executed the command u provided it me.

      for now pins are 3+4 for the exit emu button and 5+6 for the power button.

      M 1 Reply Last reply 11 Apr 2019, 19:20 Reply Quote 0
      • M
        mitu Global Moderator @O.M.A.A
        last edited by mitu 4 Nov 2019, 20:20 11 Apr 2019, 19:20

        @O-M-A-A said in How to make a momentary push button that exit games and take me back to game menu ?:

        for now pins are 3+4 for the exit emu button and 5+6 for the power button.

        I edited the post - try putting the reset pins (brown/red) on the original position and change the GPIO number from 3 to 33 (or just copy the edited script).

        O 1 Reply Last reply 11 Apr 2019, 19:27 Reply Quote 0
        • O
          O.M.A.A @mitu
          last edited by 11 Apr 2019, 19:27

          @mitu I put the 2 wires back to the same position and I edited the file from 3 to 33, but didn't work

          C O 2 Replies Last reply 11 Apr 2019, 19:32 Reply Quote 0
          • C
            cyperghost @O.M.A.A
            last edited by 11 Apr 2019, 19:32

            @O-M-A-A Please remeber to do a restart after every change!

            O 1 Reply Last reply 11 Apr 2019, 19:40 Reply Quote 0
            • O
              O.M.A.A @O.M.A.A
              last edited by 11 Apr 2019, 19:33

              @mitu

              Yeah, I do that with every change

              C 1 Reply Last reply 11 Apr 2019, 19:35 Reply Quote 0
              • M
                mitu Global Moderator
                last edited by 11 Apr 2019, 19:34

                I'll try to pull up my Pi to see how the reset button wires are wired on mine, it uses GPIO3, but I'm not sure where the other PIN is connected so that it generates the push event. It might take a while, though, I don't have it at hand right now.

                1 Reply Last reply Reply Quote 0
                • C
                  cyperghost @O.M.A.A
                  last edited by cyperghost 4 Nov 2019, 20:37 11 Apr 2019, 19:35

                  @O-M-A-A
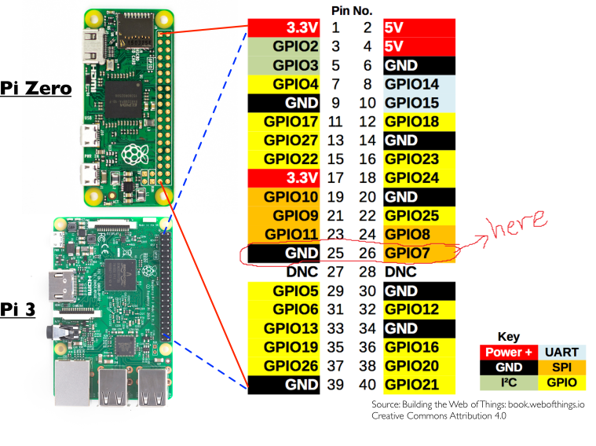
                  As I counted PIN connection on your picture it is likely your wiring is tied to PIN26 instead of 33?

                  1 Reply Last reply Reply Quote 0
                  • O
                    O.M.A.A @cyperghost
                    last edited by 11 Apr 2019, 19:40

                    @cyperghost I'm sure it is here :
                    1213134.png

                    @mitu thank you, I rly appreciate what u guys r doing.

                    C O M 3 Replies Last reply 11 Apr 2019, 19:43 Reply Quote 0
                    • C
                      cyperghost @O.M.A.A
                      last edited by cyperghost 4 Nov 2019, 20:45 11 Apr 2019, 19:43

                      @O-M-A-A And if you look to the python code, what do you see? There is PIN33 used for input. Which is obviously not used in your setup? Please change the GPIOinit and buttonState2 to 26

                      Please use the script that @mitu posted!
                      Because he also used the BCM Pin layout as setting which makes things a lot easier to hook up.

                      1 Reply Last reply Reply Quote 0
                      • O
                        O.M.A.A @O.M.A.A
                        last edited by 11 Apr 2019, 19:45

                        @mitu @cyperghost
                        I'm not concerned much on the power button, as I'm planning to install a micro usb click button like this one:

                        61jgjiVkgtL.SL1500.jpg

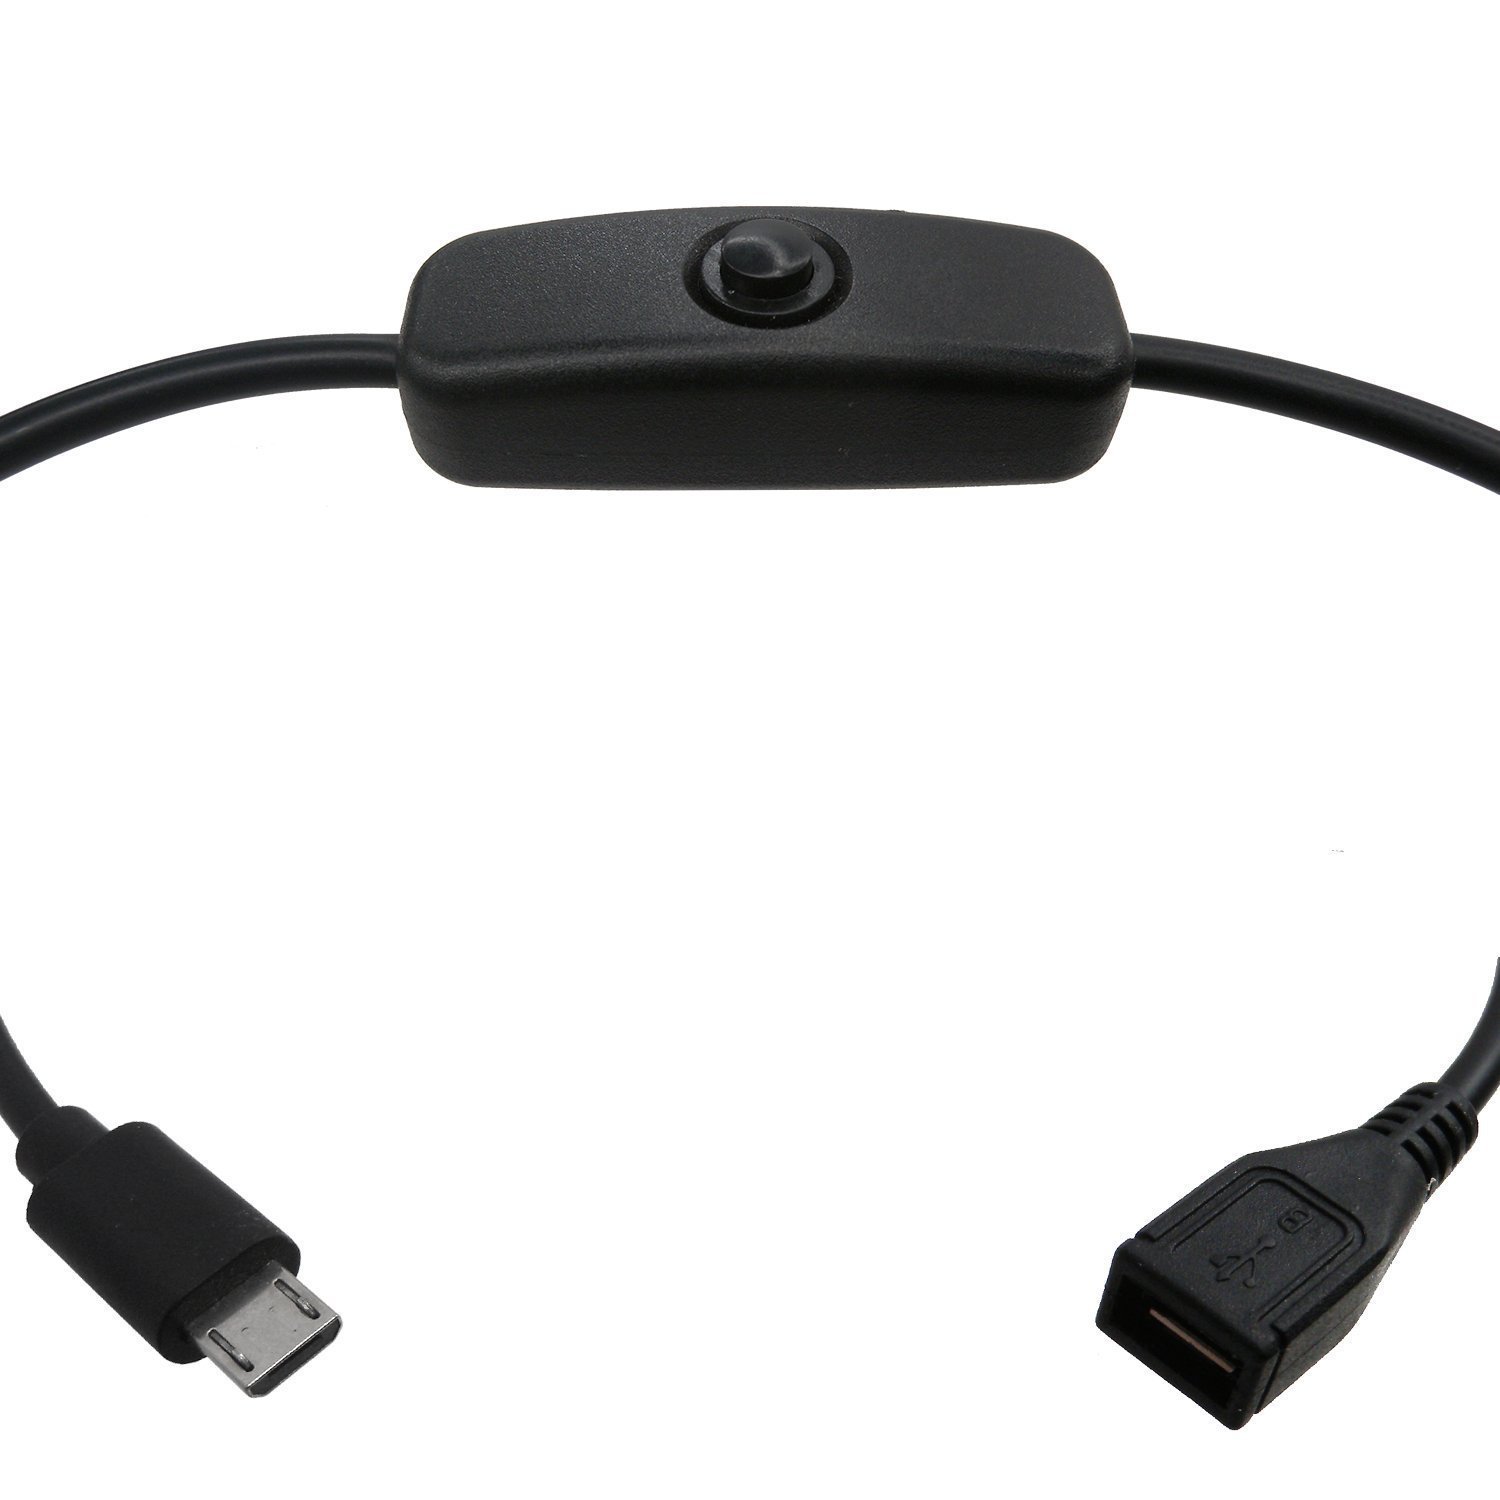
                        So I can remove the push button pins on gpio 3 and install the exit emu button instead.

                        1 Reply Last reply Reply Quote 0
                        • M
                          mitu Global Moderator @O.M.A.A
                          last edited by mitu 4 Nov 2019, 20:46 11 Apr 2019, 19:46

                          @O-M-A-A The numbering can be done in 2 ways

                          • pin number (1 - 40) - the inner numbers in your picture.
                          • so called Board/BCM (?) numbers - the outer labels in your picture.

                          If you look at how your wiring picture looks like, you see that the power wires are using pins 5 and 6, not GPIO5 and GPIO6. The numbers in your script are the PIN numbers, not the GPIO (outer) labels.

                          C O 2 Replies Last reply 11 Apr 2019, 19:50 Reply Quote 0
                          • C
                            cyperghost @mitu
                            last edited by cyperghost 4 Nov 2019, 20:54 11 Apr 2019, 19:50

                            @mitu You surly already know this website ;) https://pinout.xyz/#
                            Maybe this will help @O-M-A-A, too

                            @O-M-A-A

                            Can use it in GPIO 3 instead of the power button ? and remove the power button wires as I don't need it.

                            The GPIO is a bit special one. It let's the Raspberry recover/restart from deep sleep mode. So it's very common in use for power off/power on events.
                            Do use this switch cable to full cut power from the Pie - after Powerdown. But never cut power by force

                            1 Reply Last reply Reply Quote 0
                            • O
                              O.M.A.A @mitu
                              last edited by 11 Apr 2019, 19:50

                              @mitu @cyperghost
                              the exit emu button is on pins 25 and 26 which GPIO 7 I was using

                              Can use it in GPIO 3 instead of the power button ? and remove the power button wires as I don't need it.

                              M 1 Reply Last reply 11 Apr 2019, 19:53 Reply Quote 0
                              • M
                                mitu Global Moderator @O.M.A.A
                                last edited by 11 Apr 2019, 19:53

                                @O-M-A-A said in How to make a momentary push button that exit games and take me back to game menu ?:

                                Can use it in GPIO 3 instead of the power button ? and remove the power button wires as I don't need it.

                                You do need it, because that switch that you want to buy will not shut down properly your PI (i.e. will not run the shutdown command), it will merely cut down the power.

                                O 1 Reply Last reply 11 Apr 2019, 19:54 Reply Quote 0
                                • O
                                  O.M.A.A @mitu
                                  last edited by 11 Apr 2019, 19:54

                                  @mitu I see, so what to do now

                                  C 1 Reply Last reply 11 Apr 2019, 20:13 Reply Quote 0
                                  • C
                                    cyperghost @O.M.A.A
                                    last edited by cyperghost 4 Nov 2019, 21:14 11 Apr 2019, 20:13

                                    @O-M-A-A Hope I tranlated correct

                                    "bite together and pull through the cheeks"

                                    You are close to finish this!

                                    1 Reply Last reply Reply Quote 0
                                    • O
                                      O.M.A.A
                                      last edited by O.M.A.A 4 Nov 2019, 22:05 11 Apr 2019, 21:04

                                      @mitu @cyperghost yeah, thank you.

                                      it looks awesome, everything is working except the 1 button which is not a big deal, I will search for my problem. thanks guys a lot for your help and patience. I'm rly grateful for the time u spent it with a newbie ;D.

                                      O 1 Reply Last reply 11 Apr 2019, 21:14 Reply Quote 0
                                      • O
                                        O.M.A.A @O.M.A.A
                                        last edited by 11 Apr 2019, 21:14

                                        @cyperghost @mitu
                                        I was thinking, I have tried the button with every pins, one of these pins executed the letter H on the keyboard, and I was able to make the button as hotkey.
                                        is it possible to make this key also perform the start button, so when pressed will function as a start and hotkey which will exit the emulator ;D.

                                        1 Reply Last reply Reply Quote 0
                                        • M
                                          mitu Global Moderator
                                          last edited by mitu 4 Dec 2019, 20:17 12 Apr 2019, 16:16

                                          I just tried on by PCB and the reset button is wired on PIN3, with the other one wired to a GND pin.

                                          Here's a little script you could run (python <script.py>) to check a PIN for a momentary press

                                          #!/usr/bin/python
                                          import RPi.GPIO as GPIO
                                          import time
                                          import subprocess
                                          
                                          pinNo = 3
                                          GPIO.setmode(GPIO.BOARD)
                                          GPIO.setup(pinNo, GPIO.IN)
                                          
                                          while True:
                                              #grab the current button state
                                              buttonState2 = GPIO.input(pinNo)
                                          
                                              if not buttonState2:
                                                  # Reset emulator
                                                  print "pressed " + str(pinNo)
                                          

                                          You can test various pins for button press by replacing changing pinNo to your desired Pin number.

                                          The original script I posted can probably be simplified as

                                          #!/usr/bin/python
                                          import RPi.GPIO as GPIO
                                          import time
                                          import subprocess
                                          
                                          GPIO.setmode(GPIO.BOARD)
                                          
                                          shutdownPin=5
                                          resetPin=3
                                          
                                          GPIO.setup(shutdownPin, GPIO.IN)
                                          GPIO.setup(resetPin, GPIO.IN)
                                          
                                          oldButtonState1 = True
                                          
                                          while True:
                                              #grab the current button state
                                              buttonState1 = GPIO.input(shutdownPin)
                                              buttonState2 = GPIO.input(resetPin)
                                          
                                              # check to see if button has been pushed
                                              if buttonState1 != oldButtonState1 and buttonState1 == False:
                                                  # shutdown
                                                  subprocess.call("shutdown -h now", shell=True,
                                                    stdout=subprocess.PIPE, stderr=subprocess.PIPE)
                                                  oldButtonState1 = buttonState1
                                              
                                              if not buttonState2:
                                                  # Reset emulator
                                                  print "Reset pressed"
                                                  subprocess.call("/home/pi/scripts/multi_switch.sh --es-closeemu", shell=True,
                                                    stdout=subprocess.PIPE, stderr=subprocess.PIPE)
                                          
                                              time.sleep(.3)       
                                          
                                          O 1 Reply Last reply 12 Apr 2019, 18:47 Reply Quote 1
                                          52 out of 56
                                          • First post
                                            52/56
                                            Last post

                                          Contributions to the project are always appreciated, so if you would like to support us with a donation you can do so here.

                                          Hosting provided by Mythic-Beasts. See the Hosting Information page for more information.

                                            This community forum collects and processes your personal information.
                                            consent.not_received