RetroPie forum home
    • Recent
    • Tags
    • Popular
    • Home
    • Docs
    • Register
    • Login

    My Pi in a SNES.

    Scheduled Pinned Locked Moved Projects and Themes
    raspberry pi 3diysnesretropie 4
    17 Posts 6 Posters 8.1k Views
    Loading More Posts
    • Oldest to Newest
    • Newest to Oldest
    • Most Votes
    Reply
    • Reply as topic
    Log in to reply
    This topic has been deleted. Only users with topic management privileges can see it.
    • DipkidD
      Dipkid
      last edited by Dipkid

      Hey guys, first Post!
      So I have, like a lot of other people here, built an Snes/Pi sort of thing.
      (I have seen some awesome builds on this forum, lots of inspiration!)
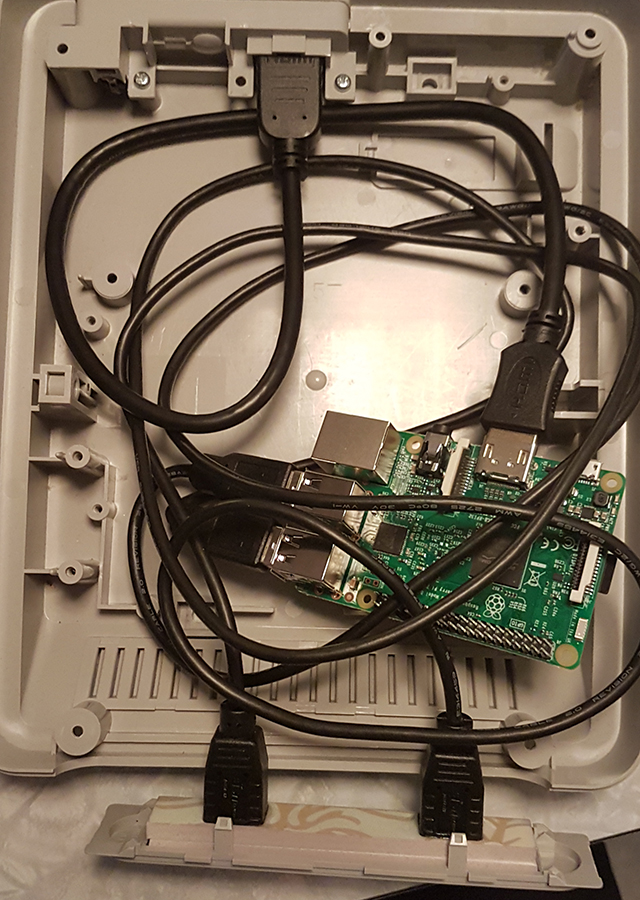
      My build, so far, includes zero soldering, but a lotta glue and tape.

      My Retropie w ES runs on a Raspberry 3 Model B w a 32 gig sd.
      I run it with generic usb snes controllers & PS3 org. dual shock.

      I pretty much knew what i wanted when I first came up with the idea,
      so I went on ebay and ordered;

      • one male 2 female hdmi cable,
      • two male2 female usb cables,
      • one usb-led light,
      • one micro usb rocker on/off cable,
      • and one old cartridge, Nhl 96 . Because I couldnt "destroy" one of my own beloved childhood games.

      So I removed everything out of an old (non working) snes,

      2_1474657727658_20160920_211607.jpg
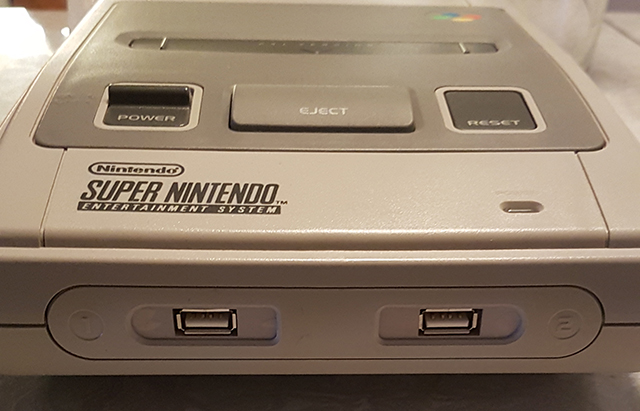
      First, I removed the org snes-controller hub, and made some Illustrator files, and cutted 10mm PVC plastics with a cutting table. As seen on the picture, I measured it to fit in the little slot between the "clip on" thingy on the original controller hub, which btw can be removed. made 2 holes for my usb´s and Painted the plastic
      grey and glued the stuff together, usb to my plasticpiece & plastic piece to the snes part.. Did pretty much the same with the back piece. Used a boxcutter to slim down the hdmi contact like 2 mm so it fitted perfect in the original hole, with no need for extra pieces.

      0_1474658400147_20160920_204754.jpg

      0_1474659411988_20160920_210135.jpg

      1_1474658436284_20160923_143025.jpg 0_1474658436284_20160923_143031.jpg
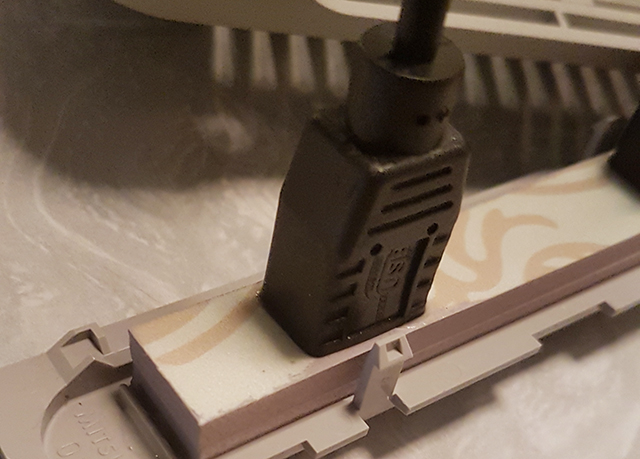
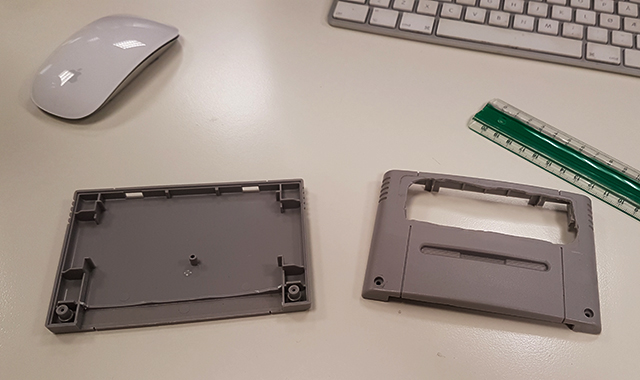
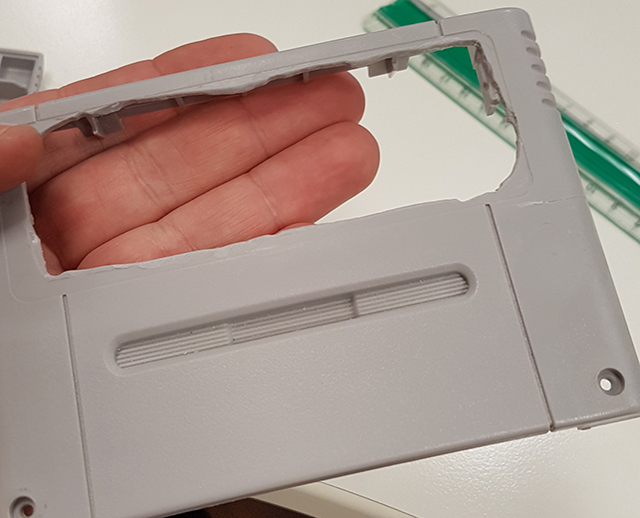
      I then took a drill and a router to the old used game. I know, It looks pretty sh*tty, but thats gonna be hidden, so..

      2_1474658436284_20160923_143045.jpg
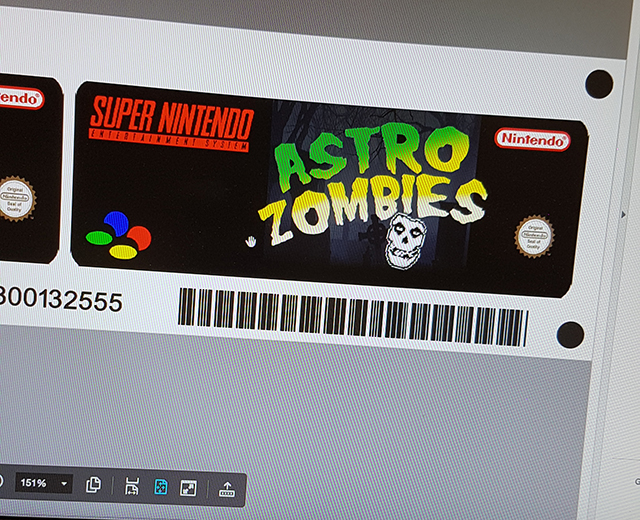
      I made a new label in Photoshop, a homage to The Worlds Greatest Band. Printed it on a backlit paper (for lightboxes and resturant menus etc)

      3_1474658436284_20160923_145540.jpg
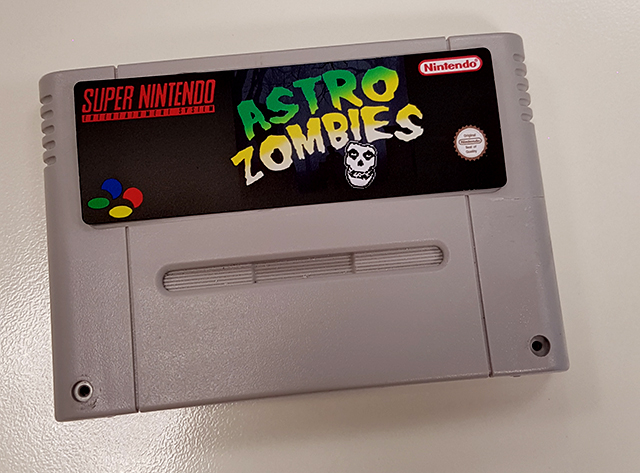
      Again, cutted it at work with a Zünd cutting table.

      0_1474658871133_20160923_184916.jpg
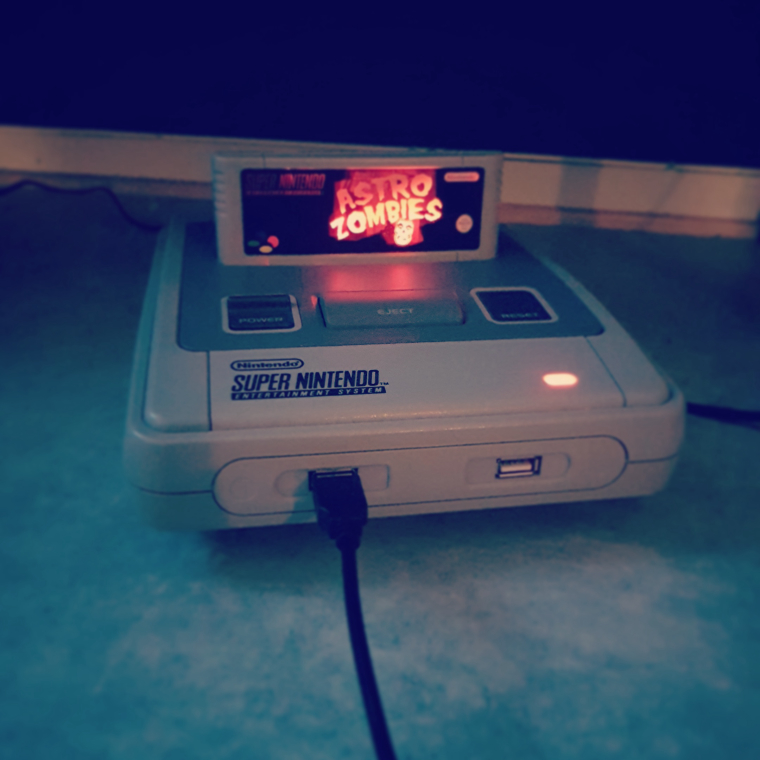
      Lastly, I stuck the cheap usb led light under the original snes light and thru the cartridge slot, up in to my new fake empty game.

      Voila. Almost done. Still waiting for the usb rocker, which I gonna try to Macgyver fix to the Snes power button.
      If that fails, (feels like its gonna fail..) I will probably buy one of those power blocks..
      Will also need to thighten some stuff, like the airwent, to stop light leaking. Thanks for watching.

      RetroPC: https://retropie.org.uk/forum/topic/13048/the-1976-retropc-diy-retro-gaming-computer-build
      Wallcab: https://retropie.org.uk/forum/topic/28324/wall-mounted-cab-2-0
      Candy Cab: https://retropie.org.uk/forum/topic/34290/diy-candy-cab-arcade

      I 1 Reply Last reply Reply Quote 7
      • darthpaulD
        darthpaul
        last edited by

        Very nice build, one can never have enough things lighting up.

        1 Reply Last reply Reply Quote 1
        • Morph-XM
          Morph-X
          last edited by

          Wow, this is nice! In a way it looks a lot like my Super Nintemu because i also made two ports in the front. But i'm curious as to how you mounted the USB ports without screws? That looks really nice and clean!

          Hopefully you'll manage to get the power button working, that's a nice asset.

          Good luck and i'll keep an eye on your project. ;-)

          DipkidD 2 Replies Last reply Reply Quote 1
          • DipkidD
            Dipkid @Morph-X
            last edited by

            @Morph-X thank you so much. As for the ports, i measured the inside of the old controller slots, and made some blueprints/cut files in illustrator cc. The material i use is 10 mm pvc (forex plastic) Then measured the she usb ports and made holes at work w our cutting table. So everything sat pretty tight, using a digital micrometer. Then just added a tiny bit of superglue from my pvc piece to the org loose snes piece. Its rock solid now, but can still pretty easyily be removed if needed. Was super lucky with the grey color. Told the guy at the graffitti store i needed "nintendo grey" and out of a 1000 cans he matched it 99.9 percent ☺️.

            RetroPC: https://retropie.org.uk/forum/topic/13048/the-1976-retropc-diy-retro-gaming-computer-build
            Wallcab: https://retropie.org.uk/forum/topic/28324/wall-mounted-cab-2-0
            Candy Cab: https://retropie.org.uk/forum/topic/34290/diy-candy-cab-arcade

            1 Reply Last reply Reply Quote 0
            • DipkidD
              Dipkid @Morph-X
              last edited by

              @Morph-X also, if i may ask, i have the original power switch from my snes, incl wires. Could one wire it directly to the gpio "power" pins, or at least wire it trough to the usb power cable? (it looked like you did something like that..)

              RetroPC: https://retropie.org.uk/forum/topic/13048/the-1976-retropc-diy-retro-gaming-computer-build
              Wallcab: https://retropie.org.uk/forum/topic/28324/wall-mounted-cab-2-0
              Candy Cab: https://retropie.org.uk/forum/topic/34290/diy-candy-cab-arcade

              1 Reply Last reply Reply Quote 0
              • Morph-XM
                Morph-X
                last edited by

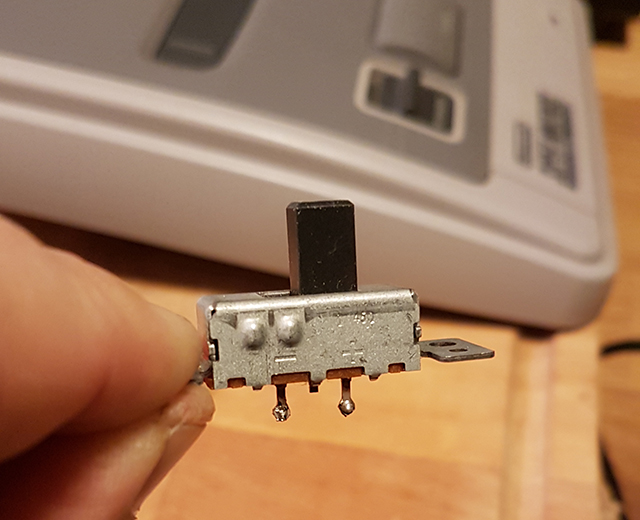
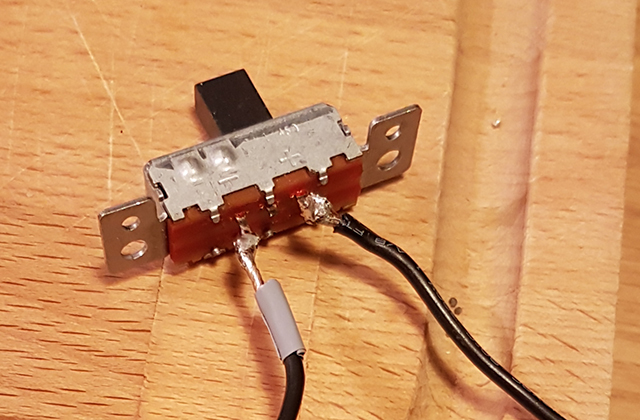
                I did it as follows:

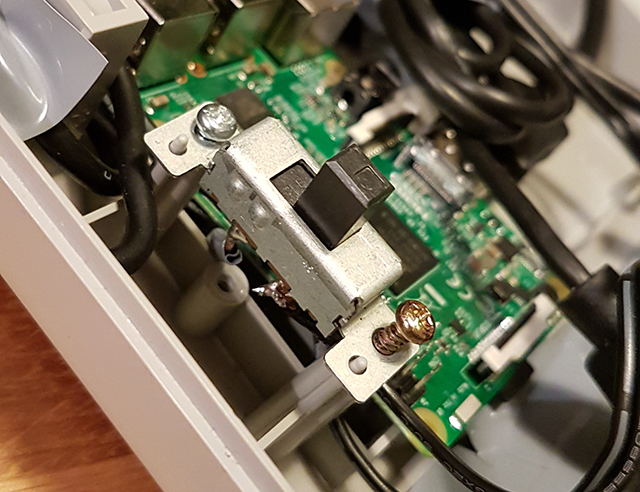
                I hope my poor English is sufficient to give a proper explanation. I connected a micro-USB extension cable to the Raspi's power input. That's of course a female connector on one side and a male connector on the other. Then i stripped a small part of the cable to cut the +5V wire and soldered both ends of it to the pins of the original SNES power switch. So after connecting a power supply, the power only reaches the Raspi when the SNES power button is switched "ON".

                Now this has of course some pro's and con's:

                • PRO: It's super cheap (an extension cable costs about $3);

                • PRO: It's actually way easier and less space consuming than a power block of some sort;

                • PRO: With an extension cable like this you're able to create a nice and corresponding female micro-USB port in your SNES case;

                • CON: You'll have to use EmulationStation's option to shutdown the Pi instead of a powerblock running a shutdown script or however those things work. I don't mind at all personally, because the option of shutting down is easily accessible through EmulationStation's option menu, but i can imagine one would not settle for a power switch that simply cuts power in an instant.

                Hopefully it's clear to you how i did it. If not, let me know so i can elaborate it some more.

                Good luck!

                DipkidD 2 Replies Last reply Reply Quote 1
                • DipkidD
                  Dipkid @Morph-X
                  last edited by

                  @Morph-X Thanks for the info, I kinda suspected there was some soldering involved.
                  I dont think my china usb rocker will fit without a lot of hazzle, so i will
                  probably try to strip the wires and connect directly to the org snes power button, when I get some free time over.
                  (There something special about the real sound and push-resistance from the snes buttons, gotta have it!)

                  Also, heres a more like-friendly picture, since I have closed some of the holes and got the Led light to look better.
                  0_1475092616376_IMG_20160926_193300.jpg

                  RetroPC: https://retropie.org.uk/forum/topic/13048/the-1976-retropc-diy-retro-gaming-computer-build
                  Wallcab: https://retropie.org.uk/forum/topic/28324/wall-mounted-cab-2-0
                  Candy Cab: https://retropie.org.uk/forum/topic/34290/diy-candy-cab-arcade

                  1 Reply Last reply Reply Quote 3
                  • DipkidD
                    Dipkid @Morph-X
                    last edited by

                    @Morph-X Heeey.. Im about to try this soldering thing. (finally packed everything out after moveing)
                    About your power button solution;
                    Did you remove the red and black wire from the snes power switch and just solderd 1 of the 4 wires
                    (2 for power and 2 for data inside a usb cable right?) from the usb cable to the "small pcb" thingy that the snes red/black wires was solderd to? Sorry about going on and on, just wanna get it right..

                    RetroPC: https://retropie.org.uk/forum/topic/13048/the-1976-retropc-diy-retro-gaming-computer-build
                    Wallcab: https://retropie.org.uk/forum/topic/28324/wall-mounted-cab-2-0
                    Candy Cab: https://retropie.org.uk/forum/topic/34290/diy-candy-cab-arcade

                    1 Reply Last reply Reply Quote 0
                    • spannernick1S
                      spannernick1
                      last edited by

                      Like the lights on the cartridge,nice work.

                      1 Reply Last reply Reply Quote 1
                      • Morph-XM
                        Morph-X
                        last edited by Morph-X

                        @Dipkid

                        Don't be sorry, i'm glad to be of help!

                        I quickly made a drawing for you, obviously a lot easier than putting it into words. ;-)

                        This is how i did it. I just cut the white and green wire since data is not needed in this case. Hopefully it's of any use to you. And good luck!

                        Image

                        DipkidD 1 Reply Last reply Reply Quote 1
                        • DipkidD
                          Dipkid @Morph-X
                          last edited by

                          @Morph-X That is f**kin excellent! Just what I needed. Thank you so much.
                          I´ll post some pics after Im done.

                          RetroPC: https://retropie.org.uk/forum/topic/13048/the-1976-retropc-diy-retro-gaming-computer-build
                          Wallcab: https://retropie.org.uk/forum/topic/28324/wall-mounted-cab-2-0
                          Candy Cab: https://retropie.org.uk/forum/topic/34290/diy-candy-cab-arcade

                          edmaul69E 1 Reply Last reply Reply Quote 0
                          • edmaul69E
                            edmaul69 @Dipkid
                            last edited by

                            @Dipkid just so you know, you should test the wires with a multimeter to verify they are correct. Cheap chinese cables will mix up the red, white, green and black wires.

                            DipkidD 1 Reply Last reply Reply Quote 1
                            • DipkidD
                              Dipkid @edmaul69
                              last edited by

                              @edmaul69 yeah I´v been reading that, thanks for the heads up!

                              RetroPC: https://retropie.org.uk/forum/topic/13048/the-1976-retropc-diy-retro-gaming-computer-build
                              Wallcab: https://retropie.org.uk/forum/topic/28324/wall-mounted-cab-2-0
                              Candy Cab: https://retropie.org.uk/forum/topic/34290/diy-candy-cab-arcade

                              1 Reply Last reply Reply Quote 0
                              • Morph-XM
                                Morph-X
                                last edited by

                                You're most welcome. edmaul69 is right, you should make sure the wires are not messed up.

                                Looking forward to your progress!

                                1 Reply Last reply Reply Quote 1
                                • DipkidD
                                  Dipkid
                                  last edited by Dipkid

                                  Done! Thanks to @Morph-X for soldering tips!
                                  Also alot of praise to @Floob & TechTipsta for all of their YT tutorials, tips n tricks.

                                  0_1475833390028_20161006_223713.jpg

                                  1_1475833390029_20161006_225639.jpg

                                  2_1475833390030_20161006_230134.jpg

                                  It works like a charm. Very satisfying. Time to play som Paper Mario this weekend.

                                  RetroPC: https://retropie.org.uk/forum/topic/13048/the-1976-retropc-diy-retro-gaming-computer-build
                                  Wallcab: https://retropie.org.uk/forum/topic/28324/wall-mounted-cab-2-0
                                  Candy Cab: https://retropie.org.uk/forum/topic/34290/diy-candy-cab-arcade

                                  1 Reply Last reply Reply Quote 2
                                  • Morph-XM
                                    Morph-X
                                    last edited by

                                    Excellent! Very well done and i wish you loads of fun! ;-)

                                    1 Reply Last reply Reply Quote 1
                                    • I
                                      iVirtualZero @Dipkid
                                      last edited by

                                      @dipkid Poor SNES, now it’s just a boring emulation box with input lag and no cart support. I always wonder what people do with the original OEM board. I assume they throw it in the trash since they never mention anything about it.

                                      1 Reply Last reply Reply Quote -1
                                      • First post
                                        Last post

                                      Contributions to the project are always appreciated, so if you would like to support us with a donation you can do so here.

                                      Hosting provided by Mythic-Beasts. See the Hosting Information page for more information.