Syncing button leds with gameplay
-
@MeduZaPaT said in Syncing button leds with gameplay:
You will find a lot of different triggers coming out of MAME for different games, there is no standard, I have an Excel file I can share with you with most of them (outdated but better than nothing),
LAMP, LED, LIGHT, TRIGGER, KNOCKER, and a big etc.One project is to wire up a knocker for QBert so would appreciate any and all help and later on Santa is going to bring me some base shakers which will be fun to enable with LEDSpicer....
-
Its working! Its WORKING! Oh man I am over the moon, I understand (mostly!) now how it all hangs together and works and it does WORK :)
I have to say a massive thanks both of you for supporting this, @Folly & @MeduZaPaT
Its been a great education which I will put to good use. I will try to build some cool animations and triggers and whatever I want now :) -
Just an idea.
Can you summarise this topic in your first post, like a tutorial or is this too much to ask ? -
@Folly I feel like I should. To be honest I have been looking for years and apart from the Wiki, there is that post on attractmode and thats it. After all the input from you guys its the least I can do :)
-
Would be great ;-)
Take your time, no hurry.It's not done yet, I have to look at the Blinker and the Impulse stuff when I can.
And most likely more. -
@hopwon for the Knocker for QBert and others you have 3 options (maybe more) to connect the solenoid:
1 get a USB controller that support high current (like the paddrive)
2 build or get a circuit using transistors to control the solenoid.
3 use a relay to move the solenoid (also need a driver for the relay).
I also need to add a knocker to mine, I have everything but time to connect and test :(LEDSpicer support solenoids BTW :)
Trying to get the UI done ASAP, makes life easier, and you see things that are really hard to find by reading documentation

-
@hopwon said in Syncing button leds with gameplay:
@MeduZaPaT Thanks I am implementing your suggestions now :)
Incidently I found that, just for Galaxians there are two LEDs, P1 Start and P2 Start. When looking at the network output from mame I see (with one credit) lamp0 = 0, lamp0 = 1, lamp0 = 0, etc.
Put two credits in then:
lamp0 = 1
lamp1 = 1
lamp0 = 0
lamp1 = 0So its basically flashing both start buttons on and off.
Will LEDSpicer accept the whole string or does it not work with spaces in the text?in that case you have 2 TRIGGERS: lamp0 and lamp1
so you need something like this:........ <map type="Element" target="P1_START" trigger="lamp0" color="Blue" filter="Normal" /> <map type="Elemet" target="P2_START" trigger="lamp1" color="Red" filter="Normal" /> ........ -
@MeduZaPaT said in Syncing button leds with gameplay:
@hopwon for the Knocker for QBert and others you have 3 options (maybe more) to connect the solenoid:
1 get a USB controller that support high current (like the paddrive)
2 build or get a circuit using transistors to control the solenoid.
3 use a relay to move the solenoid (also need a driver for the relay).
I also need to add a knocker to mine, I have everything but time to connect and test :(I have a UltimateIO which is supposed to be able to drive "high current" but its still limited to 5v. I bought a 5v Solenoid to test but there was lots of heat and smoke so I stopped testing :)
I think I will put a relay from the UltimateIO and drive say a 12v soleniod via that. Much saferLike you I have all the parts, just not the time. Future project...
-
@Folly Small addition to your runcommand-onlaunch.sh to test if an individual game profile exists and if so loads it, if not load ByEmulator
#!/bin/bash

/home/pi/Lightgun/utils/sindenautostart.sh -a "$1" "$2" "$3" "$4"
# Get system name
system=$1
emulator=$2
rom=$3
command=$4


# rom_bn receives $rom excluding everything from the first char to the last slash '/'
rom_bn="${rom##*/}"
# rom_bn receives $rom_bn excluding everything from the last char to the first dot '.'
rom_bn="${rom_bn%.*}"
rom_xml=$rom_bn.xml

if [ -f "$system/$rom_xml" ]
        then
                emitter LoadProfile $system/$rom_bn
        else
                emitter LoadProfileByEmulator $rom_bn $system
fi
I've tested some games with "normal" names but I suspect this will be a bit buggy...
-
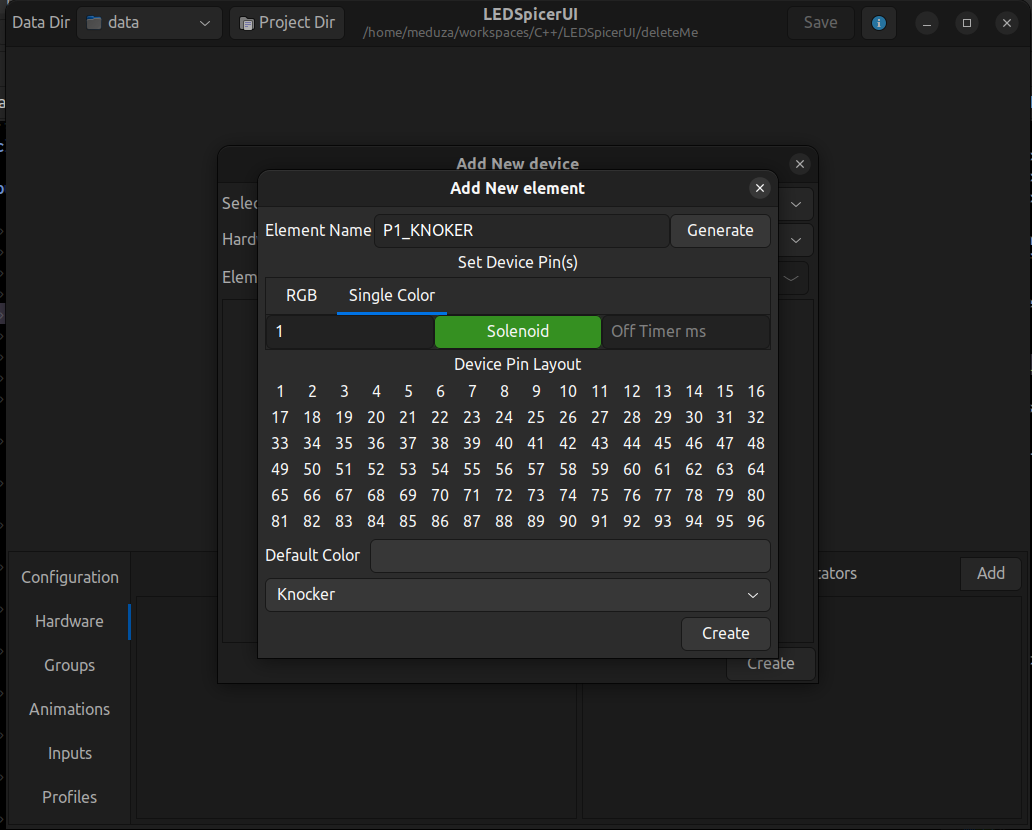
lets say you have a Solenoid on the pin # 1 of the ultimateIO
in the config inside the device section, you need something like this:<element name="KNOCKER" solenoid="1" onTime="75" />Where name is the element name you want to use, solenoid=<pin number> is the pin on the ultimateIO where the solenoid is connected, and onTime is the number of ms to send the electric pulse, 75ms is ok for most solenoids, but others needs more, you can play with this number until you get a good "kick".
solenoids needs to be shutdown after trigger, or they will overheat. -
@MeduZaPaT said in Syncing button leds with gameplay:
solenoids needs to be shutdown after trigger, or they will overheat.
I did not know this. I think thats why I got a lot of smoke when I last tried
-
@hopwon were you able to test the solenoid?
-
@MeduZaPaT nope, not got round to it yet
I got sidetracked by a new build.
Contributions to the project are always appreciated, so if you would like to support us with a donation you can do so here.
Hosting provided by Mythic-Beasts. See the Hosting Information page for more information.