Please do not post a support request without first reading and following the advice in https://retropie.org.uk/forum/topic/3/read-this-first
NO SOUND - Raspberry Pi Zero 2W + Retroflag GPi Case
-
Hello, I am struggeling with the GPi Case (B-Ware) that I got.
- I Install the Retropie via Raspberry Pi Imager for the correct model.
- I install the patch for the Display from the official Retroflag Servers
- wpa_applicant.conf and ssh
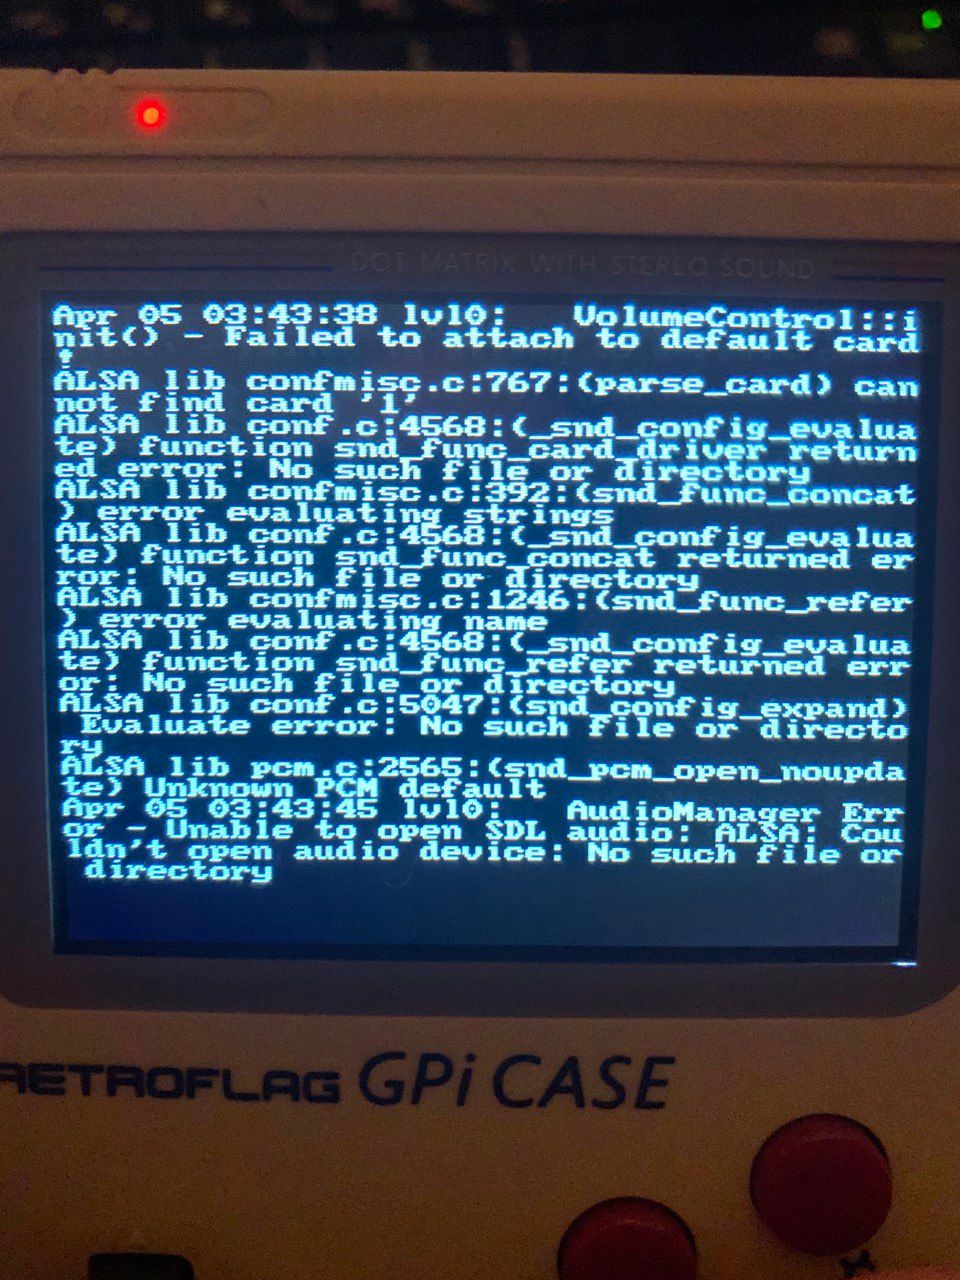
- I start the GPi and everything runs good, except that I dont have any soundcard detected.
I always get this error:

here is my config.txt
# For more options and information see
# http://www.raspberrypi.org/documentation/configuration/config-txt.md
# Some settings may impact device functionality. See link above for details

# uncomment if you get no picture on HDMI for a default "safe" mode
#hdmi_safe=1

# uncomment this if your display has a black border of unused pixels visible
# and your display can output without overscan
#disable_overscan=1

# uncomment the following to adjust overscan. Use positive numbers if console
# goes off screen, and negative if there is too much border
#overscan_left=16
#overscan_right=16
#overscan_top=16
#overscan_bottom=16

# uncomment to force a console size. By default it will be display's size minus
# overscan.
#framebuffer_width=1280
#framebuffer_height=720

# uncomment if hdmi display is not detected and composite is being output
#hdmi_force_hotplug=1

# uncomment to force a specific HDMI mode (this will force VGA)
#hdmi_group=1
#hdmi_mode=1

# uncomment to force a HDMI mode rather than DVI. This can make audio work in
# DMT (computer monitor) modes
#hdmi_drive=2

# uncomment to increase signal to HDMI, if you have interference, blanking, or
# no display
#config_hdmi_boost=4

# uncomment for composite PAL
#sdtv_mode=2

#uncomment to overclock the arm. 700 MHz is the default.
#arm_freq=800

# Uncomment some or all of these to enable the optional hardware interfaces
#dtparam=i2c_arm=on
#dtparam=i2s=on
#dtparam=spi=on

# Uncomment this to enable the lirc-rpi module
#dtoverlay=lirc-rpi

# Additional overlays and parameters are documented /boot/overlays/README

# Enable audio (loads snd_bcm2835)
dtparam=audio=on

#config_hdmi_boost=0

# force hdmi while the tv can take time before sending the signal on the hdmi output
#hdmi_force_hotplug=1

# uncomment for composite PAL
#sdtv_mode=2

# uncomment for lirc-rpi
#dtoverlay=lirc-rpi

# if you plug your tv at the same time as your rpi and that the rpi switches from the hdmi or give a low resolution because tv had no enough time to initialize it
boot_delay=3

# uncomment if you don't want the rainbow at startup
disable_splash=1

# default CEC name
cec_osd_name=recalbox

# Overclock
gpu_mem_256=128
gpu_mem_512=256
gpu_mem_1024=512

avoid_safe_mode=1

kernel=zImage

#dtparam=audio=on
display_rotate=1
dtoverlay=dpi24
overscan_left=0
overscan_right=0
overscan_top=0
overscan_bottom=0
framebuffer_width=320
framebuffer_height=240
enable_dpi_lcd=1
display_default_lcd=1
dpi_group=2
dpi_mode=87
dpi_output_format=0x6016
#hdmi_timings=320 0 28 18 28 480 0 2 2 4 0 0 0 60 0 32000000 6
hdmi_timings=240 1 38 10 20 320 1 20 4 4 0 0 0 60 0 6400000 1
dtoverlay=pwm-2chan,pin=18,func=2,pin2=19,func2=2
disable_pvt=1
disable_audio_dither=1
dtoverlay=pwm-audio-pi-zero
Please help!
-
Try to use the configuration file posted in this topic.
-
I use this config file now and it works:
# For more options and information see
# http://rpf.io/configtxt
# Some settings may impact device functionality. See link above for details

# uncomment if you get no picture on HDMI for a default "safe" mode
#hdmi_safe=1

# uncomment this if your display has a black border of unused pixels visible
# and your display can output without overscan
#disable_overscan=1

# uncomment the following to adjust overscan. Use positive numbers if console
# goes off screen, and negative if there is too much border
#overscan_left=16
#overscan_right=16
#overscan_top=16
#overscan_bottom=16

# uncomment to force a console size. By default it will be display's size minus
# overscan.
#framebuffer_width=1280
#framebuffer_height=720

# uncomment if hdmi display is not detected and composite is being output
#hdmi_force_hotplug=1

# uncomment to force a specific HDMI mode (this will force VGA)
#hdmi_group=1
#hdmi_mode=1

# uncomment to force a HDMI mode rather than DVI. This can make audio work in
# DMT (computer monitor) modes
#hdmi_drive=2

# uncomment to increase signal to HDMI, if you have interference, blanking, or
# no display
#config_hdmi_boost=4

# uncomment for composite PAL
#sdtv_mode=2

#uncomment to overclock the arm. 700 MHz is the default.
#arm_freq=800

# Uncomment some or all of these to enable the optional hardware interfaces
#dtparam=i2c_arm=on
#dtparam=i2s=on
#dtparam=spi=on

# Uncomment this to enable infrared communication.
#dtoverlay=gpio-ir,gpio_pin=17
#dtoverlay=gpio-ir-tx,gpio_pin=18

# Additional overlays and parameters are documented /boot/overlays/README

# Enable audio (loads snd_bcm2835)
dtparam=audio=on

[pi4]
# Enable DRM VC4 V3D driver on top of the dispmanx display stack
dtoverlay=vc4-fkms-v3d
max_framebuffers=2

[all]
#dtoverlay=vc4-fkms-v3d
gpu_mem_256=128
gpu_mem_512=256
gpu_mem_1024=256
overscan_scale=1

#Pi Zero 2 W GPi Config
dtoverlay=audremap,pins_18_19,swap_lr
display_rotate=1
dtoverlay=dpi24
overscan_left=0
overscan_right=0
overscan_top=0
overscan_bottom=0
framebuffer_width=320
framebuffer_height=240
enable_dpi_lcd=1
display_default_lcd=1
dpi_group=2
dpi_mode=87
dpi_output_format=0x6016
#hdmi_timings=320 0 28 18 28 480 0 2 2 4 0 0 0 60 0 32000000 6
hdmi_timings=240 1 38 10 20 320 1 20 4 4 0 0 0 60 0 6400000 1
Contributions to the project are always appreciated, so if you would like to support us with a donation you can do so here.
Hosting provided by Mythic-Beasts. See the Hosting Information page for more information.