RetroPie forum home
    • Recent
    • Tags
    • Popular
    • Home
    • Docs
    • Register
    • Login
    Please do not post a support request without first reading and following the advice in https://retropie.org.uk/forum/topic/3/read-this-first

    SNES Straight to GPIO

    Scheduled Pinned Locked Moved Help and Support
    gpiosnesdevgameconsnes
    28 Posts 9 Posters 19.9k Views
    Loading More Posts
    • Oldest to Newest
    • Newest to Oldest
    • Most Votes
    Reply
    • Reply as topic
    Log in to reply
    This topic has been deleted. Only users with topic management privileges can see it.
    • denisuuD
      denisuu
      last edited by denisuu

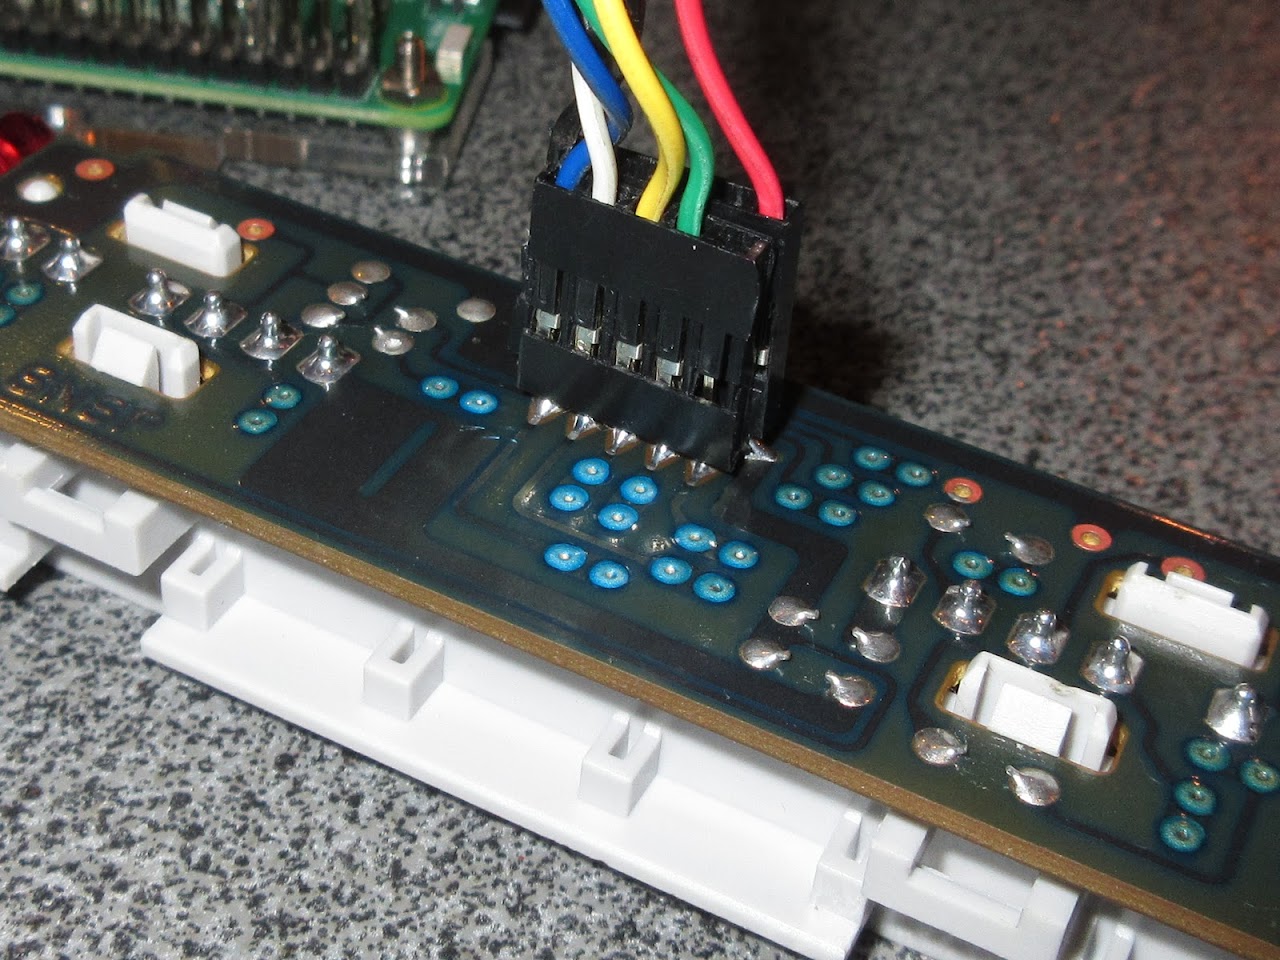
      I de-soldered the ports on the controller plate and made a layout, can anyone check if this is correct? Why does the comment above and wiki say to wire it to 3.3v while the controller needs 5v? I already have a RF module wired up to the red pin on the picture. I will get some rainbow jumper wires and solder them directly into the holes.

      alt text

      DarksaviorD 1 Reply Last reply Reply Quote 0
      • DarksaviorD
        Darksavior @denisuu
        last edited by Darksavior

        @denisuu Because it runs fine with 3.3v. I also fixed my issue with the pad working in retropie setup. I had to set the controller to Player 1. If you have any issues, please read the guide: https://github.com/retropie/retropie-setup/wiki/GPIO-Modules#gamecon_gpio_rpi

        denisuuD 1 Reply Last reply Reply Quote 0
        • denisuuD
          denisuu @Darksavior
          last edited by denisuu

          delete

          1 Reply Last reply Reply Quote 0
          • denisuuD
            denisuu
            last edited by

            I took some parts out of a old computer (header pins & audio connection cable) and soldered them onto the SNES plate. I used the recommended GPIO setup from the gamecon installer.

            But only button A is working on player 2. I'm pretty sure my soldering is good, and I suppose the wire thickness is also ok since the original ribon cable is very small. I read something about the 3 different revisions of controllers.

            The question is what can I do about it?

            alt text

            alt text

            alt text

            DarksaviorD 1 Reply Last reply Reply Quote 0
            • DarksaviorD
              Darksavior @denisuu
              last edited by

              @denisuu You need to bridge both clocks for both pads to work. I was having issues when I was using thin wires. I'm using whatever thickness IDE cables are.

              denisuuD 1 Reply Last reply Reply Quote 0
              • denisuuD
                denisuu @Darksavior
                last edited by

                @Darksavior

                Yea both clock's are bridged I checked all connections in the front ports with the RPI GPIO pins and the wiring is good. But when I push B it shows as if I push all buttons at once in jstest. IDE cables are very thin for sure these wire's are thicker. But maybe the cable is too long it's 67cm.

                I will reinstall retropie, find thicker wires and try again.

                Controller 2 doesn't want to do anything at all I tried (GPIO7=Pin26 or GPIO3=Pin05)
                With gamecon_gpio_rpi map=0,0,1,1,0,0 and 0,0,1,0,0,1...

                DarksaviorD B 2 Replies Last reply Reply Quote 0
                • DarksaviorD
                  Darksavior @denisuu
                  last edited by Darksavior

                  @denisuu
                  I'm using the default config retropie has for the gamecon driver which is 2 snes controllers. My wires are around half as long as of yours.
                  Pin1=3.3v
                  Pin5=D2
                  Pin6=GND
                  Pin7=D1
                  Pin19=C1/C2
                  Pin23=L

                  denisuuD 1 Reply Last reply Reply Quote 0
                  • denisuuD
                    denisuu @Darksavior
                    last edited by

                    @Darksavior

                    That works thanks!! It's a completely different layout then the Wiki and driver installer suggest tough. Also it turned out one of my controllers just isn't working :P

                    alt text

                    Anyway I made a small fool tutorial here

                    1 Reply Last reply Reply Quote 0
                    • DarksaviorD
                      Darksavior
                      last edited by

                      The gamecon installer pinout is almost correct except for the player pins need to be switched around. No need for a tutorial but ok...

                      denisuuD 1 Reply Last reply Reply Quote 0
                      • denisuuD
                        denisuu @Darksavior
                        last edited by

                        @Darksavior I realize that now by looking at the picture again that I was just stupid. I put clock and latch at the wrong place the whole time because I just counted one empty pin from the bottom. Anyway I'm happy It's finally working.

                        alt text

                        1 Reply Last reply Reply Quote 0
                        • B
                          beudbeud @denisuu
                          last edited by

                          @denisuu Hi i have the same problem i wanna how you do for fix it?

                          1 Reply Last reply Reply Quote 0
                          • First post
                            Last post

                          Contributions to the project are always appreciated, so if you would like to support us with a donation you can do so here.

                          Hosting provided by Mythic-Beasts. See the Hosting Information page for more information.