mintyPi Build
-
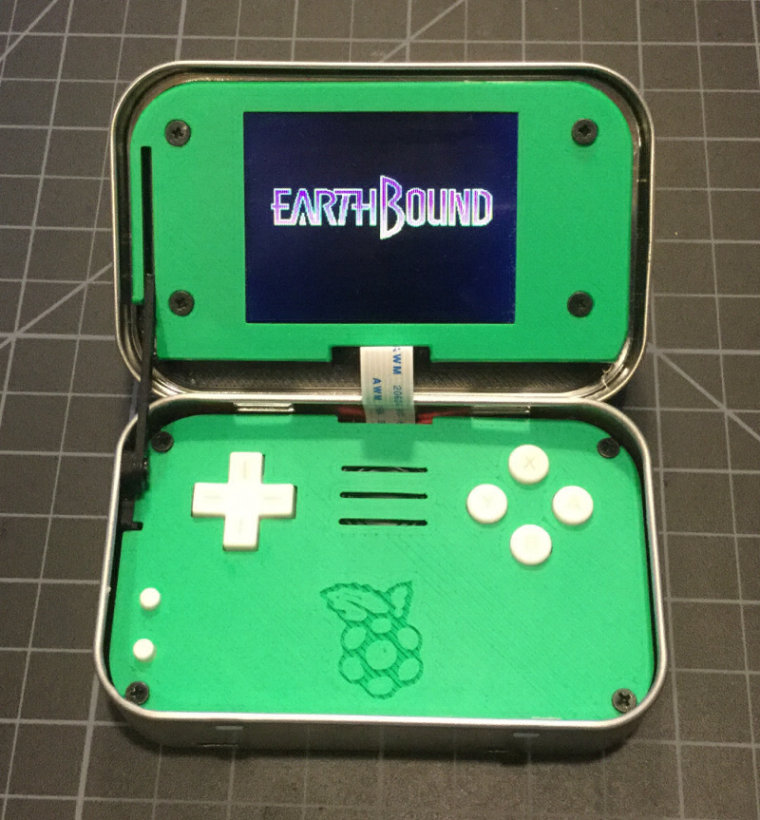
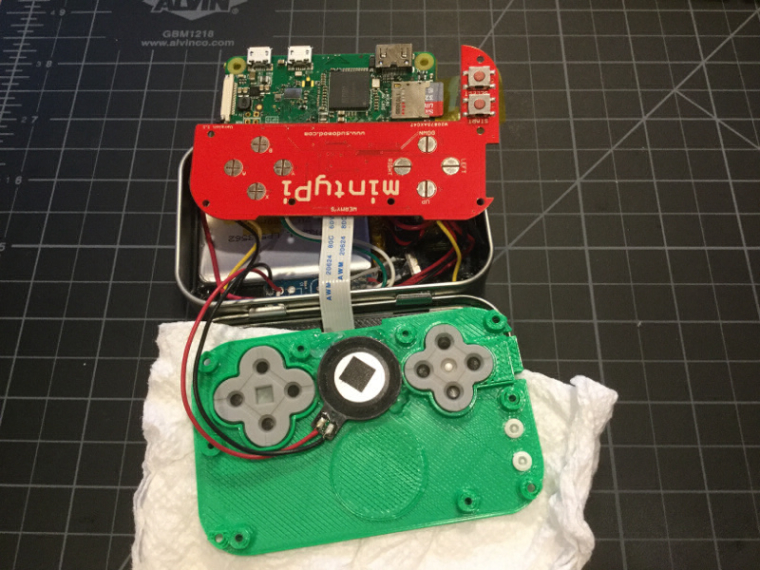
The amazing @wermy and helder joined forces to make a great kit and guide to put a Pi Zero into an Altoids tin. While it felt like cheating at times because all the steps were figured out for me ahead of time, it was certainly an exercise in patience. Between soldering the Pi to the custom PCB and making the holes in the tin to the "10 pounds of stuff in a 5 pound bag" aspect of it, I learned a lot with this build and managed to get it done in basically a weekend. Here's a short video of the finished product in action
-
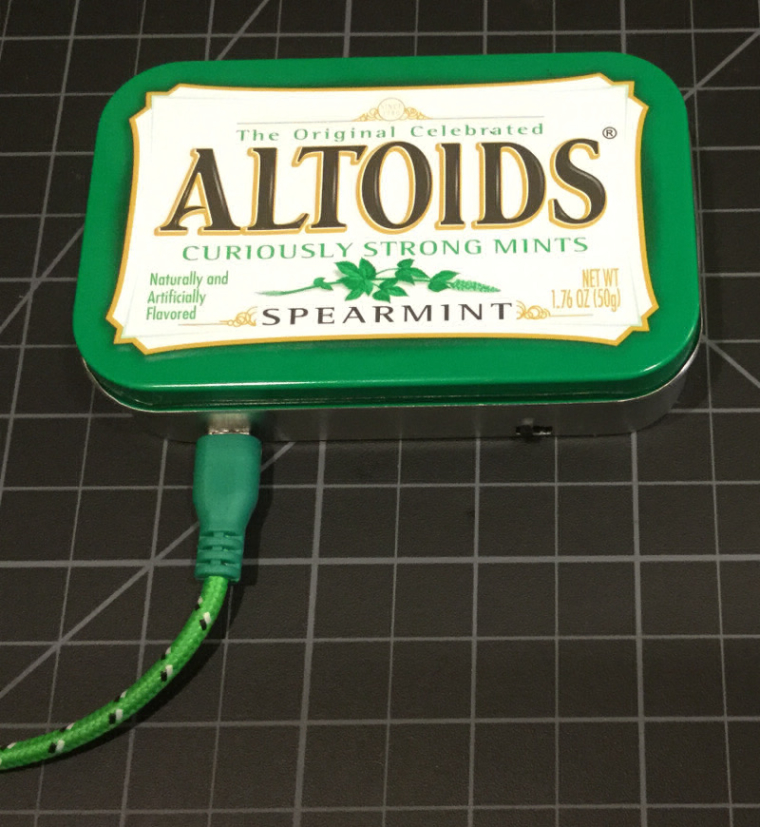
@obsidianspider Fantastic. I saw the instruction video just a few hours after it was posted and I am convinced that I want to do one of these at some point. Yours looks great. You even have a matching charge cord! Nicely done.
Any additional tips you would pass along to someone thinking about pulling the trigger? Any parts that were hard to source?
Also, how’s the battery life in practice? Can you play while charging? I was holding a tin the other day and thinking that my fingers would bump the lower edge of the lid when trying to manipulate the shoulder switches. Does the sliding bracket keep the screen at a good angle so that doesn’t happen?
-
@caver01 said in mintyPi Build:
@obsidianspider Fantastic. I saw the instruction video just a few hours after it was posted and I am convinced that I want to do one of these at some point. Yours looks great. You even have a matching charge cord! Nicely done.
Thanks! It's the first handheld I actually finished! Haha.
Any additional tips you would pass along to someone thinking about pulling the trigger? Any parts that were hard to source?
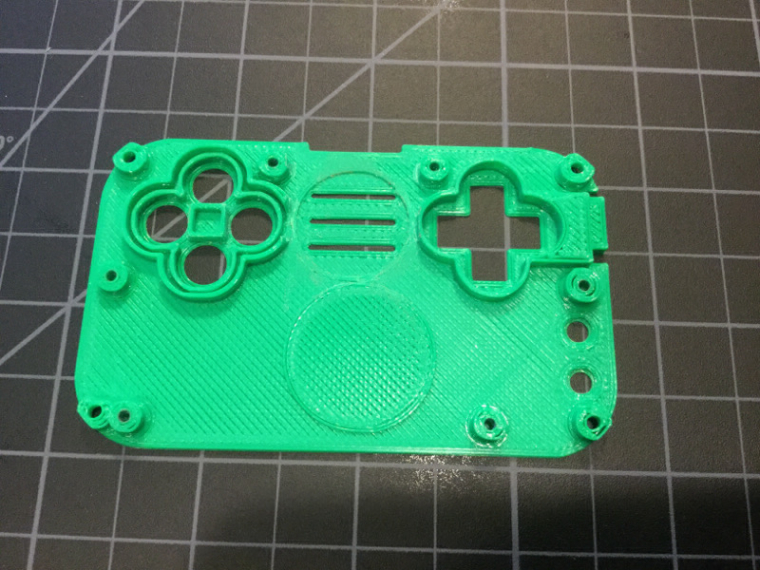
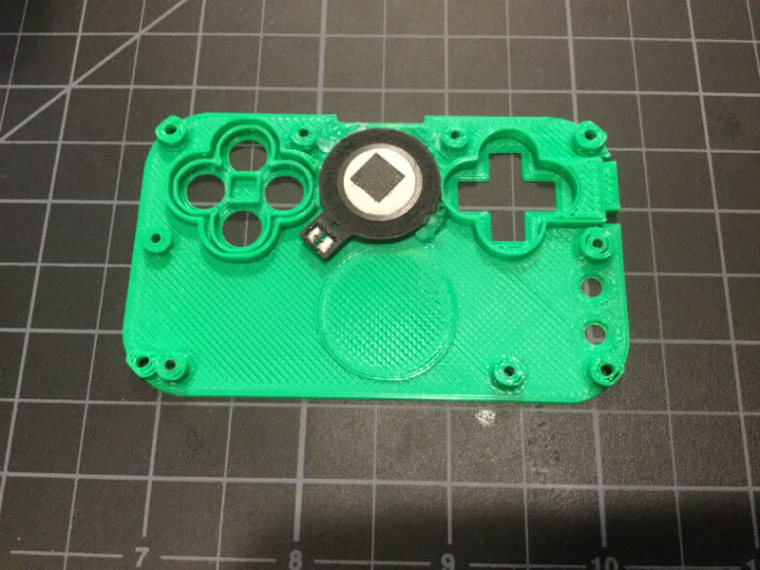
I used a broken DS Liite for the buttons, membranes, and a speaker. It was cheaper than buying those bits individually but I had to tweak one of the 3D printed parts to get the speaker to fit.
Soldering the Pi to the custom PCB is a PITA. Take your time and use your meter to verify everything, then add a little more solder. I thought I had things ok based on my meter beeping, but the screen was flickering and buttons weren't responsive. I think it was due to bad connections. Going over all the connections again and adding a touch more solder made it stable.
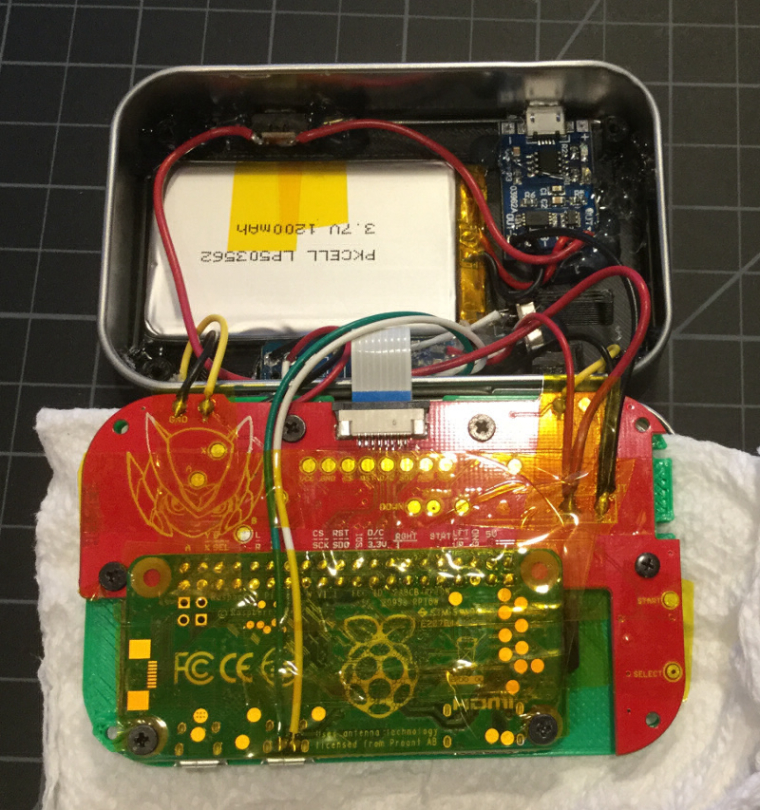
I ripped out one of the pads on the sound card when removing the USB plug, but I was able to figure out where it went and I tapped into a resistor.
The parts weren't hard to get though some required waiting a month for things to arrive from China. Adafruit has some things like the battery and power switch that aren't overpriced but they do have a significant minimum shipping charge. I always pick up a Pi0/W when I place an order to make it more worth my while.
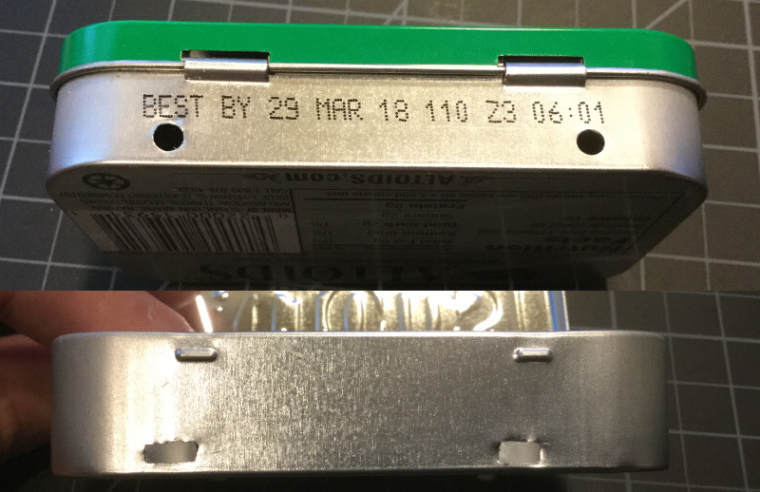
Be patient when making holes in the tin. I used one to practice with and with this second tin things are better, but still not great.
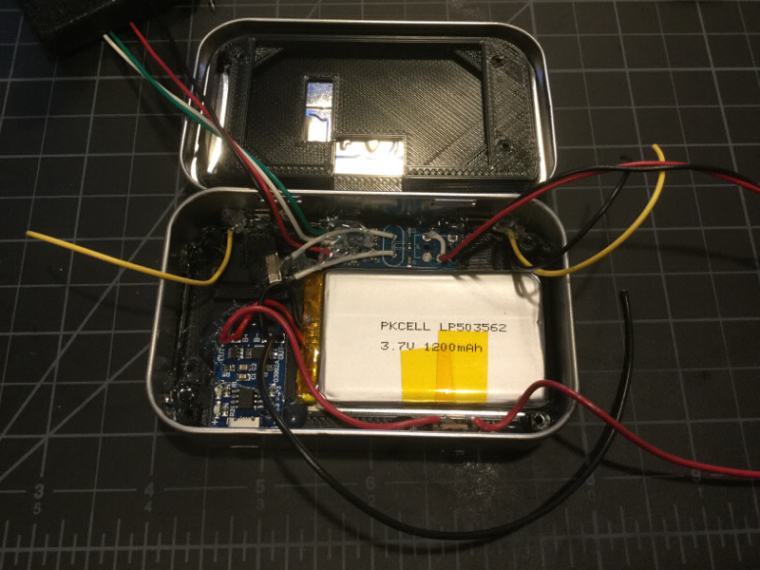
Things are a bit smooshed in the bottom. I'm not sure how it will hold up long term, or how long the ribbon cable will tolerate the pinching when the case opens and closes all the time.
Also, how’s the battery life in practice?
I have no idea. I just finished it an hour or so ago.
Can you play while charging?
The cheap charge/protect board seems to tolerate it. I can plug it in while the system is running but I have no way to know if it's actually charging or not. I have it plugged in now to see if it will charge the battery fully. I think there is a second LED that will turn blue to let me know it's fully charged. Either that or the red LED I'm seeing means it's doing something other than charging. 😉
I was holding a tin the other day and thinking that my fingers would bump the lower edge of the lid when trying to manipulate the shoulder switches. Does the sliding bracket keep the screen at a good angle so that doesn’t happen?
Screen angle isn't bad, but the lip of the tin takes some getting used to. Also, the buttons aren't as responsive as on a real DS or Gameboy. It's a novelty, and it works, but it's not an ideal form factor for hardcore gaming. The shoulder buttons work, but they're teeny and your fingers bump the lid. I don't play many games that require a ton of L and R, so I'm ok with it.
If it doesn't explode while I charge it tonight I'll try putting it in my pocket and playing it on the go for a while. It's much smaller than my 3DS, but since it's only a Pi0 some games stutter a bit.
That all I can think of right now, but it's after midnight and my brain is a bit fried. If I think Of anything else, I'll chime in later. 🙂
-
@obsidianspider nice job. I recognize the minty pi maker. He made my gameboy zero board. I built a gameboy zero for my buddy. Now if i could just get started on mine...
-
Very nice. This is on my never ending to do list as well
If you read the documentation it will answer 99% of your questions: https://retropie.org.uk/docs/
Also if you want a solution to your problems read this first: https://retropie.org.uk/forum/topic/3/read-this-first
-
@obsidianspider you even got a green usb cable to match!! :P
-
Unbelievable build. Perfect example, that you can use anything for these things. Cigar box would be also pretty neat to use for this, might do that at some point.
-
Well, it didn't explode overnight while charging and the little cheap charge/protect board does in fact have a LED that turns blue when the battery is done charging. I have no way to see how much "juice" is left in the battery at any given time, but I don't plan on playing this for hours on end anyway. That said, if there was a way to do it with software that would be really cool.
-
@herb_fargus said in mintyPi Build:
Very nice. This is on my never ending to do list as well
Considering that I still have three partially built handhelds myself, I get it. That said, this "quick win" has inspired me to get back to my mothballed builds that are sitting in boxes.
-
@obsidianspider outstanding! Looks great man!
-
Great work on this and glad you finished your first portable build ;-)
I have a question:
How hard is it to get to the microSD card slot after this is put together?I actually picked up a New 3DS XL about 3 weeks ago and have been playing The Legend of Zelda: A Link Between Worlds in my spare time. Finally finished it over the weekend but I'm missing 3 heart pieces (which you get from extremely hard mini games).
-
-
@backstander said in mintyPi Build:
Great work on this and glad you finished your first portable build ;-)
Yeah, yeah… 😜
I have a question:
How hard is it to get to the microSD card slot after this is put together?Not hard at all. I tested with two different cards before my 32GB one came in the mail. You slide it under the custom PCB. The PCB has some flex to it and between that and the angle of the dangle of the SD card, it works just fine. Now, getting the card out once the whole thing is assembled? It'd be a pain in the butt to take apart the whole device. That's why wermy suggests a Pi 0W, and for the extra $5, it's very worth it.
I actually picked up a New 3DS XL about 3 weeks ago and have been playing The Legend of Zelda: A Link Between Worlds in my spare time. Finally finished it over the weekend but I'm missing 3 heart pieces (which you get from extremely hard mini games).
I love my n3DSXL
As @lilbud said, I highly recommend putting custom firmware on it. As long as you don't mind voiding your warranty, I find the convenience of being able to backup my games to the Micro SD very worth it. No losing games or swapping them out when I travel.
-
Now, getting the card out once the whole thing is assembled? It'd be a pain in the butt to take apart the whole device. That's why wermy suggests a Pi 0W, and for the extra $5, it's very worth it.
That's what I was worried about but I could see why you'd want to use the Pi 0W. I guess you can cross that bridge if you ever have to re-flash it ;-)
I love my n3DSXL
I do too! I'm glad I picked one up! I haven't gotten on this site in about a month because of my n3DSXL and being really busy at work.
As @lilbud said, I highly recommend putting custom firmware on it. As long as you don't mind voiding your warranty, I find the convenience of being able to backup my games to the Micro SD very worth it. No losing games or swapping them out when I travel.
Already have! I did this about 2 weeks ago. I got it used off of eBay so I'm not worried about the warranty. If I would have purchased it new I probably wouldn't have done it.
I couldn't get any of the libretro emulators to work (except for the PSX one but it was super slow motion!). It crashes the second I try to load a game. I've tried both the nightly and the last stable release, neither worked for me but I did get non-libretro emulators working though.
Last night I started on Legend of Zelda: Ocarina of Time 3D which you can get the Nintendo Selects version for $14.99 at Walmart.com!
-
@backstander It's not awful to take apart, but it's not like there's a little access slot that you can just pop it out.
I actually noticed today that my
Startbutton was sticking, so I took thinks apart to tweak the hole a bit, then I readjusted the wiring and smooshed it all back in there. The lid closes a bit better now, but I noticed that the action buttons are bumping the screen when you close it. I can't really find a way to reduce the wiring on the hinge side since that's where most of the connections are located, but for what it is, it works. -
@obsidianspider i noticed in their video that they are using silicone insulated wiring and only the thicker stuff where power is concerned. I would think that even the thickness of wire would affect the fit.
I was looking at your image and wondering if the wires could be soldered to lay low around the perimeter of the battery, but I know it still has to expand out while you have it disassembled. It seems like wire management is key to getting everything to fit.
-
@caver01 I tried making things as neat as I could, but it's still very tight. I used 22ga for the power and 28ga for everything else.
-
Not a fault of wermy, but more an issue with 3D printing in general: I found that in games where you have to press more than one action button at the same time (think rolling your thumb from
BtoAin Mario Kart to fire a shell while still driving) the buttons can bind up. I found that they're getting stuck on the ribs created by the 3D printing process itself. I tried some light sanding, but I also don't want to remove too much so they'd flop around. It's not ideal. If you press straight down, everything is fine, but if you can't do anything too complex with the controls.The whole idea of a mintyPi is to be a novelty, not a hardcore gaming machine, but it's worth knowing.
-
@obsidianspider Did you print your parts with ABS filament? If so, you can smooth out a lot of those ridges in between layers by treating the pieces with acetone vapour for a short time. If you used PLA or something else, you could also try using a rotary cutter with a cone-shaped sanding bit on it. That would make the holes nice and smooth without widening them too badly I think.
This is an awesome build, and I think I may have to make one of these minty pi's one day.
-
@natron I'm not sure what material was used. I bought them from wermy as I don't have a 3D printer.
Contributions to the project are always appreciated, so if you would like to support us with a donation you can do so here.
Hosting provided by Mythic-Beasts. See the Hosting Information page for more information.