RetroPie forum home
    • Recent
    • Tags
    • Popular
    • Home
    • Docs
    • Register
    • Login

    Roadcase (somewhat) Portable Arcade

    Scheduled Pinned Locked Moved Projects and Themes
    arcadevertical screenportable
    42 Posts 13 Posters 32.5k Views
    Loading More Posts
    • Oldest to Newest
    • Newest to Oldest
    • Most Votes
    Reply
    • Reply as topic
    Log in to reply
    This topic has been deleted. Only users with topic management privileges can see it.
    • caver01C
      caver01 @caver01
      last edited by caver01

      The top panel is composed of acrylic and plywood stacked together. Yet, it's still not enough depth to flush-mount the trackball. Most panel builders have to do some routing to make a trackball sit flush, but here, I need to add depth. I did add the U-Trak bezel to my order, but this was a fallback. I was hoping to mount it nearly flush with the top surface. Using some extra plexi I had from previous projects, I built a spacer:
      0_1497066833771_img_2036-e1466616859292.jpg

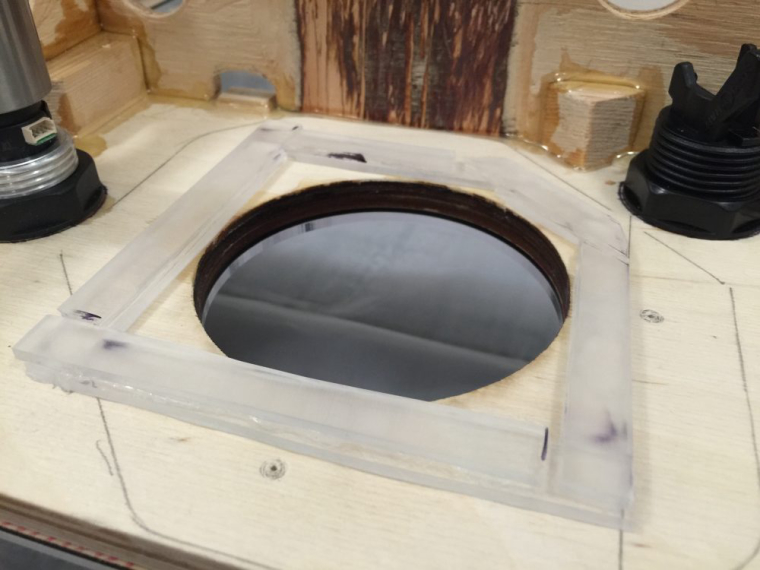
      Everything is upside-down and reversed in these views underneath the panel. Here, the flat plexi spacer will create more depth so that the trackball can sit perfectly flush with the acrylic surface.

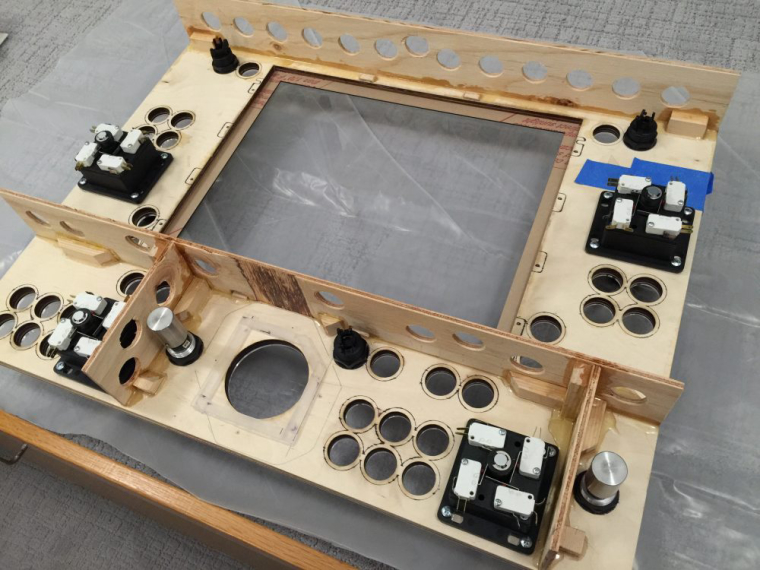
      Adding more reinforcements and test fitting the joysticks and spinners:
      0_1497066843987_img_2038-e1466617144693.jpg

      My 4-player cocktail style cabinet built as a custom "roadcase"

      caver01C 1 Reply Last reply Reply Quote 1
      • caver01C
        caver01 @caver01
        last edited by caver01

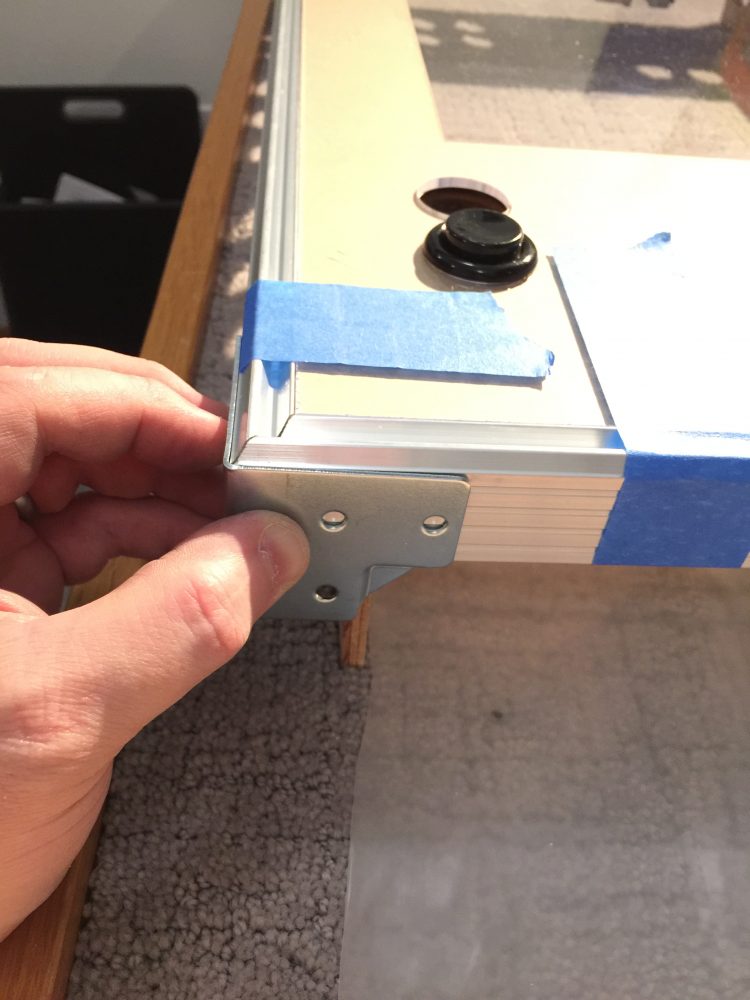
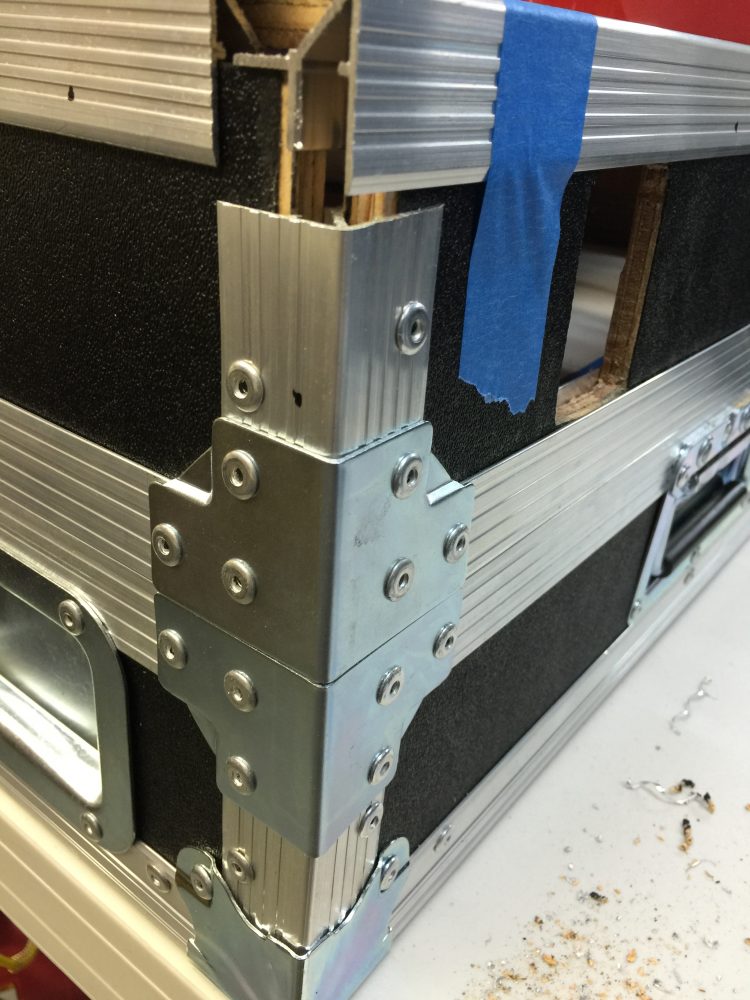
        Starting to cut extrusions for the roadcase "box" that will be the arcade cabinet itself:
        0_1497066888579_img_2057-e1466616896679.jpg

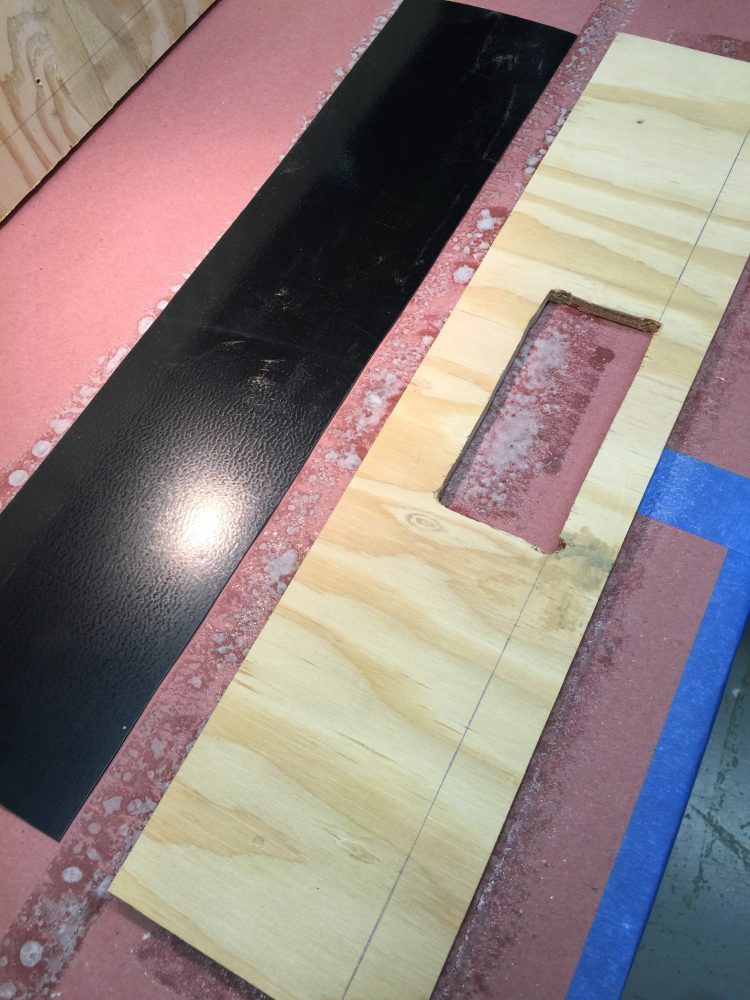
        Cutting side panels with handle holes and ABS roadcase laminate.
        0_1497066896965_img_2068-e1466617122483.jpg

        Building the box:
        0_1497066908522_img_2088-e1466617029280.jpg

        My 4-player cocktail style cabinet built as a custom "roadcase"

        1 Reply Last reply Reply Quote 2
        • caver01C
          caver01
          last edited by caver01

          These holes will be hidden behind the latch strike plate. They serve as clever audio vents for the speakers. Old-school video games aren't exactly high fidelity, but this will allow plenty of volume to get out.
          0_1497066959988_img_2089-e1466616934332.jpg

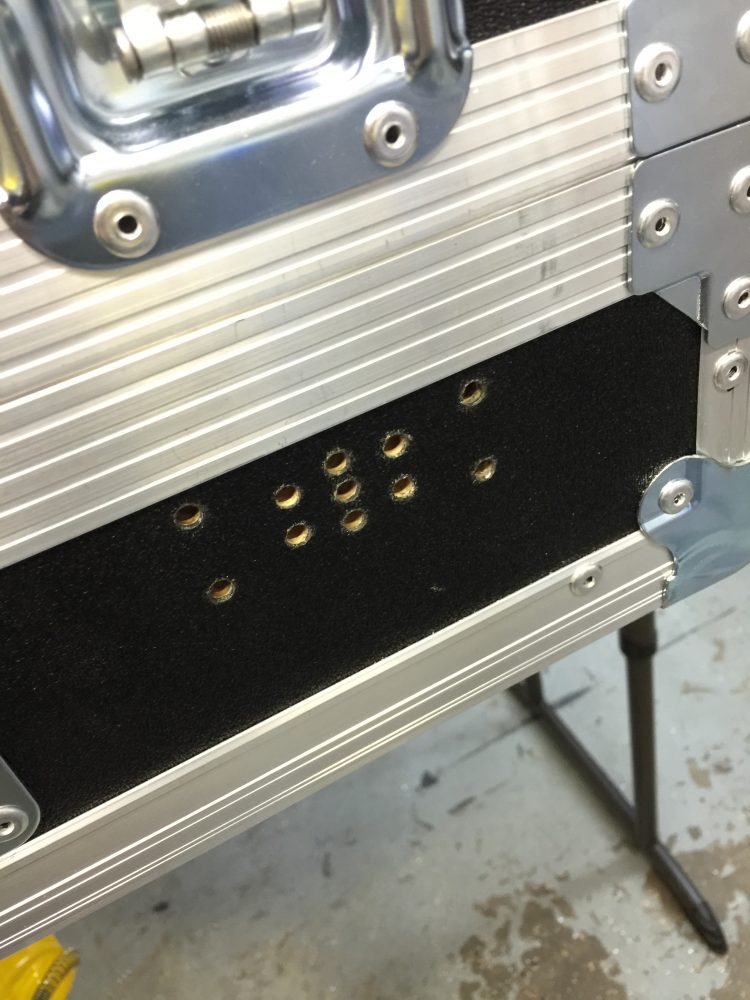
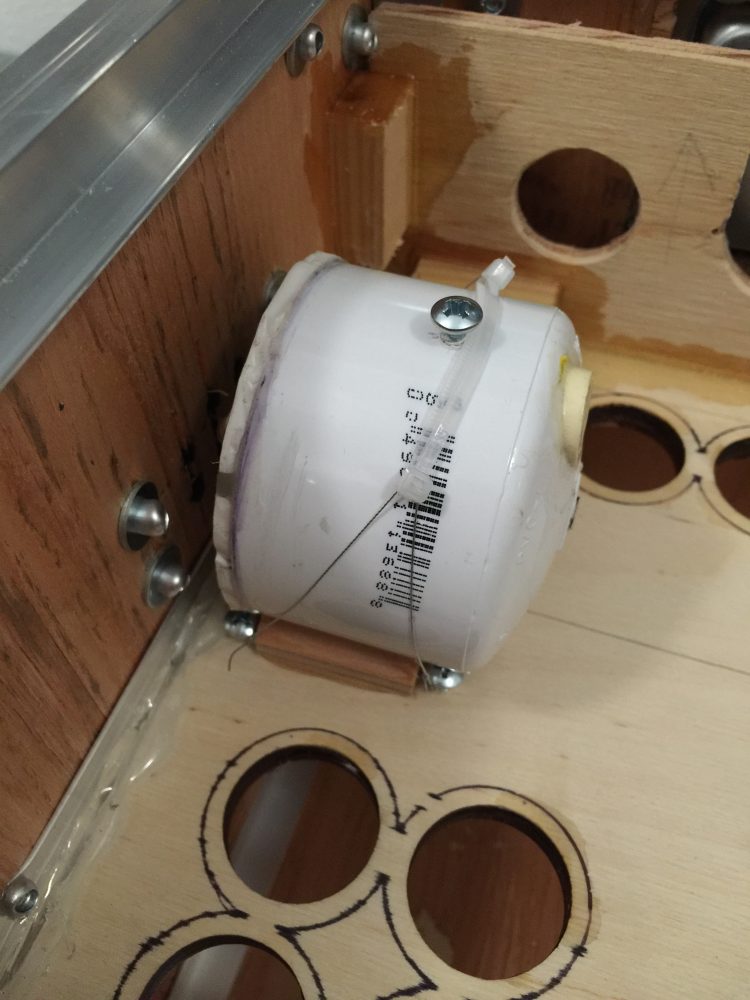
          My speakers were built with cheap enclosures that I couldn't mount easily, so I took out the drivers and put them into PVC pipe end caps. They are mounted inside the cabinet behind the holes drilled in the image above.
          0_1497066973345_img_2091-e1466616996100.jpg

          My 4-player cocktail style cabinet built as a custom "roadcase"

          caver01C 1 Reply Last reply Reply Quote 1
          • caver01C
            caver01 @caver01
            last edited by caver01

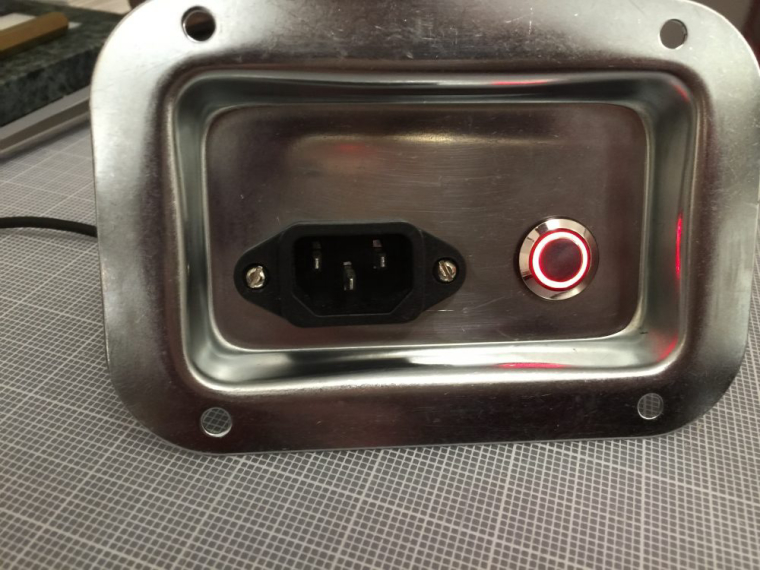
            Starting to get fun now, I am adding the power panel.
            0_1497067126308_img_2070-e1466617052959.jpg

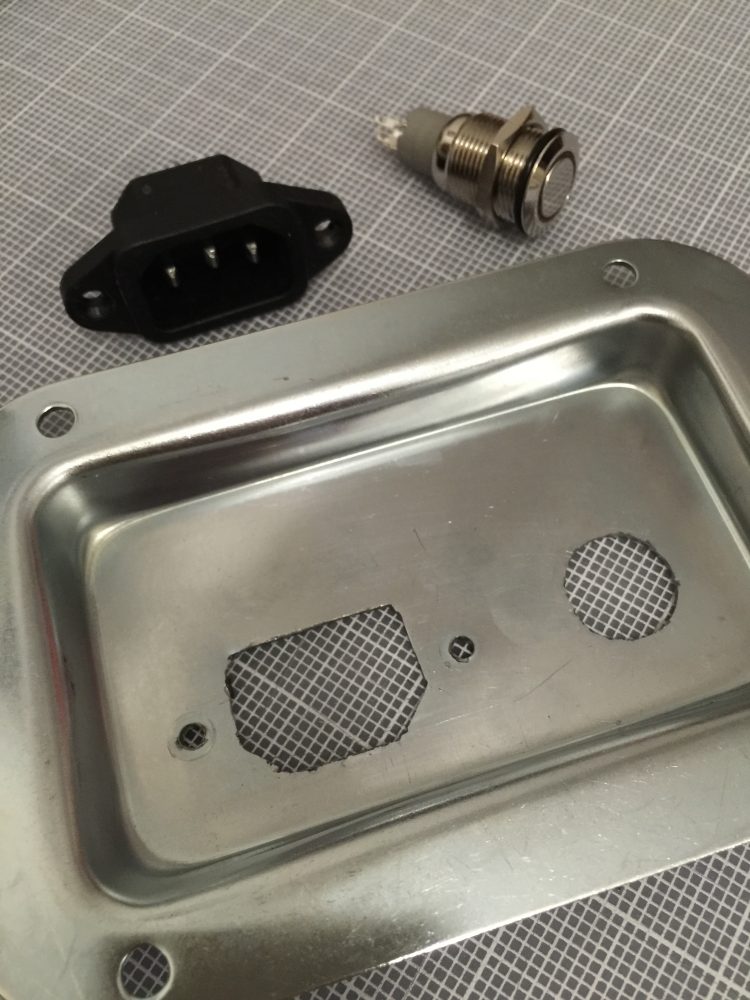
            Testing the panel. The power button has a built-in LED setup for 5V. Everything inside the box will get AC through this power plug--no additional cords.
            0_1497067135407_img_2071-e1466617097411.jpg

            My 4-player cocktail style cabinet built as a custom "roadcase"

            caver01C 1 Reply Last reply Reply Quote 2
            • caver01C
              caver01 @caver01
              last edited by caver01

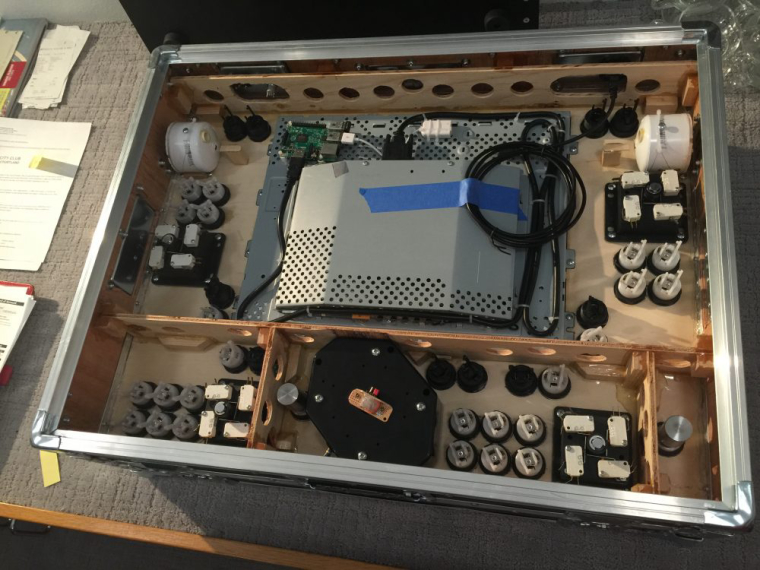
              Box built, power panel installed. The Display is now resting in place and the Raspberry Pi is mounted.
              0_1497067200767_img_2092-e1466617167465.jpg

              The buttons are now installed. Soon, IPAC 4, power strip, USB Hub, U-Trak and spinners interfaces. . .then the long process of wiring.
              0_1497067215217_img_2096-e1466617133543.jpg

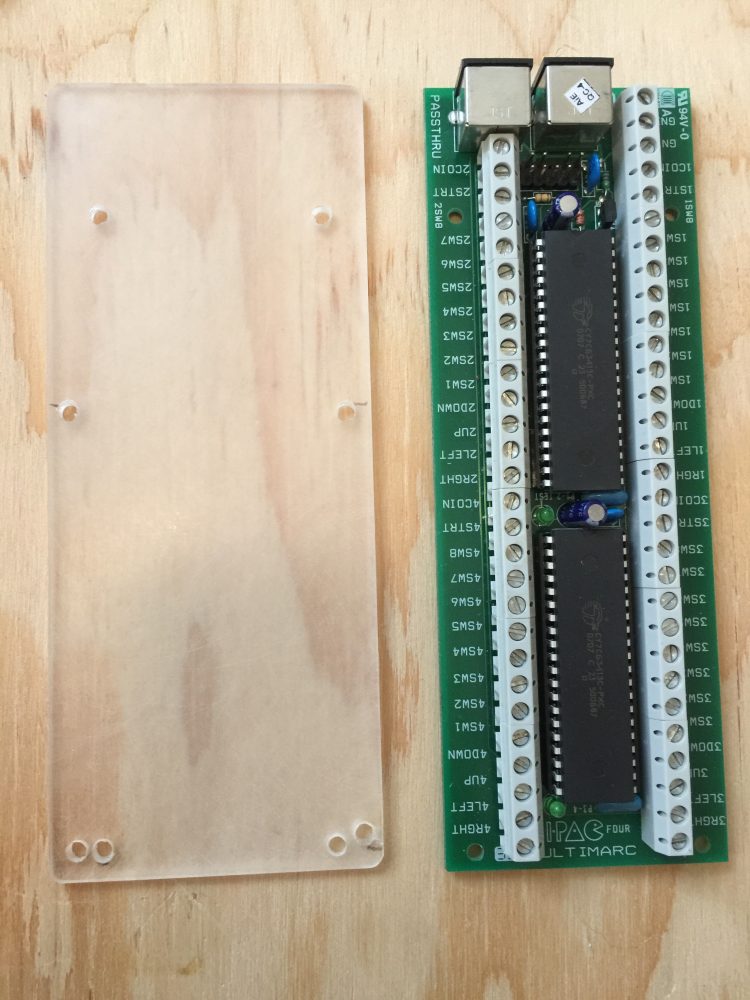
              I made a mounting bracket for the IPAC to keep it from shorting against the display:
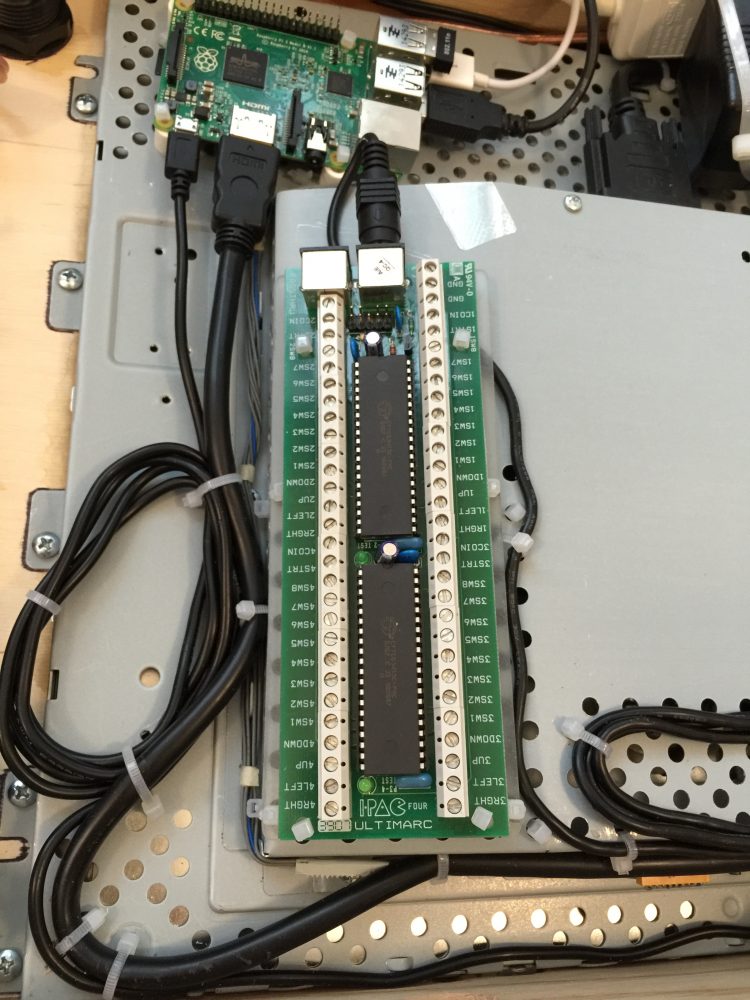
              0_1497067227570_img_2103-e1466617005917.jpg

              Mounting the IPAC4:
              0_1497067246583_img_2105-e1466617072808.jpg

              My 4-player cocktail style cabinet built as a custom "roadcase"

              caver01C 1 Reply Last reply Reply Quote 2
              • caver01C
                caver01 @caver01
                last edited by caver01

                Wiring the pushbuttons and joysticks:
                0_1497067359432_img_2106-e1466617108753.jpg

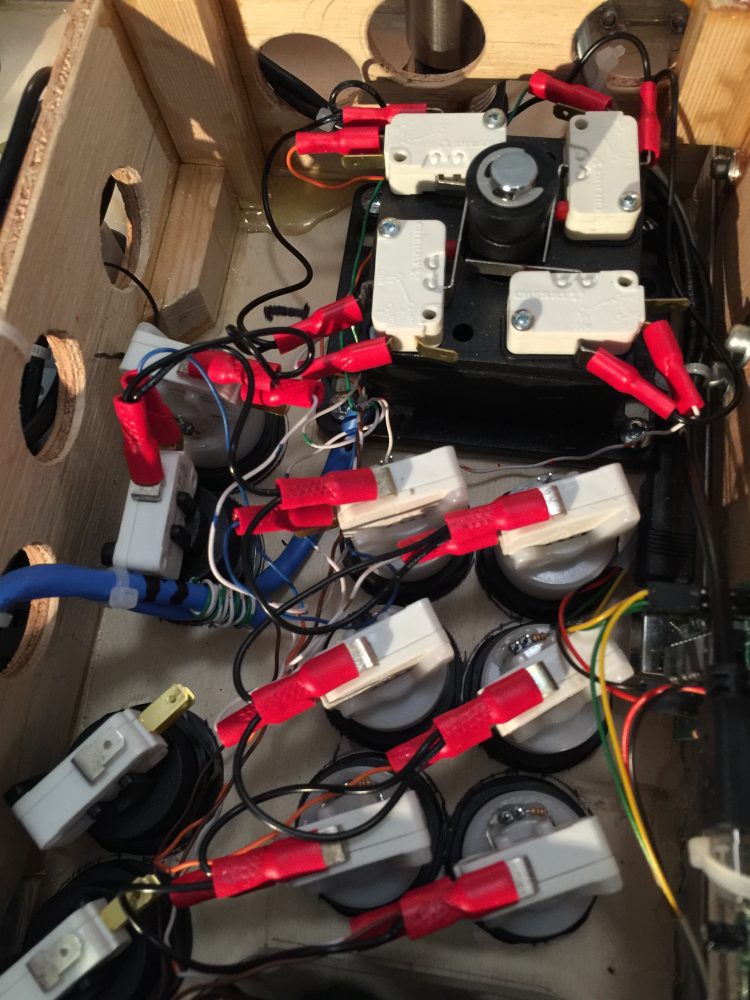
                Wiring complete. This is the inside with everything done, including the power for the LED lighting.
                0_1497067365975_img_2126-e1466615834682.jpg

                My 4-player cocktail style cabinet built as a custom "roadcase"

                1 Reply Last reply Reply Quote 4
                • caver01C
                  caver01
                  last edited by caver01

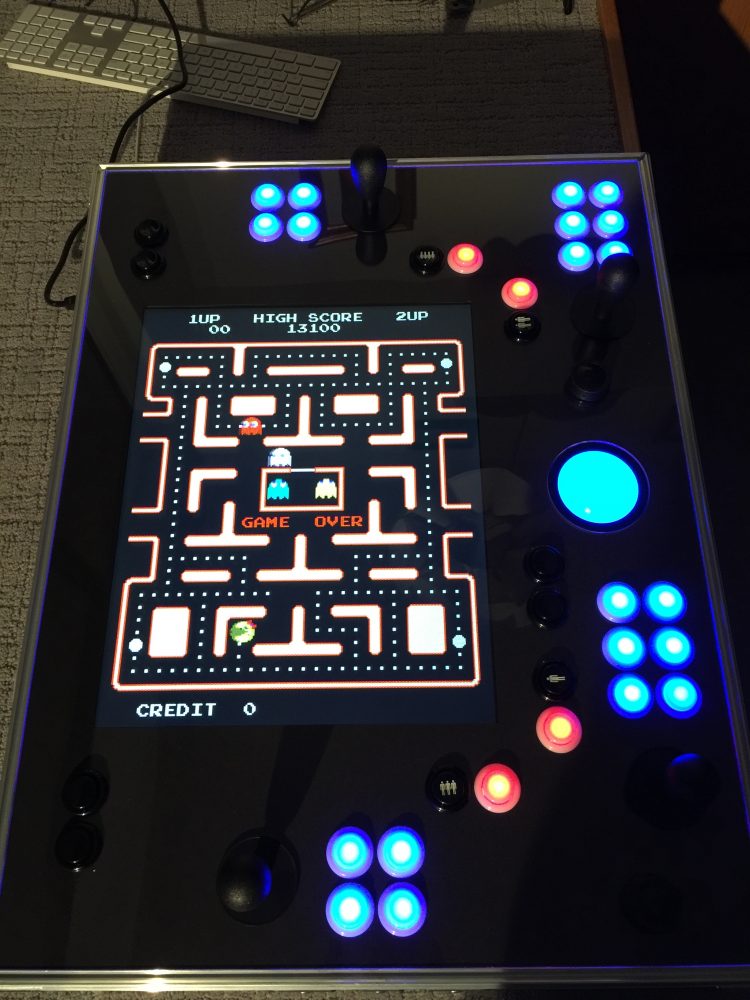
                  The build is finished! This image shows early gameplay tests using AdvanceMAME:
                  0_1497067493157_img_2124-e1466617062415.jpg

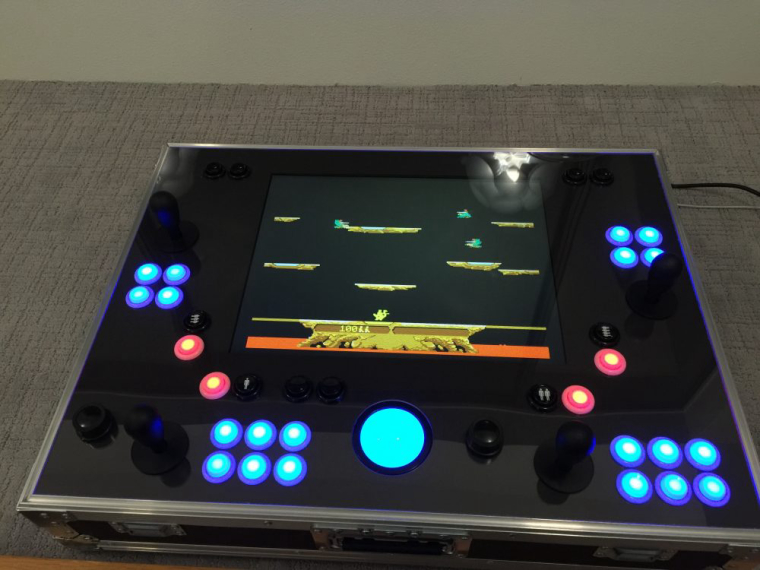
                  Vertical games play in cocktail mode from the player 3 and 4 positions on the sides:
                  0_1497067499805_img_2133-e1466617040834.jpg

                  My 4-player cocktail style cabinet built as a custom "roadcase"

                  9 1 Reply Last reply Reply Quote 9
                  • 9
                    93sugar @caver01
                    last edited by 93sugar

                    @caver01 Awesome! Great idea implemented excellently and explained wonderfully. Thank you! I'm looking to upgrade a cabinet I built about 6 or 7 years ago. UA Arcade Cabinet
                    UA Arcade Controller

                    1 Reply Last reply Reply Quote 0
                    • dankcushionsD
                      dankcushions Global Moderator
                      last edited by

                      really really nice!

                      caver01C 1 Reply Last reply Reply Quote 0
                      • caver01C
                        caver01 @dankcushions
                        last edited by

                        @dankcushions @93sugar Thanks!

                        My 4-player cocktail style cabinet built as a custom "roadcase"

                        1 Reply Last reply Reply Quote 0
                        • PingSpikeP
                          PingSpike
                          last edited by

                          Absolutely AMAZING project build!!!

                          Props man, I am seriously impressed and ever so slightly jealous lol :))

                          Here's my RetroStation project - http://www.pingspike.com/retrostation-part-4/

                          :D

                          caver01C 1 Reply Last reply Reply Quote 0
                          • caver01C
                            caver01 @PingSpike
                            last edited by

                            @PingSpike Thanks! This was literally years in the making. It came together nicely once I started the build, but I was "building" it in my mind for years.

                            I appreciate yours for different reasons. There's something to be said for portability and versatility--you can hook that up to any TV setup, bring it to a friend's house etc. Mine is a little more of an imposition.

                            My 4-player cocktail style cabinet built as a custom "roadcase"

                            1 Reply Last reply Reply Quote 1
                            • caver01C
                              caver01
                              last edited by caver01

                              Wow. I finally have my images working again. Sorry about that. At first they were too big, then my free provider clamped down on the bandwidth usage (own fault I guess) so I moved them to another site and accidentally set that site to private (can you believe this?). All better now though!

                              My 4-player cocktail style cabinet built as a custom "roadcase"

                              1 Reply Last reply Reply Quote 0
                              • C
                                chigundo
                                last edited by

                                The inspiration from this build is palpable. I like how you stripped that LCD from its casing and was able to accurately measure it's fit to the back of that plywood/acrylic. That step alone would have me pulling hair out.

                                caver01C 1 Reply Last reply Reply Quote 0
                                • caver01C
                                  caver01 @chigundo
                                  last edited by

                                  @chigundo Thanks! That step was definitely a risk. I probably had plenty of tolerance with the plywood, as I ultimately fixed the position when the screws went in. As for the flat acrylic bezel (beneath the clear)--this needed to cover the metal frame on the display, but not encroach into the viewing area more than a couple of mm on all sides. That was a gamble, as I had a local service laser-cut the acrylic with Illustrator files I provided (actually, they laser cut the plywood and the clear acrylic top for me too). This helped because all of the button holes were a guaranteed match, and if the screen cutout was off a little, I could adjust the position of the display before screwing it down tight.

                                  My 4-player cocktail style cabinet built as a custom "roadcase"

                                  1 Reply Last reply Reply Quote 0
                                  • D
                                    drizzt77
                                    last edited by

                                    This is fantastic! I would love to build something similar. I wondering what you used to design and print the layout for the top to have it cut? Is there some software or did you draw it by hand?

                                    caver01C 2 Replies Last reply Reply Quote 1
                                    • caver01C
                                      caver01 @drizzt77
                                      last edited by caver01

                                      @drizzt77 thanks. I drew it in Adobe Illustrator based on actual measurements of the display's steel framing, button holes, and careful measurements of the the trackball and joysticks. I did a mockup panel using Masonite, hand drilling the button holes etc. to play test the spacing, but my previous build project had a similar setup so it was more about ensuring enough room for the spinners and making sure the sticks don't get in the way.

                                      Anyway, once I was happy with the controls and screen placement, I used Illustrator to assemble drawn parts to make sure there would be clearance for stuff on the inside. Finally, I sent cut files to my laser cutter guys and had them cut the crystal acrylic, a thin black bezel piece to hide the display edges, and plywood to match and frame the display. The cabinet was built around this top panel.

                                      The trickiest part was attaching the mitered side pieces such that they perfectly joined at the corners, and allowed the acrylic to sit flush with the tongue-and-groove extrusion. Lap joints in the corners would have been much easier. Also, I could have used hot glue at that stage to hold it together before the ribs were installed with epoxy and eventually the rivets. After that, it was simply about building a road case.

                                      My 4-player cocktail style cabinet built as a custom "roadcase"

                                      D 1 Reply Last reply Reply Quote 1
                                      • caver01C
                                        caver01
                                        last edited by

                                        Since these photos were posted I have added a Mausberry power circuit, swapped the USB cables with ones I made to custom lengths.

                                        My 4-player cocktail style cabinet built as a custom "roadcase"

                                        1 Reply Last reply Reply Quote 1
                                        • D
                                          drizzt77 @caver01
                                          last edited by

                                          @caver01 Excellent, thank you so much for the information. I don't have access to Illustrator but I imagine I can use one of the free CAD programs or Sketchup or something to design it.

                                          One other question I had was what thickness plywood did you use for the top. It looks like 3/4" by the picture but I can't tell for certain. It looks like you used 1/2" for the rest of the box. Is that correct?

                                          caver01C 1 Reply Last reply Reply Quote 0
                                          • caver01C
                                            caver01 @drizzt77
                                            last edited by

                                            @drizzt77 to clarify, the laser cutter company I used were perfectly happy with Illustrator files to feed their laser cutter. I just had to ensure the file only had the cut lines--the other design elements were stripped from the files I sent them. All told I probably spent about $100 on laser cutting which was totally worth it for how everything lined up so perfectly. I could have cut the button holes with a drill press, but the risk of cracking the acrylic after 40 holes made the laser a no-brainer.

                                            My 4-player cocktail style cabinet built as a custom "roadcase"

                                            1 Reply Last reply Reply Quote 1
                                            • First post
                                              Last post

                                            Contributions to the project are always appreciated, so if you would like to support us with a donation you can do so here.

                                            Hosting provided by Mythic-Beasts. See the Hosting Information page for more information.