Cabinet build - almost finished
-


this is what is evolved into over the weekend.
I decided that the large Master control program image was shite. I have sneakily included it into the red line at the top, I want the MCP to be there, it used to scare the life out of me as a kid, so will be there. -


Today I was thinking about it a bit more, i thought i may prefer to wall mount the cabinet and make it a bit less intrusive, since I dont actually need the space for a CRT in it. After a google search I found the "polycade" which looks great, and gave the idea of having two mounting heights, that way i can mount it higher when I want to play it, or lower it when the kids want to play.! perfect.
I went ahead and did some reverse engineering of the polycade from some images in order to get the rough dimensions and angles, then decided I wanted it to be a bit more traditional looking, so added sides that overhang the edges and a marquee box, and viola! I also managed to squeeze it all onto a 4*8ft sheet, brilliant! -
@AndersHP I ordered my stuff from www.arcadeworlduk.com and it was in my hands less than 48 hours later, and I live in the middle east! this is amazing customer service if ever I saw it.
it was very well packaged too. They now come highly recommended in my book -
@spruce_m00se good to hear that! I'm overly satisfied as well!
-
@spruce_m00se for the cabinet research bearing guided or following router cutters. Make a template out of 6mm for the sides. Invest your work into that getting the shape of the template perfect. Then screw the template onto the inside of your sides and trim it to the template. You can also put any screw holes or aligning features on your template so it comes out exactly the same for both sides.
Always rotate the router away from your belly when you put it down
Make sure you stuff is secure
Make sure you don't trip. Go slow and concentrate on the bearing.
If you wobble it's fooked so keep it flat at all times -
I had pretty much come to the conclusion that a plunge router with a bearing guided bit was the way forward for getting the sides right, I got my plan down so that with 7 cuts most of the straight lines were taken care of, and I got the MDF cut at the store.
I have done one side with a jigsaw, then touched it up with a rasp and a file, then I just used the router to copy that to the other side, and it has worked very well.
I have four more pieces to cut, all straight, with the jigsaw, then I am ready to start assembly.
I will post some pics once assembly begins. -

This is the intended mounting height of the cabinet, I will mount it on the wall, thats the idea.

here is the sketching onto the MDF, quite a lot easier to get right than I had imagined it would be thanks to the CAD model being infront of me, I could measure any distance I wanted on the model.
using the router to get both halves exactly the same, this was a massive win, although I could get em close with a jigsaw, I bashed the second side out in about 30 mins total. I used a rasp and file to clean up the curves etc before "copying" them onto the second half.
all the bits offered up and held in place with some tape to check the fit, there are a few bits I want to change.
All in all this came out well, its the first time I have done anything like this, i messed up one piece which is 2mm too short, its up at the marquee, im thinking of changing that area a bit to make it look better, we will see in the morning, im off to watch Narcos for a bit.
-

All screwed together,

I have a piano hinge between the screen board and the keyboard, I dont know which one of the two I want hinged yet, I guess it has to be the keyboard as the screen is accesible from the back anyway, I would like to be able to change the viewing angle for the screen though
-

My pi overheated whilst playing quake 3 arena last night, I 3d printed a case to hold an 80mm fan above it, currently powered from a seperate 12v power supply, I now challenge the Pi to get warm again!
its coming along nicely, -

-
Here are a few shots of the completed cabinet, I put some bright white led strips up the back and under the keyboard, along with RGB leds around the back to light the wall up.
I have three buttons next to the screen that control the volume and power of the TV, with a few multiclick combos they also toggle the fan on and off and toggle the white LEDS on and off. currently the RGB leds are on their original remote, although im in the process of having the arduino control them also.
I have a pin on the Pi connected to the arduino, to shut it down, although I have yet to implement the code, I need the arduino to not be powred by the pi in order to turn it back on, will do that shortly,
there are a few issues such as the ipac2 double pressing each button, which makes fighting games difficult,
I decided to omit a Marquee in favour of a place to leave my remotes and drinks whilst playing,
and for sound, well its been an ongoing saga, I got an amp from arcadeworld uk and it was shot when it arrived so got a refund, I got a diy amp kit, soldered one channel up, but didnt know about negative biased power supplies, and thus conencted it to a DC power supply and it smoked, so I intend eventually to make the other channel and properly test it, it should be 2 x 50WRMS, so it will eventually crank, but for now I give up, speakers are sat on the floor, I need to put them in the screen panel somewhere, will do it next week maybe.and finally I need to go round all of the joints with some black silicon to hide the cuts that werent straight as the light shines through them. But all in all im very happy with it


-
@spruce_m00se see puzzle bobble being played

Creator of the Radiocade: https://retropie.org.uk/forum/topic/6077/radiocade
Backlog: http://backloggery.com/lilbud
-
Looking good! I like the ambience lighting behind the arcade!
-
@lilbud puzzle bobble has seen a good ten or more hours since I have had it up and running.
we also played streets of rage on the megadrive to the last level, although we got killed by them damn flying trolleys in the corridor,
and SF2 has seen a good amount of play, but the bloody double click on the ipac has made it unplayable on the arcade version, megadrive doesnt suffer the same issues, but after playing arcade the megadrive looks pants -
@spruce_m00se i dont have a double click with my ipac. I assume its a mame issue you are having it in? I know there is something about mame having its own controls on top of retroarch. I remapped all my ipac buttons to match more to retroarch so i dont use numbers and fkeys so i dont know if that matters at all. If it is due to both retroarch and mame controls you could open up the mames retroarch.cfg file and add the keyboard keys and map them to stuff that doesnt exist. Not sure how that works if you use the arcade folder.
-
@edmaul69 I have an ipac two, half is set as a gamepad and half as a keyboard, I need to look into either using all gamepad or all keyboard, but right now I have double clicks on the down button in the ES menu, and then in games I assume the double click is causing an issue because in mame, you cant do any moves, and it doesnt even work in NES for example,
I have a new image on another card ready to play with, do you know the path for the mame retroarch.cfg? I will ssh in and have a look at it compared to the megadrive.the other thing I need to do is to set the megadrive to recognise a six button controller, hitting start to switch from punch to kick in SF2 isnt good when the start button is under the keyboard.
-
@spruce_m00se yeah its easy to set sega to 6 button. It is in the quick menu options for picodirive. It sucks that they added it to the core optionss. Because of that it doesnt work with the select button. Pc engines 6 button / 2 button mode button works. Not sure why they messed it up for both genesis emulators. Picodrive works better. Genesis plus gx just randomly decides which game gets 6 buttons. One street fighter game will be 6 buttons and another is 3. And you cant change it at all. I leave picodrive on 6 button. I havent found a game with a problem with that yet. Pc engine 2 button games go crazy if you have it set to 6 button, just like a real system.
So for the ipac 2 there is an update to make it keyboard only.
-
my ipac was keyboard only, i changed the firmware to make it allow gamepad, that was a ball ache, it bricked, and then randomly came back to life a few hours later.
how do you setup keyboard only? do you have to edit config files or can you use the ES input config? I tried in ES and it just overwrites player one everytime with the second player two joystick.I was in a hurry to play, had a friend round, which is why i set it to keyboard and gamepad, then I did it through ES.
do you have a config file you could share? I can map the ipac to your config file easily with its config tool,, then just ssh your config file in.
-
The way i setup my iPac is i made sure it was set to keyboard mode. Then i used the ES controller config to map the keyboard to ES so i could navigate the ES menu. Then i went into the configs-all auto joypads folder and deleted the config file for the keyboard.
At this point i could use the keyboard to navigate ES but not play any games in retroarch.
Then i opened retroarch.cfg and mapped out each keyboard key manually to all the default keyboard controls for player 1 and 2.
Then i edited the retroarch.cfg under the system specific folders for any system that didnt follow the default layout (my default was optimized for 2 button play, so i had to customize snes, genesis and a couple others).
Then, and this was the hard part, i had to make a specific per-game config file with separate control schemes for every mame/fba game that didnt follow the default scheme (fighting games had a specific 6 button layout that didnt match the default, some game like ninja turtles had action and jump backward, and so on) so yeah, 40 or 50 custom config files later, i had a really nice setup, and every game worked correctly with keyboard controls.
Needless to say, have about 20 separate backups of these files, haha.
-
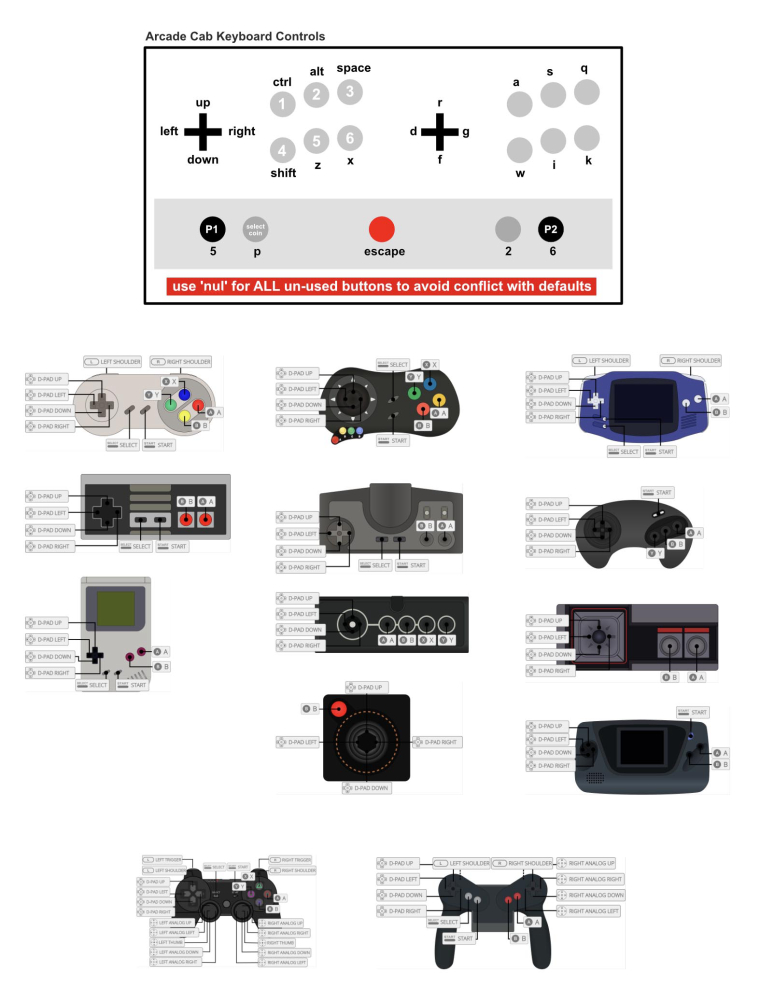
It also helps to make a map showing how the retropad is setup for each controller versus how your keyboard mapping is layed out on your control panel, because you still have to set key controls to retropad layout. Mine looks like this, i keep a laminated copy inside my cab. Your layout may vary, but you get the idea.
The top part shows my button layout and the corresponding keys on the iPac2. This is default mame control, so it's pretty universal. (some people reverse mame123 and mame456 button locations though).
Vector Artist, Designer and Maker of Stuff: Laser Cut Atari / Pixel Theme Bartop
Contributions to the project are always appreciated, so if you would like to support us with a donation you can do so here.
Hosting provided by Mythic-Beasts. See the Hosting Information page for more information.