[Guide] Stable Windows 95 on RetroPie!
-
I have spent a lot of time (more than I would like to admit) during the last few months trying to make Windows 95 work on RetroPie. It was relatively easy task to run it on my Windows 10 dektop, but comepletely different challenge to achieve the same result on RetroPie. In the end, I managed to put together stable Windows 95 running under DOSBox from Retropie. Whole purpose of this was to have everything together (with other systems and games in RetroPie). It boots without any problem, runs DOS games without crashing. This is only the beginning and I will try to push this "project" even further (run games that require additional drivers, etc.). If you are interested, you can follow my guide below and share any of your knowledge to help us make this thing better. Before we start, I want to say Thank You to @bigflyer and @edmaul69 - you were very helpful!
This guide is not here to get you through every single click required to achieve the result. Some basic knowledge of DOSBox commands + configuration and knowledge of RetroPie folders structure is required. If you are struggling with anything described below, feel free to ask and I will try to help.
1. Before we start, you will need the following
- MS-DOS Boot Disk - I used version 6.22 (file should be named as 622C.IMG)
- DOSBox - I used version 0.74
- Bochs x86
- Windows 95 - ISO image of installation disk (let's call it WINSTALL.ISO)
- S3 Graphics Trio 32/64 (Windows 9X/ME) - I found package called w9520204.zip
2. Creating HDD file
- Run bximage.exe (this is part of Bochs x86 package)
- enter following input:
1
hd
flat
2048
c.img - file c.img was created in the directory where bximage.exe is placed
- move c.img to your working directory, let's say D:\Win95
3. Extracting installation files from Windows 95 ISO file
- mount WINSTALL.ISO using Daemon Tools or anything similar (it should contain directory win95, if not, you do not have the right disk)
- copy contents of win95 directory (~79MB) to subdirectory winstall of our working directory - D:\Win95\winstall
4. Extracting S3 zip archive w9520204.zip to our working directory
5. Working directory review
- verify that you have all required files and folders in your working directory:
- w9520204 (directory ~440kB)
- winstall (directory ~79MB)
- c.img (~1.96GB)
- 622C.IMG (~1.40MB)
6. Preparing HDD
- start DOSBox and execute following commands:
- imgmount 2 D:/Win95/c.img -size 512,63,128,520 -fs none
- boot d:/win95/622C.IMG
- fdisk (Option 1 - Create DOS partition of Logical DOS Drive)
- close DOSBox and start it again to execute following commands:
- imgmount c D:/Win95/c.img
- boot d:/win95/622C.IMG
- format c:
- close DOSBox
7. Copying installation files to HDD
- start DOSBox and execute following commands:
- imgmount c D:/Win95/c.img
- mount d D:/Win95/winstall
- c:
- mkdir WIN95
- cd WIN95
- copy D:\WIN95\*.*
- close DOSBox
8. Install Windows 95
- start DOSBox and execute following commands:
- imgmount c D:/Win95/c.img
- boot d:/win95/622C.IMG
- c:
- cd Win95
- setup /is
- follow instructions on screen to finish installation
- once installation is done, set Windows 95 to 16-colors to get rid of black square cursor
9. Booting Windows 95 after installation
- whenever you need to boot Windows 95 from now on, execute following commands in DOSBox:
- imgmount c D:/Win95/c.img
- boot D:/Win95/c.img
10. Windows 95 configuration
- copy content of w9520204 (placed in our working directory) to c.img (use the same approach like in 7th step)
- boot Windows 95 (9th step)
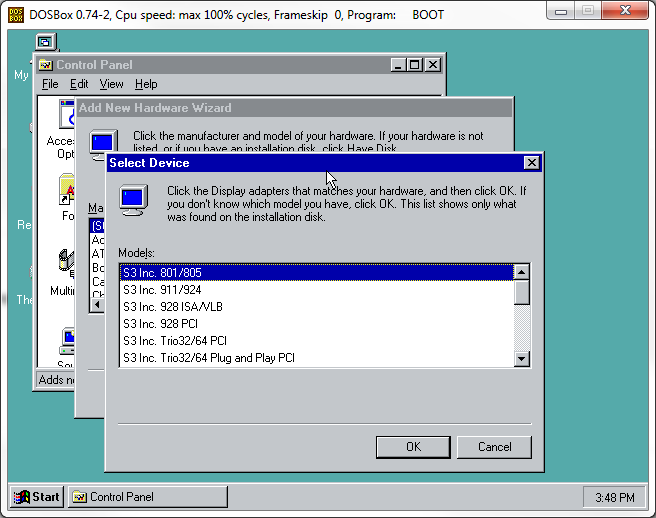
- install S3 drivers using content of w9520204 folder
- navigate to folder wherever you copied it to (for example C:\S3 in my case)
- right click S3 file and choose Install
- remove drivers COM1, COM2, LPT1:
- Start -> Settings -> Control Panel -> System -> Device Manager
11. Let's move to Pi!
- copy c.img to /home/pi/RetroPie/roms/pcdata/WIN95/
- create file Windows95.sh in /home/pi/RetroPie/roms/pc/
- its content should be following:
#!/bin/bash
/opt/retropie/emulators/dosbox/bin/dosbox -conf "/opt/retropie/configs/pc/WIN95.conf"
- create copy of dosbox-SVN.conf placed in /opt/retropie/configs/pc/ and name it WIN95.conf
- adjust following variables accordingly:
machine=svga_s3
core=normal
cputype=pentium_slow - add following lines to [autoexec] section:
mount -u c
imgmount c /home/pi/RetroPie/roms/pcdata/WIN95/c.img
boot /home/pi/RetroPie/roms/pcdata/WIN95/c.img - set permissions for the file
sudo chmod 777 /opt/retropie/configs/pc/WIN95.conf
12. Notes
- use Windows95.sh file to run it like any other DOS game in RetroPie
- always exit Windows 95 using the Start menu and Shut Down option, otherwise you may have ScanDisk pop up on next run - in such case, just skip it
- this guide was created and tested using RetroPie v4.3, Raspberry Pi3, DOSBox v0.74
This is my first guide here, if you have anything to say, don't forget to leave your feedback!
-
I for one want to ask if I can use this guide on this SBC Gaming Wiki I'm building with the folks at /r/sbcgaming
I'd like to post it in detail there, while giving you credit of course. Would that be fine?
-
@sgtjimmyrustles feel free to use it. after all, it's for the community
-
@spiky it looks like this requires using a PC (or running Windows already in emulation) to get it setup before moving to the Pi. Is that true?
Second question: what is the likelihood that someone could install the WinIPAC utility and have it interact with an IPAC over USB on the Pi? I would setup Windows 95 on my Pi just so I could run that utility!
-
@caver01 technically, only the 2nd step has to be done on Windows machine. The rest was just my preference, because you may have issues installing and configuring Windows 95 on Pi.
-
So have you been able to run any good windows 95 games? I'm kinda curious to see what the limit is.
-
@sgtjimmyrustles not yet. I am happy I had enough time and energy to put the guide together. I need to spend some time without Pi now :) as soon as I get back to it and manage to make something interesting run, I will post here
-
Up and working for me! Just have to figure out how to add my CD-ROM drive and test some things out!
Note: May be helpful for some that you're going to get a crazy background once 95 is booted for the first time and everything will be all garbled up. The black cursor referenced and the crappy windows appearance can be solved by right clicking and going to settings and changing your color to 16 colors, as mentioned in the guide.
-
@hooperre Glad to see people having some success with this, going to give it a try myself. I think I just resolved my issue with retropie-mount, and now have 256gb of space to waste. :)
-
@spiky
Great tutorial!On step 10 where you install the S3 drivers, which driver are you installing?
Also, all your directory addresses should be backslashes instead of forward slashes like
boot D:\Win95\c.img;-)
-
@backstander forward-slashes mentioned in my guide are correct (they are mostly part of commands of DOSBox where this type of slash is used, on both Windows and Pi). you probably mixed it up with DOS command line where path is indeed defined with back-slashes
-
A bit off topic, but Slash and Myles Kennedy are making some AWESOME music. Better than Slash's other gig if I dare say so...
-
@spiky I GOT IT WORKING!!! It doesn't autostart from the shell script, I have to manually mount and boot it, but I can work on that.
Now if I can get Starcraft Broodwar to run...
EDIT: I can mount the .iso image I ripped from my Starcraft CD using imgmount d /path -t iso BUT booting a HD image in Dosbox wipes out all your mounts, so back to square one there. If there was only a way to return to the Z: drive and mount something while Win95 is loaded up.
***By running MS-DOS from a disk image, you will lose some of the niceties of the DOS environment which DOSBox provides. Some such examples are the ability to mount and unmount drives whenever you like, and the ability to run DOSBox’s internal commands. Also, if you need to use the mouse in MS-DOS you will need to load a suitable mouse driver.
DOSBox does not emulate CD-ROM hardware, so you won’t be able to load CD-ROM drivers and access a CD-ROM drive or ISO image. An alternative could be to use a hard disk image and attach an additional IDE drive to DOSBox. You will still be unable to switch between disk images while DOSBox is running, however.***
UPDATE: apparently there ARE utilities that will mount an iso image in Win95, but I can't seem to get the huge iso image onto the virtual drive without hanging Dosbox. I'm downloading the 28mb freeware demo, if I can't get that working then I guess there is no sense trying to get the whole iso to run anyway.
UPDATE #2: This is becoming an epic pain in the ass. I'm gonna plunk down the cash and trying using Exagear to run some Windows games.
-
@spiky
Yeah, I meant that all your DOS commands are typed using forward slashing but should be backslashes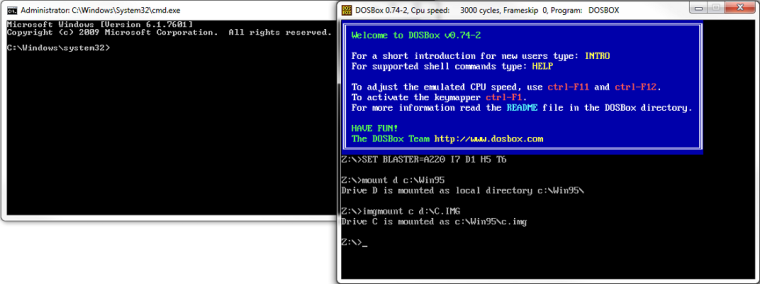
Your *nix commands are correct.
I also read that after you run
imgmount c D:/Win95/c.imgyou can just doboot -l cand it will automatically boot what you already have mounted to the C: drive (which is D:/Win95/c.img in this example so you don't have to use "boot D:/Win95/c.img") I guess another way to skin a cat! -
@spiky one question? I have had 95 running for a while. Issue i have is since it cant read real discs i have some iso program on there but it doesnt work when on the pi. How are you reading iso’s to install and play games? Also making a .vhd windows 95 instead of a .img windows 95 allows you to open it up natively on windows as a drive to add stuff
-
@edmaul69
I have been experimenting with getting a ISO to stay mounted after booting into the Windows 95 IMG without any luck. I can get a floppy IMG to stay though!How are you reading iso’s to install and play games?
I did the same as @spiky did with the Windows 95 install CD. I extracted the contents of the CD into a directory on my computer (C:\Win95), mounted the c.img file in DOSBox as C:\ and copied that directory over to the C:\ (which is saving it in the c.img file), then booted into Win95 and just installed it from that new directory.
I've successfully installed Hover! (1995) and Fury 3 (1995) with this method.
I've also read about others install the last Windows 9x compatible version of Daemon Tools v3.4.7 and copying the ISO over like I did with the directory and mounting it in Win95. I haven't tried this yet!
-
@backstander ive mounted images in separate .vhd as a second drive and installed some stuff but if it does a check to verify its a cd drive it fails. So i was hoping for a better solution.
-
but if it does a check to verify its a cd drive it fails.
Daemon Tools should help with the verify cd drive checks. Another option is to find the no-cd crack for that game but I hate searching for those because half the time they contain viruses.
So i was hoping for a better solution.
Yeah, I hope there is as well! If mounting floppies and separate .vhd's work, why can't .iso's?
-
@backstander vhd’s mount as a hard drive. Not sure why iso’s dont work.
-
@edmaul69 Only drivers emulated in the Dosbox core program remain if you boot an image. Hard Drive emulation is there, but Dosbox doesn't emulate CD drives at the hardware level, so if you mount a CD image it goes bye-bye if you boot a hard drive image.
***By running MS-DOS from a disk image, you will lose some of the niceties of the DOS environment which DOSBox provides. Some such examples are the ability to mount and unmount drives whenever you like, and the ability to run DOSBox’s internal commands. Also, if you need to use the mouse in MS-DOS you will need to load a suitable mouse driver.
DOSBox does not emulate CD-ROM hardware, so you won’t be able to load CD-ROM drivers and access a CD-ROM drive or ISO image. An alternative could be to use a hard disk image and attach an additional IDE drive to DOSBox. You will still be unable to switch between disk images while DOSBox is running, however.***
Contributions to the project are always appreciated, so if you would like to support us with a donation you can do so here.
Hosting provided by Mythic-Beasts. See the Hosting Information page for more information.