My SNES Build
-
This looks very promising! Afterwards i think i could've kept the eject mechanism in place as well, but at first glance i got rid of it thinking the Pi would not fit. Hmmm...
So i take it you reused the original reset switch of the SNES?
-
@obsidianspider Thanks for the heads up; I'll be sure to post the full code if I get it to work.
Yeah, still got to figure out the hub but using the Pi0 gives a slight advantage in that respect and doing it myself leaves some room for tweaking.
@Morph-X Yeah, the original reset switch desoldered from a dead board - I've gone through 4 broken SNES consoles from eBay just trying to find a decent shell without too much yellowing so I've plenty of spares!
-
OK; so after about a couple of days of playing around I'm stumped with the reset switch.
Although to be fair I'm not totally stumped, I've got a switch connected to GPIO and it correctly runs a script. I've tried it with a shutdown and a reboot script and all is well, however, this isn't what I want - need it to reset a rom so to be almost indistinguishable from the original SNE function.
I haven't tried it yet but I'm sure I could write a script that would emulate a key board input, but (as I understand it) this means I'd have to update the hotkeys in
SNESpad.cfgand then I'd loose the ability to use hotkeys from the controller - again, not what I want.Anyone know how to emulate a gamepad input from a script? This may seem like a lot of effort for very little gain (actually it is!) since the functionality already exists from the controller but that's my perfectionist streak coming out. I'm might switch to solving the hub problem and comes back to this later.
-
I understand why you'd want it that way. It's a nice feature to have with the RESET button, even though in reality you would use your controller to reset a rom, not stand up and walk towards your console to hit that button. But yeah, if you made your mind up, then that's what you want.
I wouldn't know how to do it, sorry.
-
@jackal123uk so if in retroarch you set a hotkey and a reset key to the keyboard, couldnt you just program the reset button to simulate pressing those 2 keys? you have to have a hotkey on the keyboard since you have one on your controller but that would work for 99% of the emulators on the pi
-
If you want a GPIO reset button to act like
Select+Bdoes in RetroArch, then have a look at the network commands.I did this in my NES build and used the python socket module to send 'RESET' to 127.0.0.1, port 55355 when I pressed my reset button. (the script posted on my blog doesn't directly poll a switch, it listens for a message over serial, but the concept's the same)
def retroarch_command(message):
    sock = socket.socket(socket.AF_INET,
                         socket.SOCK_DGRAM)
    sock.sendto(message, ("127.0.0.1", 55355))
then on a button press:
retroarch_command("RESET")You have to enable network commands in the RetroArch settings and make sure the port it's listening to (default:55355) matches what you have in your script, but it's pretty straightforward and works exactly like an original reset button would.
-
@edmaul69 You're right - if I understand you correctly - I could set
input_enable_hotkey_btnandinput_reset_btnto 2 keys (or even the same key) and have a script send those keys but then I'd lose the ability to use hotkeys on the controller.@mike Thanks for the pointer, I'd probably never have thought to implement it this way. I'm gonna try to clear a couple of hours tomorrow to play around with this.
-
@jackal123uk set them as keyboard keys not buttons (same command minus "_btn")
-
@mike Works like a charm - thanks again for the heads up! For anyone else interested in this method here's exactly how I did it.
import RPi.GPIO as GPIO import time import socket GPIO.setmode(GPIO.BCM) GPIO.setup(17, GPIO.IN, pull_up_down = GPIO.PUD_UP) def Int_reset(channel): sock = socket.socket(socket.AF_INET, socket.SOCK_DGRAM) sock.sendto("RESET", ("127.0.0.1", 55355)) GPIO.add_event_detect(17, GPIO.FALLING, callback = Int_reset, bouncetime = 2000) while 1: time.sleep(1) -
The last outward facing blemish on my build is the backplate; I've completely reused the power jack and the HDMI connector fits nicely into the multi-out but the hole for the RF-out is a tad unsightly. I've had a blank black plate 3D printed with the intention of cutting the holes to suit but the finish was no where near good enough (although you can't see it in the photos.
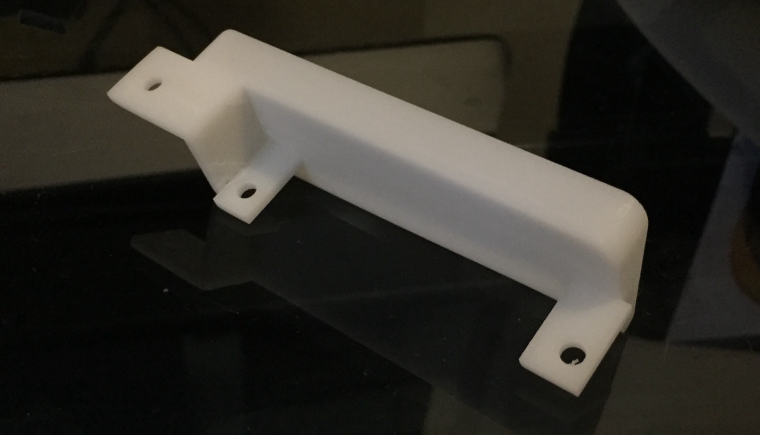
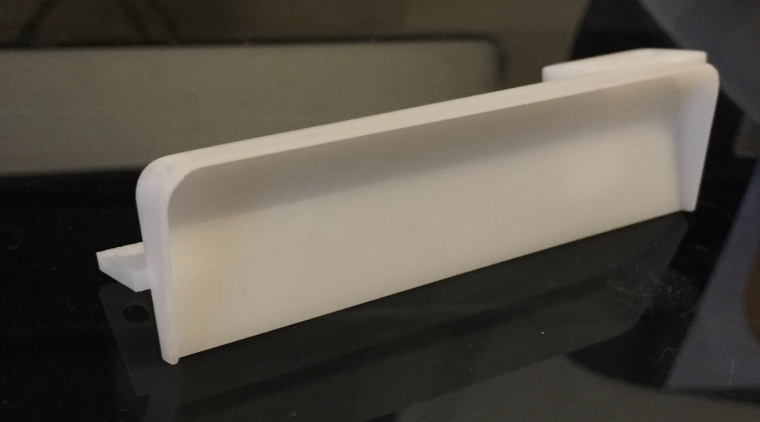
I can upload the 3D file somewhere if anyone is interested in doing something similar. -
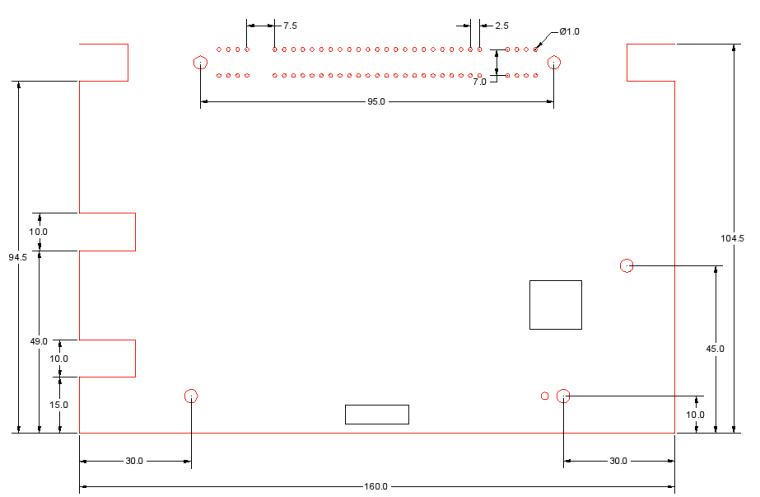
I'm turning my attention to the next version of my pcb, I've decided to go easy on myself for now and leave the USB hub contained in a cartridge although this means I've now to mount the 62 pin cartridge connector onto the pcb. Below are my measurements of the original board - I know the position of the reset switch and the mounting holes to the right are correct as I used these on the last version of my board. Anyone know if there's a more official version of this type of drawing or something that's at least been verified?
-
@jackal123uk said in My SNES Build:
I can upload the 3D file somewhere if anyone is interested in doing something similar.
Can you upload that STL file? A friend of mine offered to help me with making a 3D print of the back panel tomorrow, but if you already modeled it that will be a huge help. I want to adapt it to add in keystone jacks.
-
@obsidianspider of course, here you go, shouldn't be too hard to add the keystone jacks.
https://dl.dropboxusercontent.com/u/9389059/SNES backplate.stl
Also, not sure if there's any differences between the regions but at least it's a decent starting point.
-
@jackal123uk said in My SNES Build:
@obsidianspider of course, here you go, shouldn't be too hard to add the keystone jacks.
https://dl.dropboxusercontent.com/u/9389059/SNES backplate.stl
Also, not sure if there's any differences between the regions but at least it's a decent starting point.
Thanks!
-
OK so my day job's been getting in the way on this project for a while but I've just gotten back to it this weekend and trying to get USB hub to work over the cartridge slot. I've soldered directed to the pads for the USB data connections.
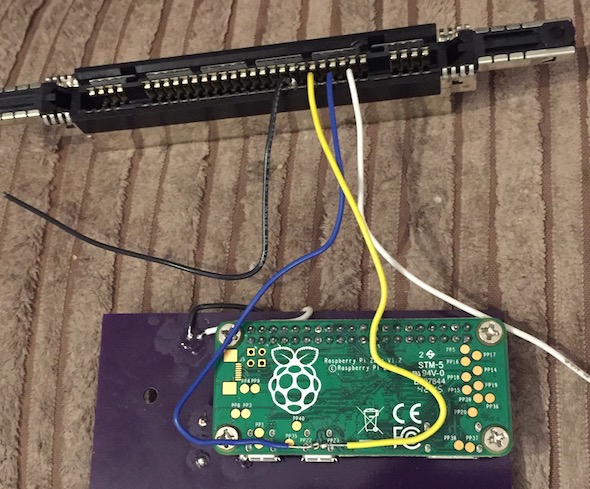
All in all I think the finished article looks good...
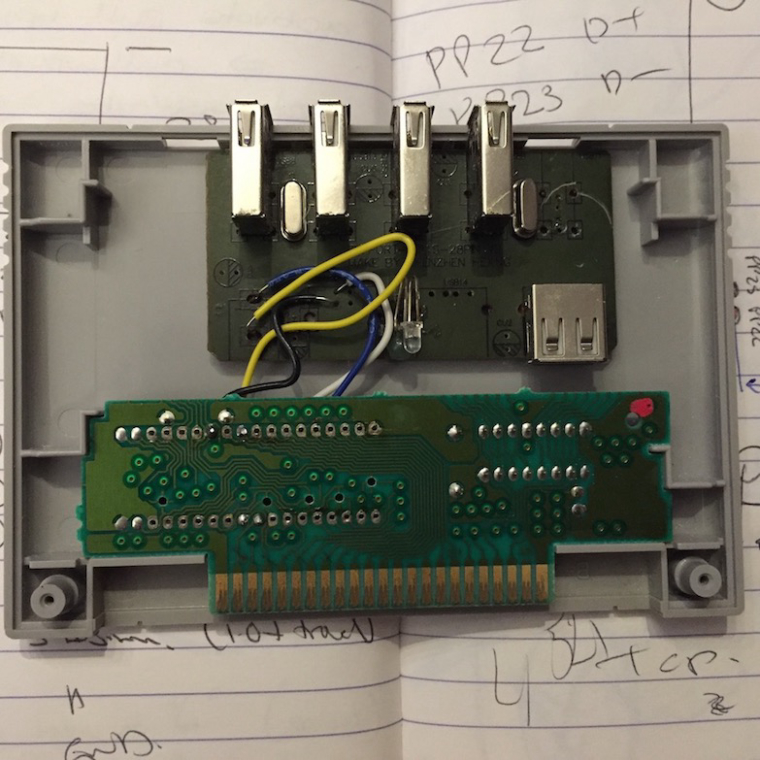
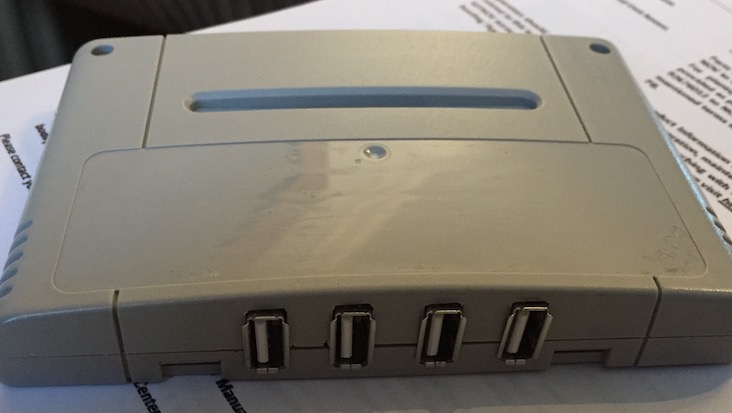
Only problem being the hub doesn't seem to want to work. I've tried crossing over the data pins in case I'd messed up there but nothing. Does anyone have any experience with doing something like this with a pi zero?
-
Are you supplying it with its own power? or power from the pi? I've heard pi zero are quit temperamental with power to USB hubs.
-
@monstermadeofman did you test the original wires before wiring this?? Red isnt always on 5v and green isnt always data, etc., etc....
-
@monstermadeofman no, not supplied through the pi zero, both the hub and the pi zero are fed from a common rail though. The pi runs fine but I'll try giving the hub a completely separate supply in case there are some problems there.
@edmaul69 the 5v and GND are certainly right, wasn't 100% on the data, hence swapping round to check.
-
@jackal123uk I can tell you, in dealing with my gameboy zero project, that the PI zero is extremely picky on hubs that work. Definitely power it from your 5V rail, not the pi. Also twist your D+ and D- lines together and keep them as short as you can... Inside your cart the wires are a mess so I'd definitely recommend shorting them and twisting them... Also you can try to drop the USB speed to v1.1 (which is ok for wifi, keyboards, and controllers). Do this by adding this to the end of your cmdlines.txt:
dwc_otg.speed=1
If you're bored, you can look through the forums at sudomod (where the gameboy zero project is). There is along thread on Helder's AIO board that talks about the usb issues....
-
@jsawhite Point taken about the data wires; I'll tidy those up.
Curiously, I've tried the same hub (I actually picked up two) directly in the Pi zero with an OTG adaptor and it's still not recognised, although works fine in a full sized Pi. Could it be something with the OTG protocol and hub rather that my sloppy wiring?
Contributions to the project are always appreciated, so if you would like to support us with a donation you can do so here.
Hosting provided by Mythic-Beasts. See the Hosting Information page for more information.