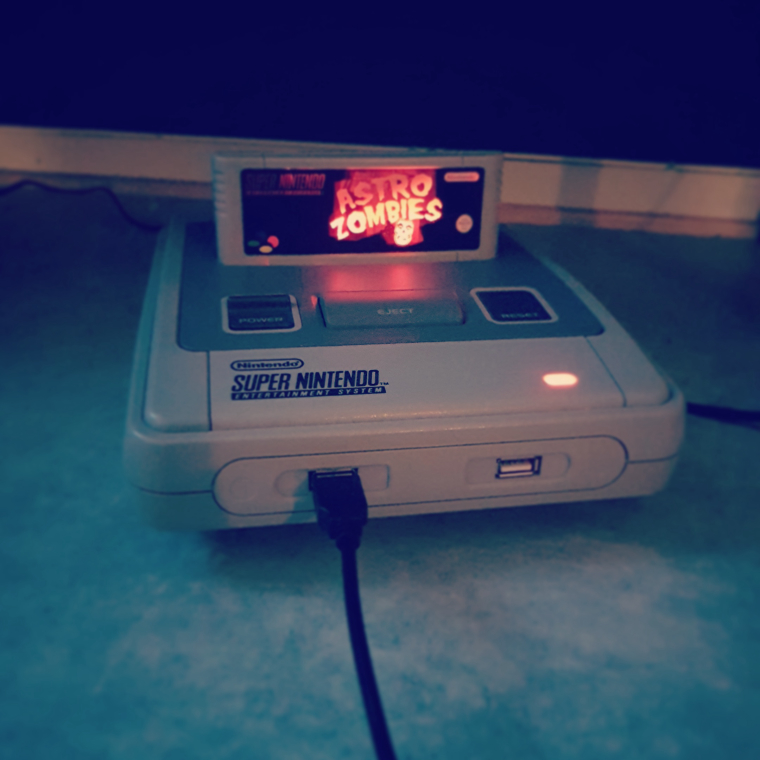
RetroPie forum home
    • Recent
    • Tags
    • Popular
    • Home
    • Docs
    • Register
    • Login

    My Pi in a SNES.

    Scheduled Pinned Locked Moved Projects and Themes
    raspberry pi 3diysnesretropie 4
    17 Posts 6 Posters 8.3k Views
    Loading More Posts
    • Oldest to Newest
    • Newest to Oldest
    • Most Votes
    Reply
    • Reply as topic
    Log in to reply
    This topic has been deleted. Only users with topic management privileges can see it.
    • Morph-XM
      Morph-X
      last edited by

      I did it as follows:

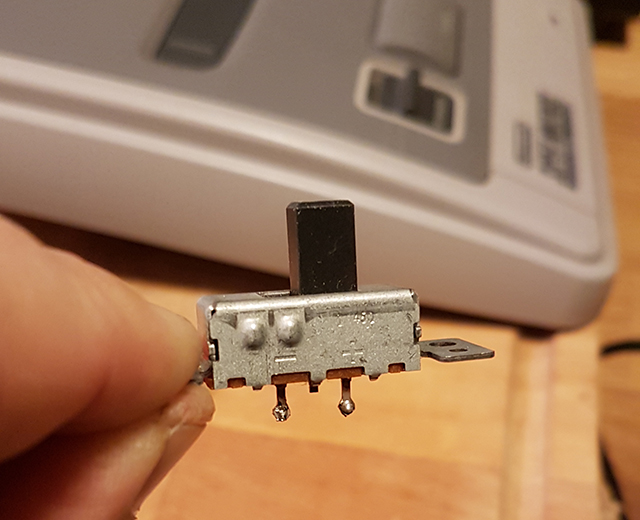
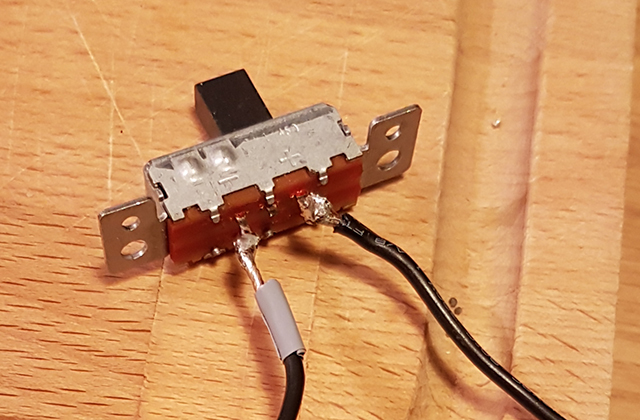
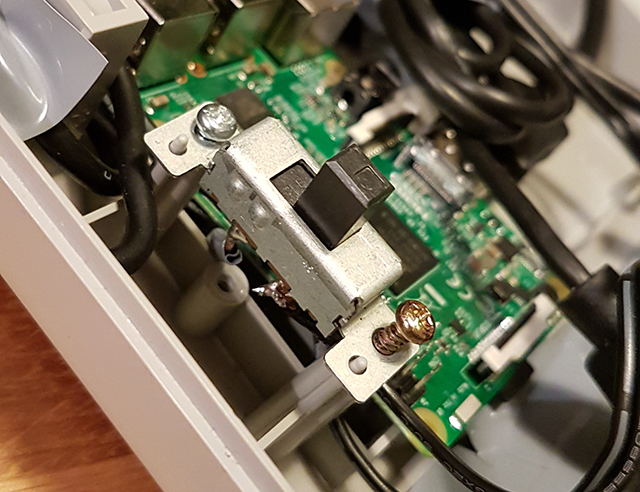
      I hope my poor English is sufficient to give a proper explanation. I connected a micro-USB extension cable to the Raspi's power input. That's of course a female connector on one side and a male connector on the other. Then i stripped a small part of the cable to cut the +5V wire and soldered both ends of it to the pins of the original SNES power switch. So after connecting a power supply, the power only reaches the Raspi when the SNES power button is switched "ON".

      Now this has of course some pro's and con's:

      • PRO: It's super cheap (an extension cable costs about $3);

      • PRO: It's actually way easier and less space consuming than a power block of some sort;

      • PRO: With an extension cable like this you're able to create a nice and corresponding female micro-USB port in your SNES case;

      • CON: You'll have to use EmulationStation's option to shutdown the Pi instead of a powerblock running a shutdown script or however those things work. I don't mind at all personally, because the option of shutting down is easily accessible through EmulationStation's option menu, but i can imagine one would not settle for a power switch that simply cuts power in an instant.

      Hopefully it's clear to you how i did it. If not, let me know so i can elaborate it some more.

      Good luck!

      DipkidD 2 Replies Last reply Reply Quote 1
      • DipkidD
        Dipkid @Morph-X
        last edited by

        @Morph-X Thanks for the info, I kinda suspected there was some soldering involved.
        I dont think my china usb rocker will fit without a lot of hazzle, so i will
        probably try to strip the wires and connect directly to the org snes power button, when I get some free time over.
        (There something special about the real sound and push-resistance from the snes buttons, gotta have it!)

        Also, heres a more like-friendly picture, since I have closed some of the holes and got the Led light to look better.
        0_1475092616376_IMG_20160926_193300.jpg

        RetroPC: https://retropie.org.uk/forum/topic/13048/the-1976-retropc-diy-retro-gaming-computer-build
        Wallcab: https://retropie.org.uk/forum/topic/28324/wall-mounted-cab-2-0
        Candy Cab: https://retropie.org.uk/forum/topic/34290/diy-candy-cab-arcade

        1 Reply Last reply Reply Quote 3
        • DipkidD
          Dipkid @Morph-X
          last edited by

          @Morph-X Heeey.. Im about to try this soldering thing. (finally packed everything out after moveing)
          About your power button solution;
          Did you remove the red and black wire from the snes power switch and just solderd 1 of the 4 wires
          (2 for power and 2 for data inside a usb cable right?) from the usb cable to the "small pcb" thingy that the snes red/black wires was solderd to? Sorry about going on and on, just wanna get it right..

          RetroPC: https://retropie.org.uk/forum/topic/13048/the-1976-retropc-diy-retro-gaming-computer-build
          Wallcab: https://retropie.org.uk/forum/topic/28324/wall-mounted-cab-2-0
          Candy Cab: https://retropie.org.uk/forum/topic/34290/diy-candy-cab-arcade

          1 Reply Last reply Reply Quote 0
          • spannernick1S
            spannernick1
            last edited by

            Like the lights on the cartridge,nice work.

            1 Reply Last reply Reply Quote 1
            • Morph-XM
              Morph-X
              last edited by Morph-X

              @Dipkid

              Don't be sorry, i'm glad to be of help!

              I quickly made a drawing for you, obviously a lot easier than putting it into words. ;-)

              This is how i did it. I just cut the white and green wire since data is not needed in this case. Hopefully it's of any use to you. And good luck!

              Image

              DipkidD 1 Reply Last reply Reply Quote 1
              • DipkidD
                Dipkid @Morph-X
                last edited by

                @Morph-X That is f**kin excellent! Just what I needed. Thank you so much.
                I´ll post some pics after Im done.

                RetroPC: https://retropie.org.uk/forum/topic/13048/the-1976-retropc-diy-retro-gaming-computer-build
                Wallcab: https://retropie.org.uk/forum/topic/28324/wall-mounted-cab-2-0
                Candy Cab: https://retropie.org.uk/forum/topic/34290/diy-candy-cab-arcade

                edmaul69E 1 Reply Last reply Reply Quote 0
                • edmaul69E
                  edmaul69 @Dipkid
                  last edited by

                  @Dipkid just so you know, you should test the wires with a multimeter to verify they are correct. Cheap chinese cables will mix up the red, white, green and black wires.

                  DipkidD 1 Reply Last reply Reply Quote 1
                  • DipkidD
                    Dipkid @edmaul69
                    last edited by

                    @edmaul69 yeah I´v been reading that, thanks for the heads up!

                    RetroPC: https://retropie.org.uk/forum/topic/13048/the-1976-retropc-diy-retro-gaming-computer-build
                    Wallcab: https://retropie.org.uk/forum/topic/28324/wall-mounted-cab-2-0
                    Candy Cab: https://retropie.org.uk/forum/topic/34290/diy-candy-cab-arcade

                    1 Reply Last reply Reply Quote 0
                    • Morph-XM
                      Morph-X
                      last edited by

                      You're most welcome. edmaul69 is right, you should make sure the wires are not messed up.

                      Looking forward to your progress!

                      1 Reply Last reply Reply Quote 1
                      • DipkidD
                        Dipkid
                        last edited by Dipkid

                        Done! Thanks to @Morph-X for soldering tips!
                        Also alot of praise to @Floob & TechTipsta for all of their YT tutorials, tips n tricks.

                        0_1475833390028_20161006_223713.jpg

                        1_1475833390029_20161006_225639.jpg

                        2_1475833390030_20161006_230134.jpg

                        It works like a charm. Very satisfying. Time to play som Paper Mario this weekend.

                        RetroPC: https://retropie.org.uk/forum/topic/13048/the-1976-retropc-diy-retro-gaming-computer-build
                        Wallcab: https://retropie.org.uk/forum/topic/28324/wall-mounted-cab-2-0
                        Candy Cab: https://retropie.org.uk/forum/topic/34290/diy-candy-cab-arcade

                        1 Reply Last reply Reply Quote 2
                        • Morph-XM
                          Morph-X
                          last edited by

                          Excellent! Very well done and i wish you loads of fun! ;-)

                          1 Reply Last reply Reply Quote 1
                          • I
                            iVirtualZero @Dipkid
                            last edited by

                            @dipkid Poor SNES, now it’s just a boring emulation box with input lag and no cart support. I always wonder what people do with the original OEM board. I assume they throw it in the trash since they never mention anything about it.

                            1 Reply Last reply Reply Quote -1
                            • First post
                              Last post

                            Contributions to the project are always appreciated, so if you would like to support us with a donation you can do so here.

                            Hosting provided by Mythic-Beasts. See the Hosting Information page for more information.