RetroPie forum home
    • Recent
    • Tags
    • Popular
    • Home
    • Docs
    • Register
    • Login
    Please do not post a support request without first reading and following the advice in https://retropie.org.uk/forum/topic/3/read-this-first

    Retropi + GPIO = Not Working (Using adafruit more info in post)

    Scheduled Pinned Locked Moved Help and Support
    gpioraspberry pi 3retropieadafruit gpioadafruit
    25 Posts 5 Posters 6.6k Views
    Loading More Posts
    • Oldest to Newest
    • Newest to Oldest
    • Most Votes
    Reply
    • Reply as topic
    Log in to reply
    This topic has been deleted. Only users with topic management privileges can see it.
    • R
      R0shen @hiulit
      last edited by R0shen

      @hiulit said in Retropi + GPIO = Not Working (Using adafruit more info in post):

      /boot/retrogame.cfg

      How would I get to the screen that would show that? And are the green numbers the GPIO numbers or pin number?

      1 Reply Last reply Reply Quote 0
      • hiulitH
        hiulit @hiulit
        last edited by

        @hiulit said in Retropi + GPIO = Not Working (Using adafruit more info in post):

        To change this file go to the terminal and enter sudo nano /boot/retrogame.cfg.
        Change the KEYS and GPIO numbers to your liking and then CTRL+O, hit ENTER to save it and CTRL+X to close it.

        Like this ;)

        My little contributions to the RetroPie project:

        • Shell-Script-Boilerplate
        • Fun-Facts-Splashscreens
        • Limit-Last-Played-Games
        1 Reply Last reply Reply Quote 0
        • hiulitH
          hiulit @hiulit
          last edited by

          @hiulit said in Retropi + GPIO = Not Working (Using adafruit more info in post):

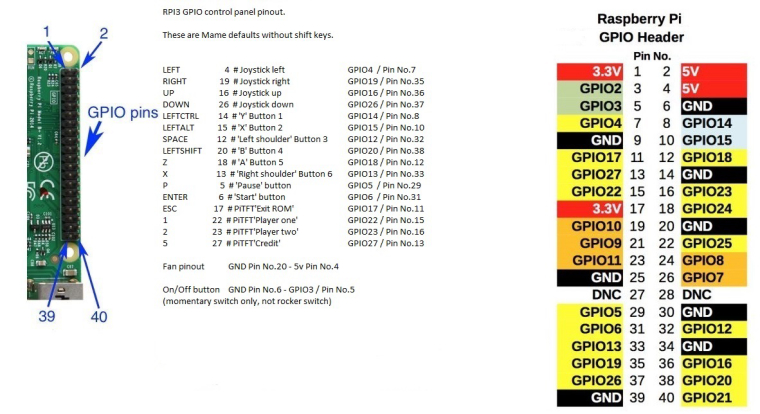
          The GPIO numbers must be the BCM numbers. Check this website https://pinout.xyz/

          Go to this website and use the BCM numbers :)

          My little contributions to the RetroPie project:

          • Shell-Script-Boilerplate
          • Fun-Facts-Splashscreens
          • Limit-Last-Played-Games
          R 1 Reply Last reply Reply Quote 0
          • R
            R0shen @hiulit
            last edited by

            @hiulit
            So use the BCM numbers on the left and right and plug each butten and write the corresponding numberon the boot retrogame cfg file?

            1 Reply Last reply Reply Quote 0
            • R
              R0shen @hiulit
              last edited by

              @hiulit
              Sorry I'm a noob at this stuff so I can wire up to any BCM number from the pinout website photo?

              hiulitH 2 Replies Last reply Reply Quote 0
              • hiulitH
                hiulit @R0shen
                last edited by

                @r0shen Don't worry, no need to apologize :)

                Yes, you can wire up to any BCM number.
                You also need to connect the joystick and all the buttons to GROUND.

                My little contributions to the RetroPie project:

                • Shell-Script-Boilerplate
                • Fun-Facts-Splashscreens
                • Limit-Last-Played-Games
                1 Reply Last reply Reply Quote 1
                • hiulitH
                  hiulit @R0shen
                  last edited by hiulit

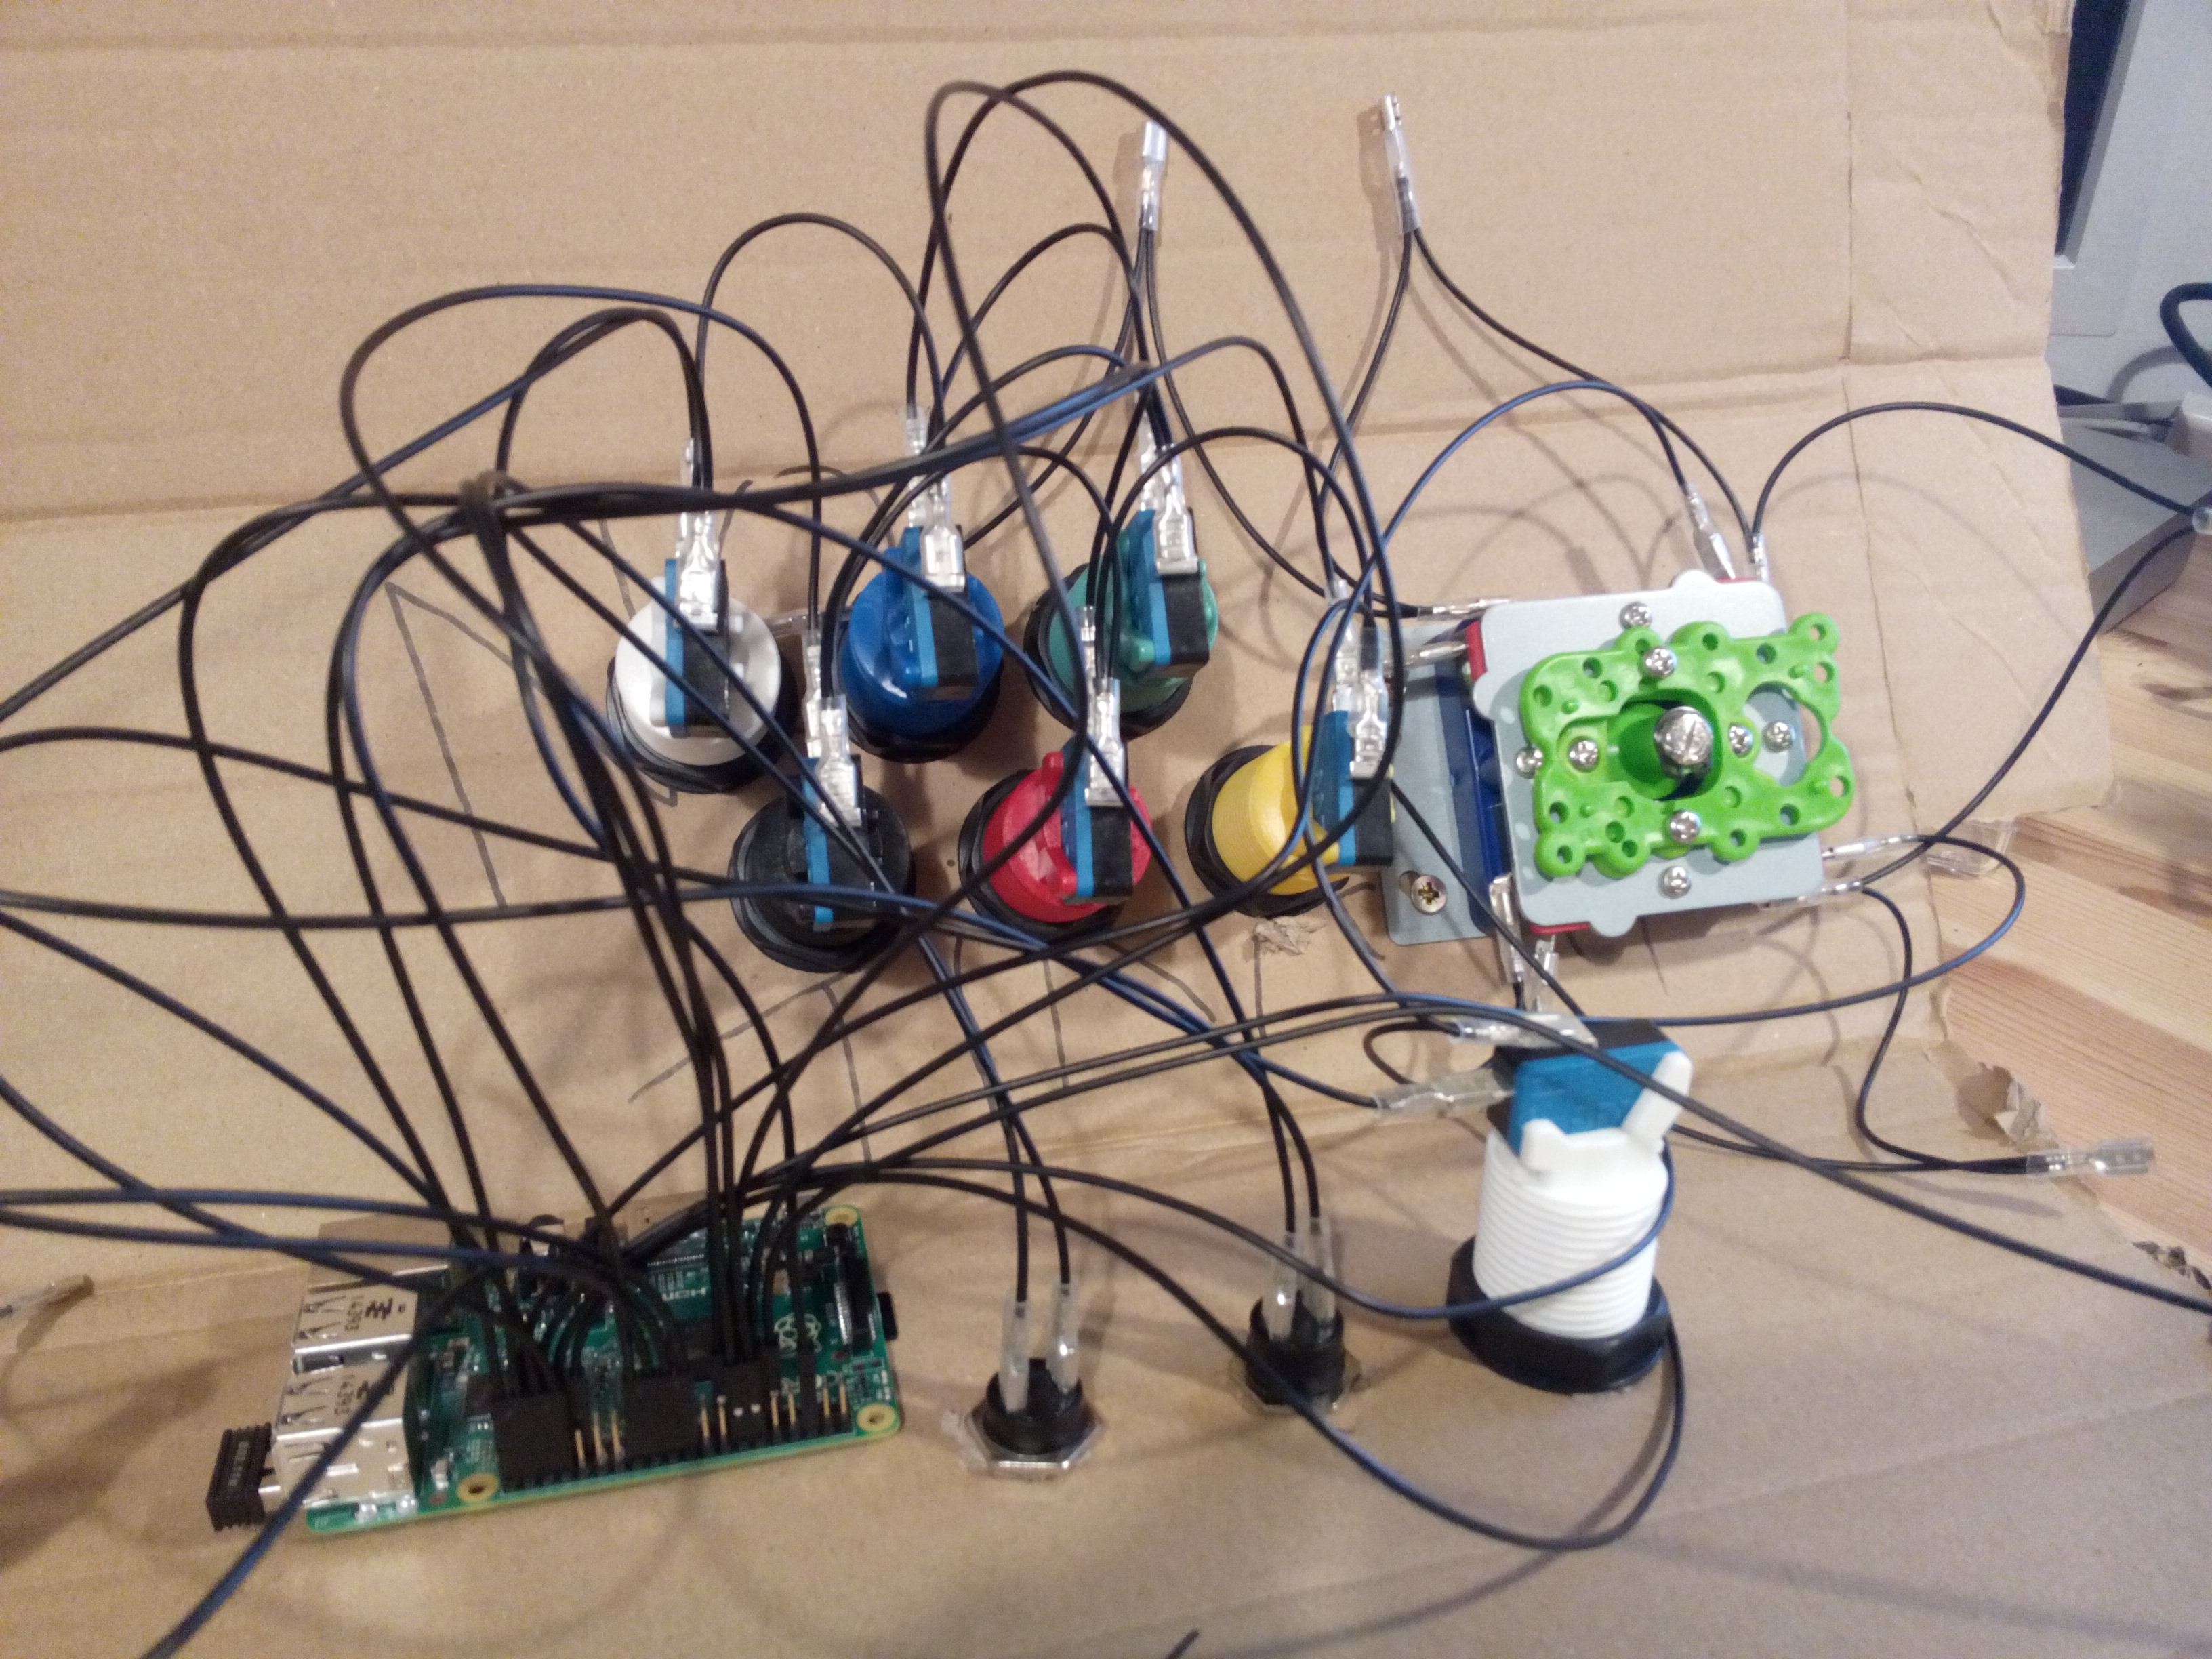
                  @r0shen Here, a pic with the GPIO pinout (here it says GPIO instead of BCM)

                  Raspberry Pi GPIO

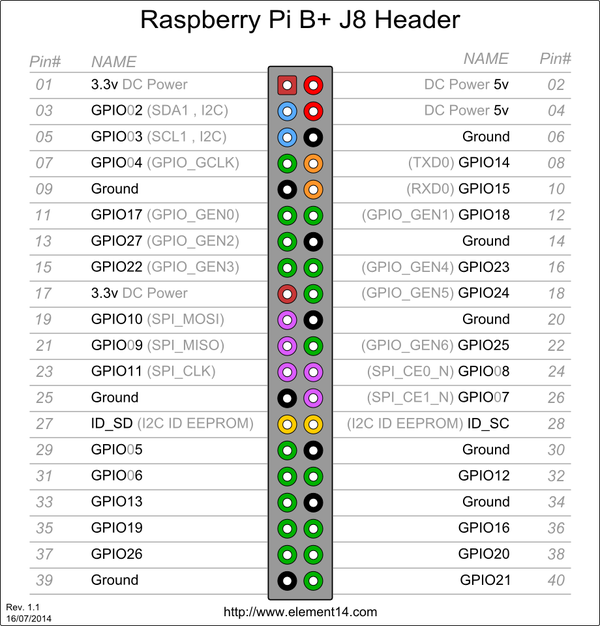
                  And how it looked like when I was starting my project :)

                  Wiring

                  My little contributions to the RetroPie project:

                  • Shell-Script-Boilerplate
                  • Fun-Facts-Splashscreens
                  • Limit-Last-Played-Games
                  R 1 Reply Last reply Reply Quote 0
                  • R
                    R0shen @hiulit
                    last edited by

                    @hiulit
                    Eyyy!! Thank You SOOOOOO Much I got it working currently enjoying some donkey kong Thank You sooo much haha :)

                    hiulitH 1 Reply Last reply Reply Quote 1
                    • hiulitH
                      hiulit @R0shen
                      last edited by

                      @r0shen Alright!!! :D I'm glad you're enjoying some retro games!

                      My little contributions to the RetroPie project:

                      • Shell-Script-Boilerplate
                      • Fun-Facts-Splashscreens
                      • Limit-Last-Played-Games
                      R 1 Reply Last reply Reply Quote 0
                      • R
                        R0shen @hiulit
                        last edited by

                        @hiulit
                        If I was to do a 2 player is their an adafruit gpio code to make 2 joysticks and 3 buttons on either side work?

                        hiulitH 1 Reply Last reply Reply Quote 0
                        • hiulitH
                          hiulit @R0shen
                          last edited by

                          @r0shen You can tweak the same file and add as many KEY/GPIO values as you want.

                          My little contributions to the RetroPie project:

                          • Shell-Script-Boilerplate
                          • Fun-Facts-Splashscreens
                          • Limit-Last-Played-Games
                          R 1 Reply Last reply Reply Quote 0
                          • R
                            R0shen @hiulit
                            last edited by

                            @hiulit
                            Where would you add the duplicate joystick and three buttons?

                            hiulitH 1 Reply Last reply Reply Quote 0
                            • hiulitH
                              hiulit @R0shen
                              last edited by

                              @r0shen Below the KEY/GPIO values you already have.

                              You just need to assign new values. Example:

                              W    21 # 2 player UP
                              S    22 # 2 player DOWN
                              A    23 # 2 player LEFT
                              D    24 # 2 player RIGHT
                              P    25 # 2 player 'A' button
                              etc...
                              

                              and so on.

                              P.S. This example is completely made up! ;) But you get the idea, right?

                              My little contributions to the RetroPie project:

                              • Shell-Script-Boilerplate
                              • Fun-Facts-Splashscreens
                              • Limit-Last-Played-Games
                              R 1 Reply Last reply Reply Quote 0
                              • R
                                R0shen @hiulit
                                last edited by R0shen

                                @hiulit
                                So the name such as 2 player UP
                                2 player DOWN does it matter what it's named? or does the name correspong with something in retropi? and also would you know in retro pi where to configure an extra joystick and duplicate buttons (e.g. 2 x buttons 2 y buttons and so on)

                                hiulitH 1 Reply Last reply Reply Quote 0
                                • hiulitH
                                  hiulit @R0shen
                                  last edited by

                                  @r0shen No, those are comments. Everything that comes after a hashtag # is a comment. So it doesn't matter what you write there. It's just so you know what the key represents.
                                  And for the second question, I don't know, but you could take a look at the docs https://retropie.org.uk/docs/RetroArch-Configuration/ maybe you'll find something there :)

                                  My little contributions to the RetroPie project:

                                  • Shell-Script-Boilerplate
                                  • Fun-Facts-Splashscreens
                                  • Limit-Last-Played-Games
                                  R 1 Reply Last reply Reply Quote 0
                                  • R
                                    R0shen @hiulit
                                    last edited by R0shen

                                    @hiulit
                                    So All it does is make each GPIO number a keystroke and you just wire your controlls to it and use the keystroke as up down left right button a b x y and so on. You just write what it is to know whats in that GPIO number right? anyway to add more of the GPIO pins to that code?

                                    1 Reply Last reply Reply Quote 0
                                    • RaccoonR
                                      Raccoon
                                      last edited by Raccoon

                                      Hi there ^^,
                                      I´m new here and I seriously need help. I´m doing an Internship right now and my finishing Project is trying to build my own MintyPi, whith a Raspberry Pi Zero. The emulation Station is working, with an extern USB Controler.
                                      I soldered my own board for Buttons. And I checked the Buttons funktion. They´re doing their job.
                                      I installed the new image and everything.

                                      I´m totally new to Raspi and Linux.
                                      For 5 Days now, I tried to configurate the Buttons: A, B, X, Y, UP, DOWN, LEFT, RIGHT, START, SELECT, L, R
                                      I loaded down the Adafruit retrogame and loaded the PiGRRL Zero.
                                      Looks kind of like this:

                                      LEFT 27 # Joypad left
                                      RIGHT 22 # Joypad right
                                      DOWN 5 # Joypad down
                                      UP 4 # Joypad up
                                      Z 14 # 'A' button
                                      X 16 # 'B' button
                                      A 21 # 'X' button
                                      S 20 # 'Y' button
                                      Q 12 # Left shoulder button
                                      W 6 # Right shoulder button
                                      LEFTCTRL 19 # 'Select' button
                                      ENTER 17 # 'Start' button

                                      these numbers are the bcm i read out over
                                      gpio readall
                                      I also tried the GPIO pins from the coulerfull picture earlier in the chat:

                                      LEFT 27 # Joypad left
                                      RIGHT 22 # Joypad right
                                      DOWN 05 # Joypad down
                                      UP 04 # Joypad up
                                      Z 21 # 'A' button
                                      X 16 # 'B' button
                                      A 26 # 'X' button
                                      S 20 # 'Y' button
                                      Q 12 # Left shoulder button
                                      W 06 # Right shoulder button
                                      LEFTCTRL 19 # 'Select' button
                                      ENTER 17 # 'Start' button

                                      But the only thing that works as said is ENTER 17, this is the only button working correctly.
                                      on the last setting the
                                      X button does LEFT
                                      Y button does DOWN
                                      L button does UP (but not always)
                                      and the others are doing nothing

                                      So my guess is that the pins might be correct but the commands LEFT, RIGHT, etc.
                                      are not assignt correctly.

                                      I would be really gratefull O3O
                                      if you could help me find a solution.

                                      1 Reply Last reply Reply Quote 0
                                      • RaccoonR
                                        Raccoon
                                        last edited by Raccoon

                                        So I actually found an smal pice for a solution. Turns out I had a german keyboard configured.
                                        The Adafruitprogramm, seems to take the keys from the keyboard an transfers it to my own buttons. Since I used an german keyboard it didn´t work. I changend to us keyboard, but that didn´t work either. I´m back to german keyboard now. So I changed the Names of the Keys:
                                        A 27 # Joypad left
                                        D 22 # Joypad right
                                        S 5 # Joypad down
                                        W 04 # Joypad up
                                        ? 21 # 'A' button NUM6
                                        ? 16 # 'B' button NUM5
                                        ? 26 # 'X' button NUM4
                                        ? 20 # 'Y' button NUM8
                                        ? 12 # Left shoulder button must be the 3§³ Key
                                        "+" 6 # Right shoulder button on NUM+ + without the ""
                                        #' 19 # 'Select' button must be the '# Key
                                        ENTER 17 # 'Start' button

                                        So far, so good.

                                        My new Problem is that I don´t know the correct names of the keys needed.
                                        Does anyone of you know where i could find them?

                                        Would be great if anyon could answer :D

                                        hiulitH 1 Reply Last reply Reply Quote 0
                                        • hiulitH
                                          hiulit @Raccoon
                                          last edited by

                                          @raccoon Here you go:

                                          • https://github.com/adafruit/Adafruit-Retrogame/blob/master/keyTable.h
                                          • https://thenated0g.wordpress.com/misc-linux-info0/keys-from-usrincludelinuxinput-h/
                                          • https://github.com/torvalds/linux/blob/master/include/uapi/linux/input-event-codes.h

                                          My little contributions to the RetroPie project:

                                          • Shell-Script-Boilerplate
                                          • Fun-Facts-Splashscreens
                                          • Limit-Last-Played-Games
                                          RaccoonR 1 Reply Last reply Reply Quote 1
                                          • D
                                            dizmodawg
                                            last edited by

                                            Is there some body who could make a youtube video on how to retrogame and program the buttons to the gpio pins? I'm almost done with my cabinet and i have a arcade only build and not want to use a game pad encoder. I want to use gpio pins but am a noob. Also i am using a pi 3. I found this and this is how i want mine.
                                            0_1509587421239_pins.jpg

                                            1 Reply Last reply Reply Quote 0
                                            • First post
                                              Last post

                                            Contributions to the project are always appreciated, so if you would like to support us with a donation you can do so here.

                                            Hosting provided by Mythic-Beasts. See the Hosting Information page for more information.