Pi in a Gameboy Advance Build - WIP
-
@obsidianspider I was planning on buying 2 lots of buttons from Kitsh-Bent (http://store.kitsch-bent.com/product/custom-buttons), and then drill the extra holes for the second A and B buttons (maybe mould some supports from sugru or something) but they only have clear ones, and the postage to the UK was like $17 so that put the stops on that!!
will the buttons from your NES controller fit in the GBA button holes?
want to get a tft into your project, look no further than here https://retropie.org.uk/forum/topic/7464/ili9341-tft-screen-guide
-
@obsidianspider
Can you measure the depth and the radius of the speaker housing?
Or can you provide the dimensions of the original speaker please?About I2S, well it's digital sound and the amp provides downmix to stereo by internal circuit to power one speaker :) In most cases it seems the best solution for such a small build and maybe you can save space in your housing because you don't have to use a USB HUB and just use a Wifi USB Stick for internet connection.
But I provided you links to my build :) There you can read the whole story.
I think space will be rarer than thought, because you may use:
- Battery packs
- Battery balancer (also provided by adafruit)
- Space for your GPIO controllers
- SD adapter.....
Good luck! May the farce always be with you ;)
-
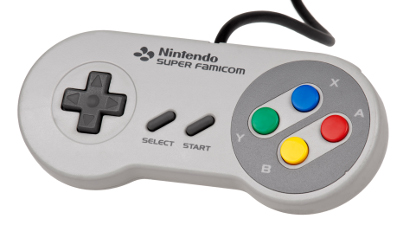
@moosepr I was looking at the diameters of buttons and the stock AGB buttons are ~8.8mm. I measured the Super Nintendo controller buttons and those are ~10.4mm, but I was looking around and I asked on reddit if anyone could measure a Gameboy Pocket (which doesn't have "A" and "B" on the buttons) and per the response those are ~8.9mm. .1mm is probably within the realm of the tolerances of the reproduction company. I want to do the blue green yellow red thing like on a Super Famicom controller, and I've seen those colors for sale on eBay (the greens are a bit lighter, but I haven't looked very hard), but first I have to see about how to make the four ABXY buttons actually fit in there. With the screen now taking up some room and the support for the R trigger button in the way I'm going to have to see what can be done.
-
@cyperghost The Nintendo speaker is ~23mm in diameter, the housing is around the same. It's a snug fit. The new width now that I chopped out for the screen is around ~19mm. If I remove the rest of the speaker housing I could shift the speaker over and it would still fit inside the case, only partially blocked, and would probably still sound decent.
I have to look into the I2S thing as I am using a GPIO-driven screen and will probably have 12 GPIO buttons connected, so I'm not sure what or how many connections will be required or if they would conflict with the display. I'd like stereo through headphones and a mono speaker if possible, but I'm not there yet.
Lots to consider.
-
@obsidianspider the adafruit i2s board is tiny, and only needs 3 gpio pins https://learn.adafruit.com/adafruit-max98357-i2s-class-d-mono-amp/raspberry-pi-usage
The only problem might be that it will need to use pin 18, which is normally used by TFT screens for backlight (as it can do the pwm that is handy for the sound part)
want to get a tft into your project, look no further than here https://retropie.org.uk/forum/topic/7464/ili9341-tft-screen-guide
-
@moosepr It looks like the I2S isn't going to work because on my screen pin 19 is being used by the screen.
-
@obsidianspider You could use a composite display. That way the GPIO is open and the I2S is available.
-
This ABXY thing is kicking my butt. With that trigger button where it is, there's no good way to put X and Y buttons on top of the existing B and A holes.
I'm thinking way outside the box here, but the New 3DS has ABXY , and you can get replacement buttons for ~$9. Not super cheap, but they're the colors I want and would be cheaper than buying a bunch of gameboy pocket buttons that wouldn't all fit anyway. And…
They're smaller.
Using some overall dimensions I saw online and doing some guesswork, it looks like the ABXY cross is ~24.5mm across. I don't have a New 3DS, but I might be able to go measure one at a store display since they are still the current model.
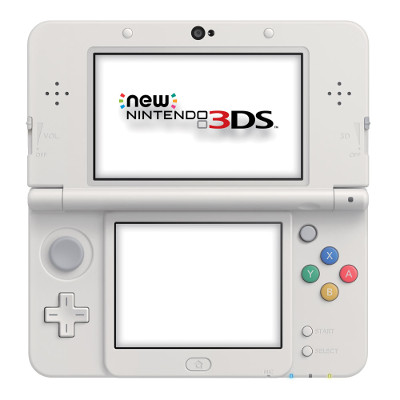
So what if I drill a 1" (25.4mm) hole in the front of the Gameboy, then 3D print a button panel to fit that hole. Kind of like how there's a circle on the face of a Super Nintendo controller…
It'd kind of look like this…
This assumes the ABXY buttons are the size I think they are.
I have a feeling I'm not going to be able to pull this off. :-/
-
@obsidianspider you could glue in the insert, fill the gaps with a filler of your choice, sand it smooth then give the whole thing a coat of paint.
That's how things like this are born http://modretro.com/xen/index.php?threads/gamecube-portable-the-varia-cube.15084/
want to get a tft into your project, look no further than here https://retropie.org.uk/forum/topic/7464/ili9341-tft-screen-guide
-
@obsidianspider actually this one is exactly what you were planning http://modretro.com/xen/index.php?threads/game-gear-x-brasil.15052/
I did ponder the same with an old broken nds for the buttons. Even got a red one so the red buttons would look good against the white GBA
-
@moosepr I just fell into a frankencasing rabbit hole. This looks pretty doable. I just don't know how I'm going to blend the textures together…
-
I decided to buy a broken DS Lite from eBay for $7 to see if/what I can do with the buttons, pads, and case. Should be here next week.
-
@obsidianspider I did also fall into a googling frenzy for the second time. I always have these ideas, then research the hell out of them, then never find the time to actually finish (or in this case, even start them!)
This guide seems helpful http://bitfixgaming.boards.net/thread/138/frankencasing-controller-parts-case
-
I decided to try out the "use GPIO as a controller" thing today and I used test leads to make my "buttons"
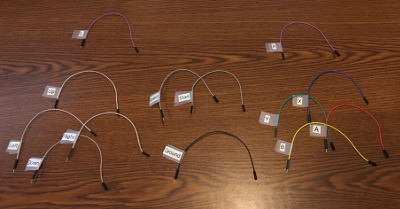
Then I connected them up to the GPIO using the pin numbers from the Adafruit PiGRRL 2 Default Controls. I may change this to tidy things up in the case, but this was just a test.
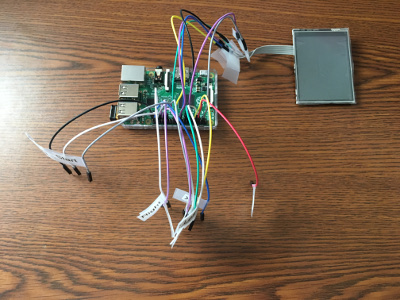
I then installed the retrogame software and configured it by commenting out the buttons in the config file I wouldn't be using.
When I rebooted the Pi to try to configure things my screen started acting wavy and I thought that there was an issue with conflicting pins, but it turned out that my very quick mockup had some screen wires touching each other and that was causing the disruption.
Mapping the buttons was just like any other controller in EmulationStation and things seem to work fine.
If you're finding the MAME ROW too easy, you can try this new controller out. ;)

-
@obsidianspider thats one less usb required ;)
want to get a tft into your project, look no further than here https://retropie.org.uk/forum/topic/7464/ili9341-tft-screen-guide
-
@moosepr said in Pi in a Gameboy Advance Build:
@obsidianspider thats one less usb required ;)
Haha, yeah, 13 wires to replace 4…
At some point I still have to figure out the power situation to see if I have enough GPIO pins available.
-
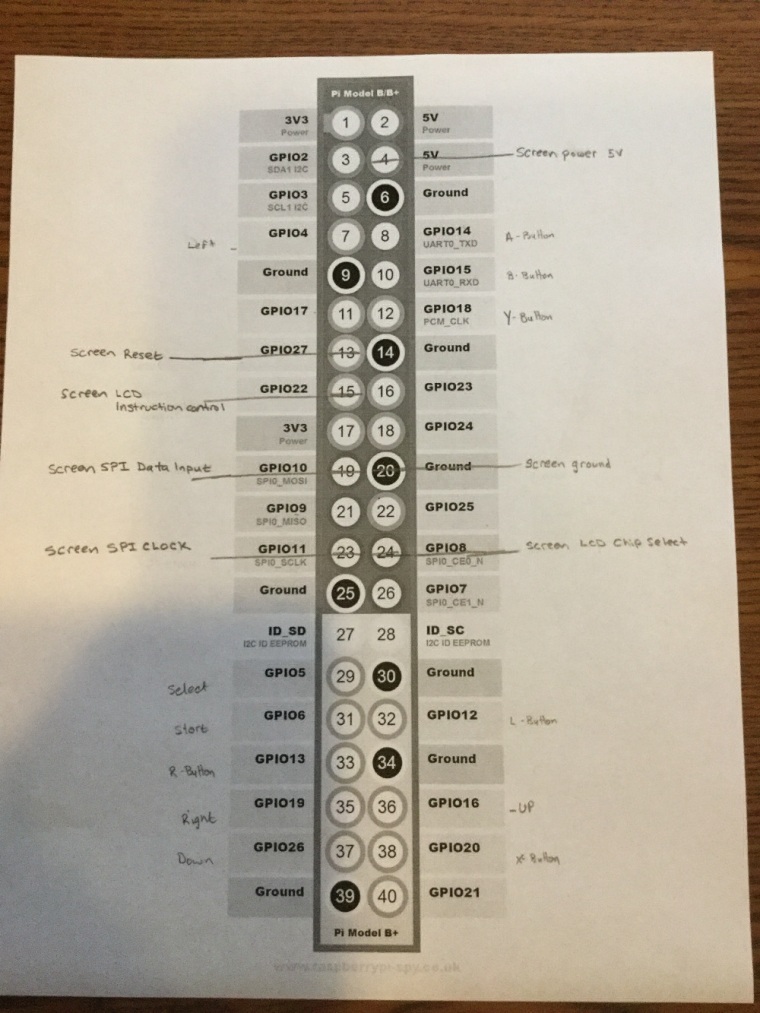
@obsidianspider Can you please provide a better resolution of your latest photo?
As you don't use the Key buttons of your screen GPIOs are set free
Can you recheck your wiring with this picture by adafruit please?or can you recheck if you have GPIO 18, 40 or 45 free? These pins can provide PWM sound! I think you don't need a USB hub :)
-
@obsidianspider there are ways to reduce the number of pins your using http://raspberrypi.stackexchange.com/questions/14035/8x8-matrix-of-buttons but it does mean you will need different software to scan the rows and columns to figure out what is pressed
want to get a tft into your project, look no further than here https://retropie.org.uk/forum/topic/7464/ili9341-tft-screen-guide
-
@cyperghost Sorry for the delay, I was helping to run Bacon Fest all day today, and I'll be back tomorrow.

That's ~1/5 of the festival area. A few people showed up. ;)This is my current GPIO setup (I have been writing it on a diagram as I go through wiring it up on my Pi 2 test machine)
I know you REALLY want me to use that I2S amp, but from what I can see, it's mono, and I want stereo sound to the headphone jack, so I don't know that it would work for me, plus I'm already running out of GPIO pins, and I still need some for my power switch once I figure that out. Even my Mausberry needed at least two when I did that on my Super Famicom.
Semi-related: I got Pi-related mail today.
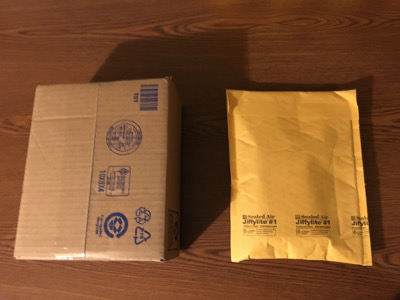
Can you guess what was in the box and what was in the padded envelope?
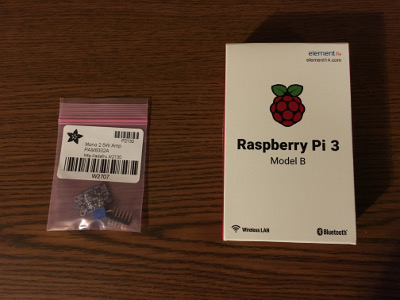
If you guessed that the box was for the 24mm Adafruit amp and that the padded envelope was for the Pi 3, you'd be right. Haha. I will never understand shipping decisions. For what it's worth, they were ordered from the same company. The Pi 3 was a free giveaway by Arrow this past week. Now I have to make something cool with that too…
-
@moosepr I'm not sure I need to go the multiplexing route, but if I run out of pins, I'll keep it in mind. I haven't really researched how to do that at all and my brain is fried from doing volunteer work for 12 hours, and I'm doing more tomorrow.
Contributions to the project are always appreciated, so if you would like to support us with a donation you can do so here.
Hosting provided by Mythic-Beasts. See the Hosting Information page for more information.