Pi in a Super Famicom Build
-
@danfozzy is it a psone or a playstation 1? I did a playstation 1 and i can help you out.
-
@OBSIDIANSPIDER Did you ever get that STL file of the Super Famicom backplate made?
-
@elranzer My friend who was helping me, and then moved, has some time now and worked on it in the last few days. It looks promising from the photos, but I haven't seen it in person yet.
-
A Raspberry Pi build is never truly "done" but my Super Famicom build is pretty close to that point.
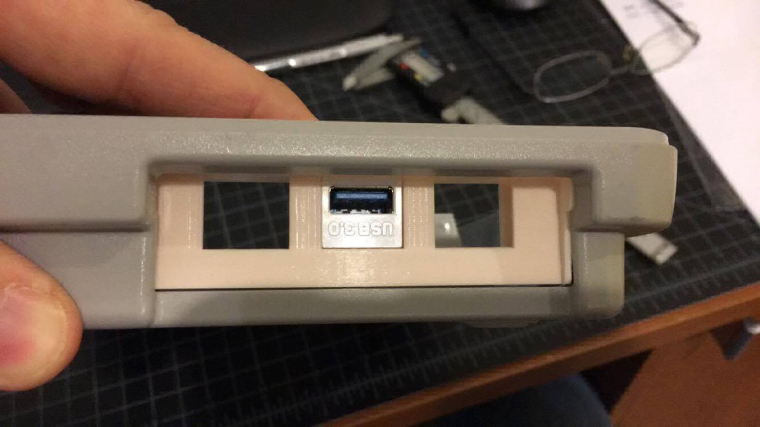
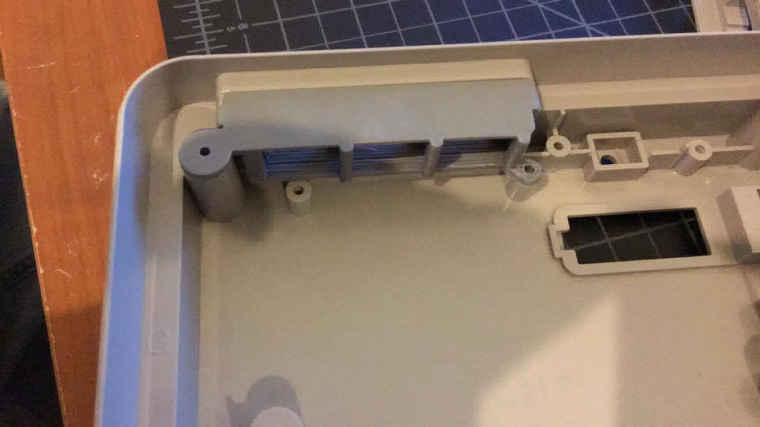
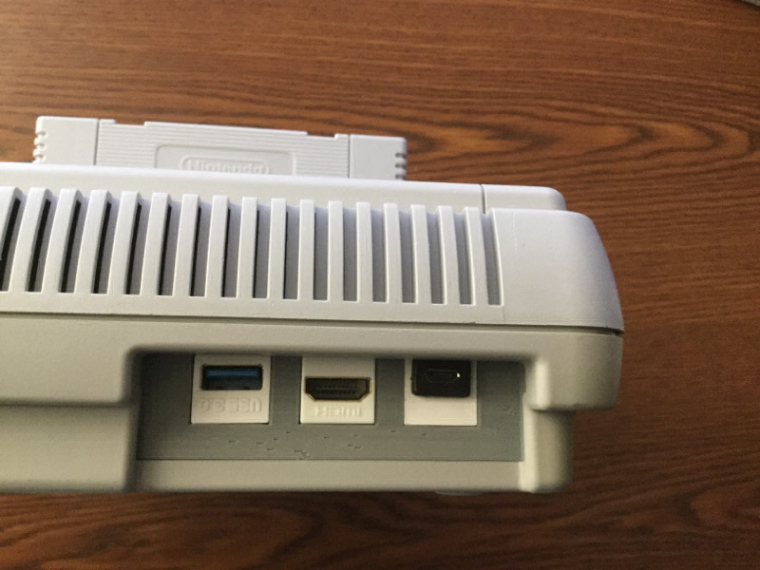
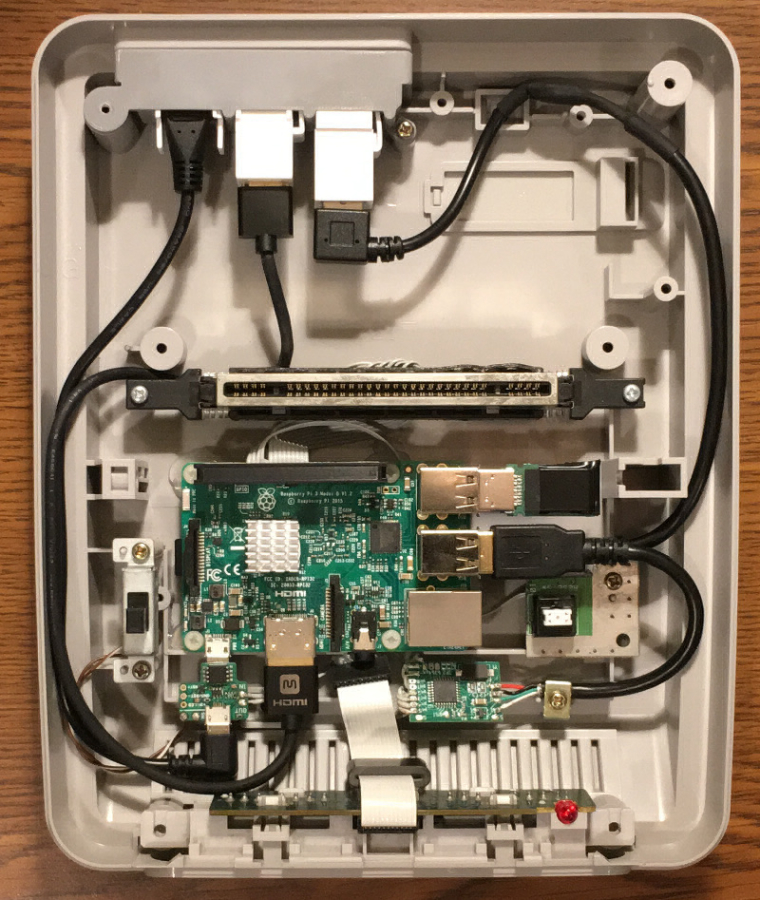
I met up with my friend and picked up my Super Famicom shell and the part he 3D Printed for me. It's fantastic. Printed in ABS and it fits the Super Famicom like it was from the factory. The Keystone Jacks are right at the top edge of the opening, but that was a design decision based on not wanting to modify the Super Famicom shell. If I wanted to remove the ledge from the inside the ports could be lowered, but I can plug into every port without any strain.
If you want to download the STL, my friend was nice enough to upload it to Thingiverse.
I'm really happy with how things turned out.
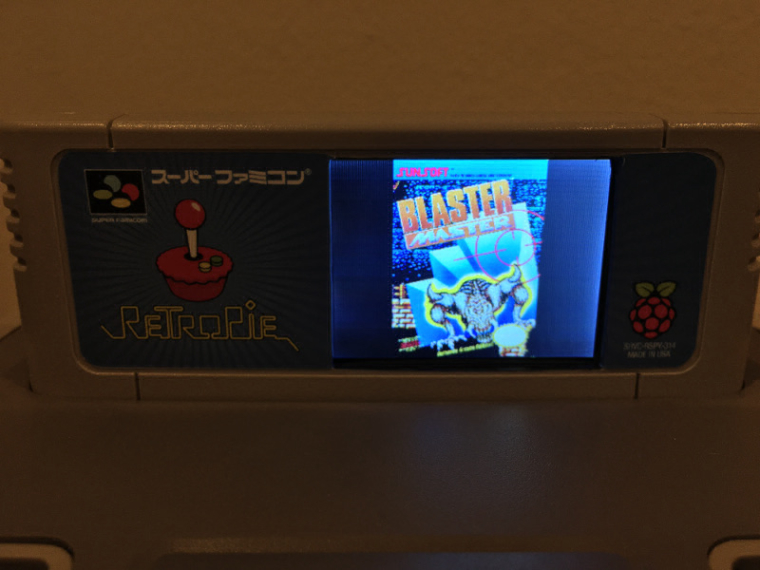
It's not easy to take a photo that also shows the cartridge TFT
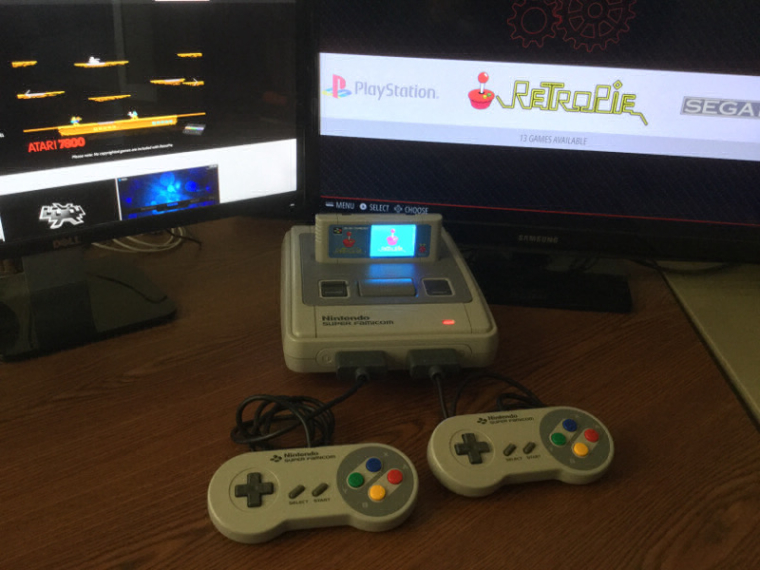
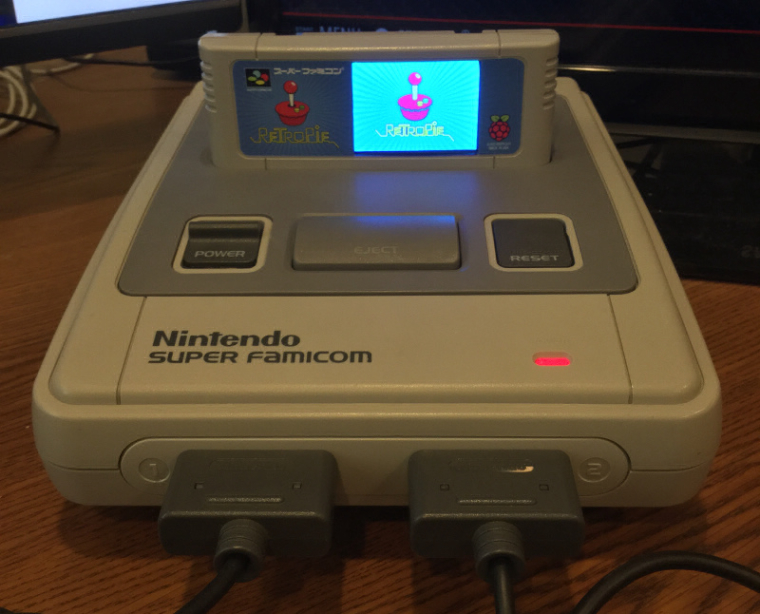
I hadn't powered the Pi on in a few months, so now it's updating and I still want to make some tweaks to how the TFT works and what the Reset button will control (I went back to just having it turn the screen on and off) but it's finally "complete".
-
@obsidianspider congrats on finally finishing this system. Its got to feel great to finally see this done.
-
@obsidianspider I never tire of seeing this!!! :D
want to get a tft into your project, look no further than here https://retropie.org.uk/forum/topic/7464/ili9341-tft-screen-guide
-
@moosepr Now that it's "done" and hooked up to my 65" TV I kind of really love it. I want to adjust some more things with the scripts and artwork for the little screen, and I just ordered controller rebuild pads, but after playing it a few hours last night, I'm really happy with how things turned out.
-
I love this project. I'm always impressed by the consoles that people pop a 'Pi in, but one thing that always puts me off doing my own is the functionality of the cartridge, but what you have done is brilliant. I had my SNES on display and in service up to the purchase of my Pi, then it sat there collecting dust so I boxed it all up again. If I was ever able to recreate something to this standard then I'd happily bust it back out and let it take pride of place under my TV.
But until that happens, I shall just return to this thread and gaze in awe at your work!
-
@Danorak1981 I still have my discolored, but working US Super Nintendo and a few dozen games from when I was 10 and I don't plan to mod that, even if it's not compatible with modern televisions.
A nice thing about the game with the screen in it is that it doesn't have to be inserted for the Pi to work properly. If you take the cartridge out you just don't have a little screen showing you the game you're playing. I've not tried removing it or inserting it while the Pi is on, but then again, you can't swap out a game with a real Super Nintendo turned on either. ;)
I usually leave the screen turned on, but hitting
Resetturns it off and on quite reliably. -
And that's what I think is great-the cart slot/cart has a purpose, albeit non-essential. What better way to make use of something that is often over looked: using it to display the box art makes your conversion as close to original as I see possible.
I was going to attempt the 50/60hz switch mod and region lockout Mod on my original SNES, but bought a Famicom like yours to try it on. As the SNES was on display, I used the Famicom to make a mould of the case so I could make a clear but fitted plastic dust cover. The dust cover was a success, however, the process disfigured the unit without me realising, so the project went on the backburner, and then I discovered the RPi. I'd like to attempt something like this, but like you, I'm not using my original console so it'll have to wait until I have some spare money for a second unit! (I've also been inspired by your GBA project too-could you lay off the projects for a bit please?!).
In relation to the screen, is it likely to cause any burn with it being switched on during gameplay as it is a static image?
-
@Danorak1981 I really don't know. It was $9 from eBay, so I'm sure it's not designed to be as resilient as a screen from an iPhone. I guess I'll find out over time. Stuff like that is part of why I made it removable. If it dies I can just unscrew it from inside the case and put in a new one with all of 9 soldered connections. Of course, that assumes they would still make a board of the same size if and when it dies.
-
Massive props to this build. The idea of popping in a display in the cartridge is only rivaled by your execution of it. Absolutely brilliant. It kind of transcends the "homebrew" category, it could well enough be a fully marketed product.
I hope it brings you just as much joy in using it as it did while building it.
Congratulations on a superb build!
-
In a case of "while I'm at it", when I got my TFT working again after the new 20170303 kernel update was released I decided to do something about the images being displayed on the TFT.
When I was first getting things going I just resized the image to 320x240 and displayed it. It worked, but if the image wasn't the correct aspect ratio, the script didn't care and it resulted in a distorted image. Today I managed to correct that. My new (still admittedly hacky) script will now resize images proportionally so they fit inside the window without stretching.
I think it's a "more right" way to address the issue, and is a whole lot more convenient than making custom images for every single game so it doesn't look stretched.
-
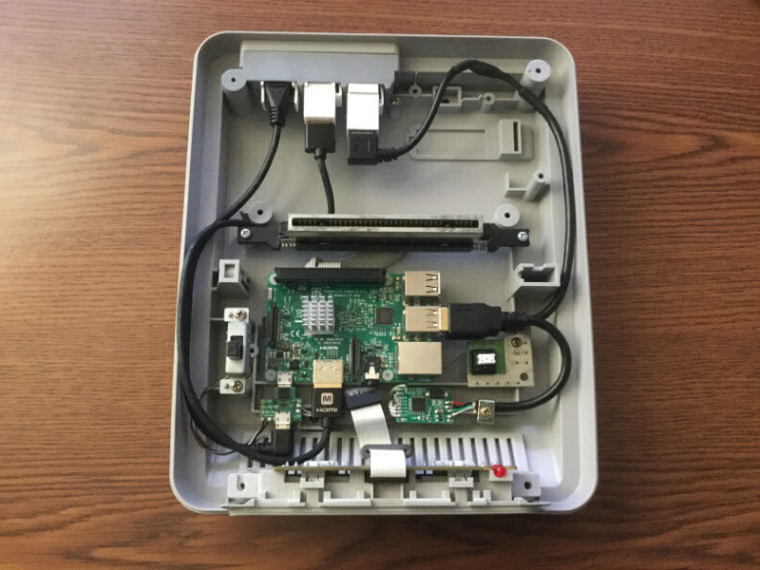
Today I added a 256GB USB drive to the Super Famicom Pi and it was pretty easy. The drive was a bit too long, but I learned from putting one in my Genesis hub Pi that by taking the case off it should fit with no problems. The blue LED is really bright, so I covered it with a piece of tape, because without it there was blue light bleeding out of all of the vent holes like a spaceship read to take off.
-
@obsidianspider
Monoprice is the place to get cables lol
I'm sure some people would like the blue-light-bleeding-out-of-all-of-the-vent-holes-like-a-spaceship-ready-to-take-off disease! -
@backstander Monoprice was the only vendor I could find with a short HDMI cable that also had small connectors. Everyone else had really thick rubber on the plug and the cable insulation was huge.
-
Today I decided to work on moving my scripts to my USB drive for stability, and to clean things up since I was initially just cobbling things together to get them to work. One challenge I faced was that the USB drive isn't immediately mounted when the system boots. It takes a few seconds. To get around that I put the
tftstart.shscript in the/home/pi/folder and added a bit to tell it to wait until the USB folder is available before trying to execute the scripts that are located on it.#!/bin/bash # Wait for USB disk detection # Disk drive mount we're waiting on usbdrive="/media/usb0/retropie-mount" # Max time to wait (in seconds) maxwait=60 for (( i = 0; i <= $maxwait; i++ )) do [ -d $usbdrive ] && break sleep 1 done #load image sudo python /home/pi/RetroPie/tft/imageparam.py "/home/pi/RetroPie/tft/images/RetroPie Splashscreen Blue.jpg" #turn on backlight and enable Reset button toggle sudo python /home/pi/RetroPie/tft/switch.pyI also updated my
runcommand-onstart.shscript to reference images located in the ROMs folder (I'm moving images to the ROMs folder) and to also handle file names with square braces[ ], which were breaking the script.# /opt/retropie/configs/all/runcommand-onstart.sh # get the full path filename of the ROM rom=$3 # get the system name system=$1 # get rom filename without folder rom_bn=$(basename "$rom") #get rom filename without extension rom_bn="${rom_bn%.*}" # escape square brackets in rom filename rom_bn="${rom_bn//\[/\\[}" rom_bn="${rom_bn//\]/\\]}" # Set a TFT-specific image if there is one img="$(find "/home/pi/RetroPie/tft/images/roms/${system}" -type f -name "${rom_bn}-image.*" -print -quit)" # If a TFT-specific image was not found, look in the images folder in the ROMs directory for that system if [[ -z "${img}" ]]; then img="$(find "/home/pi/RetroPie/roms/${system}/images" -type f -name "${rom_bn}-image.*" -print -quit)" fi # If an image was not found in the ROMs directory for that system, check to see if there are any in the default emulationstation location if [[ -z "${img}" ]]; then img="$(find "/opt/retropie/configs/all/emulationstation/downloaded_images/${system}" -type f -name "${rom_bn}-image.*" -print -quit)" fi # If no game images are found, display one for the system being emulated if [[ -z "${img}" ]]; then img="$(find "/home/pi/RetroPie/tft/images/systems" -type f -name "${system}.*" -print -quit)" fi # If no system image is found, default back to the Raspberry Pi logo if [[ -z "${img}" ]]; then img="/home/pi/RetroPie/tft/images/Raspberry_Pi_Logo.svg.png" fi # run the python script to display the image sudo python /home/pi/RetroPie/tft/imageparam2.py "$img"I'm sure there is a lot that could still be improved or optimized, but things are working well.
-
@obsidianspider Very good work. I am also rebuilding and have a question. How did you connect the original reset button? On the bottom are 4 connection possibilities?
-
-
Super, Thank You.
Contributions to the project are always appreciated, so if you would like to support us with a donation you can do so here.
Hosting provided by Mythic-Beasts. See the Hosting Information page for more information.