Reworked Convertible Bartop/Full Height Cabinet
-
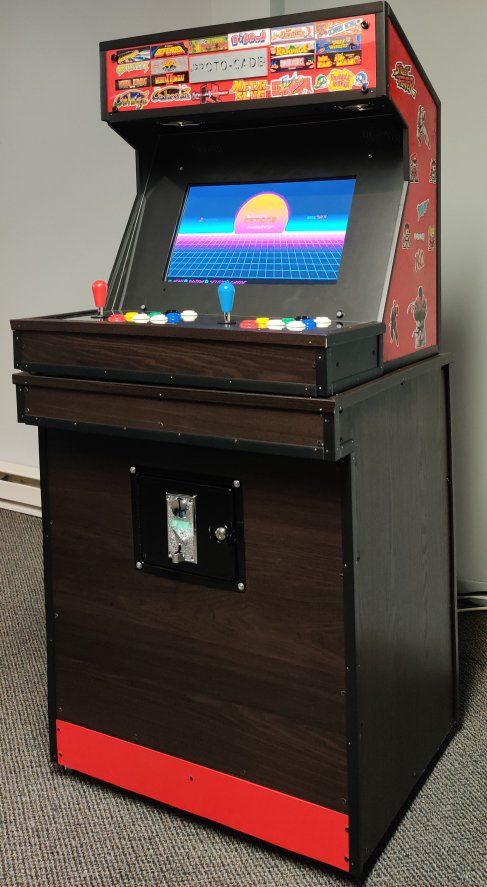
Hello All! I've been a long-time forum browser, and I can honestly say that this is THE place to be for PI-based arcade machine configuration information. You guys are amazing! I just got around to creating an account as I decided I finally had something worth sharing. I just finished building/re-building a convertable bartop/full height two-player cabinet with a working coin mech.
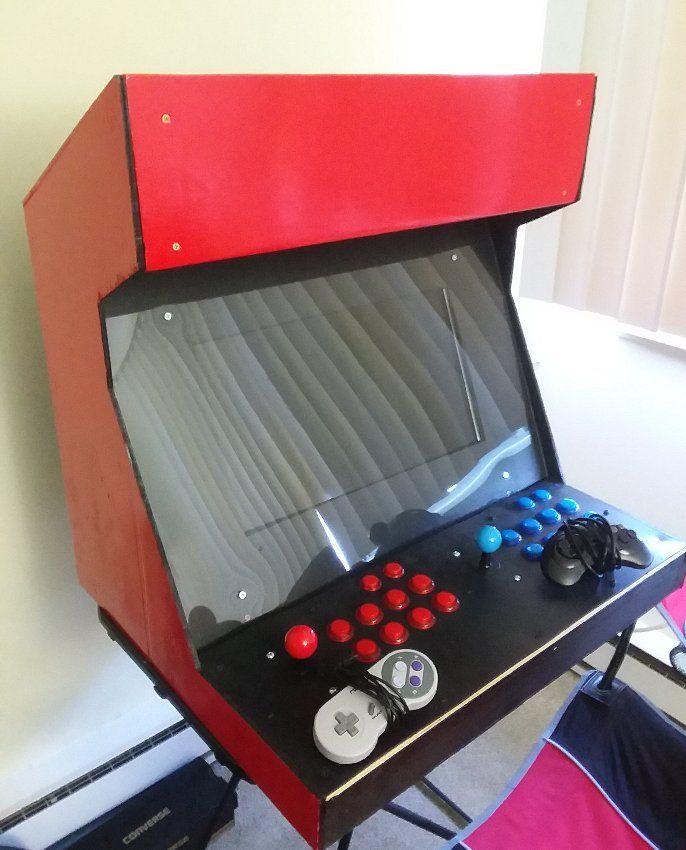
A few years back, I hastily constructed a simple RetroPie bartop using mostly pine cabinet-grade plywood, some aluminum L-strips for homemade VESA mounts, 2x2 furring strips and some 2x1 cabinetry odds/ends. I also wood glued every piece in addition to screwing it all together. I used a 19" 720P LCD TV (to keep costs down and improve game performance), a PI3b w/ heatsinks (heavily overclocked), disassembled Logitech stereo desktop speakers and a pair of 5v 80mm thin cooling fans. I also used some odds/ends computer fan grills I had on-hand. The black screen bezel and original control surface were ABS plastic sheets that I cut with a draw knife. The screen cover is acrylic, but if I ever replace it I'll be using Lexan (polycarbonate) instead. I used nothing but black/white spray primer (several coats) and red gloss spray paint for exterior wood surfaces. The result was an inexpensive, functional, lightweight and durable RetroPie bartop build. It was, however, severely lacking in the aesthetics department. (see picture below)
I finished a long-time project of mine to revamp the old bartop and also to construct a stand to make it a full-height cabinet-style machine. (I moved from an apartment to a house with a finished basement for my game room, so I now had space) Along the way, I decided I could add a functional coin-mech and get everything wired properly such that the machine can be unstacked by disconnecting a single Ethernet cable. (Should someone want me to drag it to their place for whatever reason) I work in IT and love hobby electronics, so the wiring and software configuration were the most interesting/fun to me. Time was probably my biggest constraint, next to a general lack of serious carpentry skills/tools. The only power tools used were a reciprocating saw (for cutting furring strips), an electric jigsaw (for wood panels and polycarbonate) and a cordless drill. I used a holesaw kit for buttons, sticks and panel mount connectors.
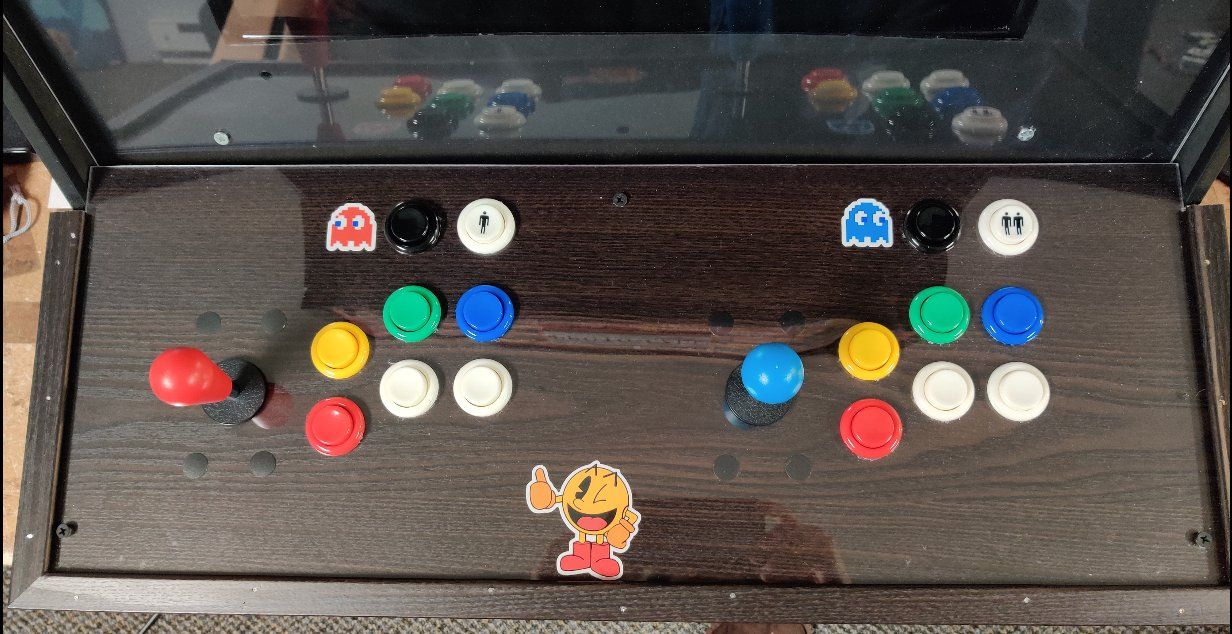
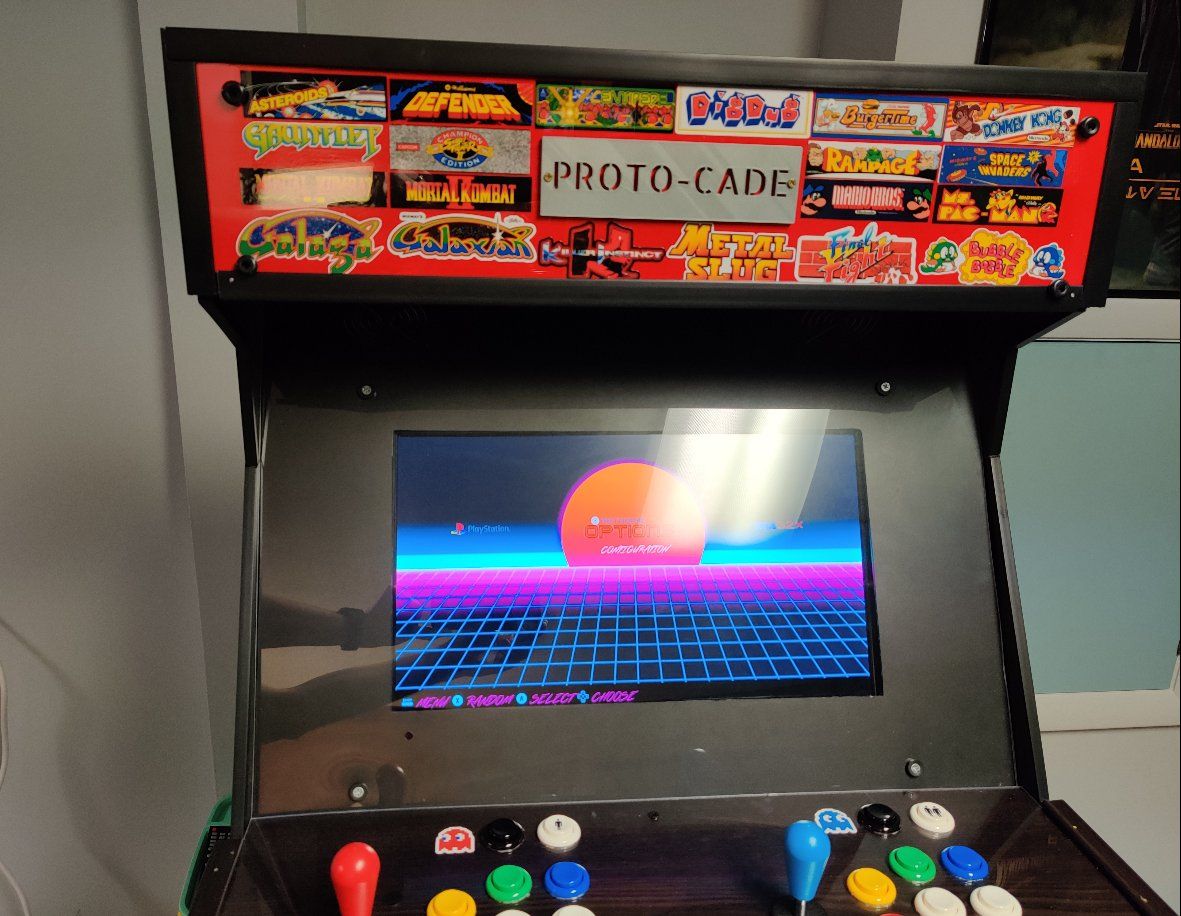
I rebuilt the control panel and marquee of the bartop, then trimmed it in matching java particle trim and black styrene plastic trim I found online. That styrene stuff is a joy to work with, as it can be cut using just metalworking hand tools. I used brads to tack the trim on, which is permanent, but probably easier to remove than glue if I ever have to take it apart. All of the new clear plastic panels are polycarbonate, as it's WAAAY easier to work with than acrylic (just use smooth cut wood blades). I found a lot of great mini marquee decals from an Etsy listing and some Mega Man and Street Fighter decals on Amazon. My brother had access to a 3D printer and he made me a "Proto-Cade" nameplate in silver, which I attached to the center of the marquee. I used a higher quality Happ-style button/stick set with clicky switches (good for 1.5 million cycles, supposedly), which the new bat sticks also feature. Controls were set up using a printable PDF controls template I found online, which is very similar or identical to a Sega six-button layout. I matched the button color pattern to that of the new NeoGeo MVSX. The encoders are DragonRise, but so were my originals and I have not had any problems with them. The old light-up button kit I had was cheap, with mushy proprietary button switches. It wasn't really worth taking it apart, but I did save the whole panel in case I find another use for it.
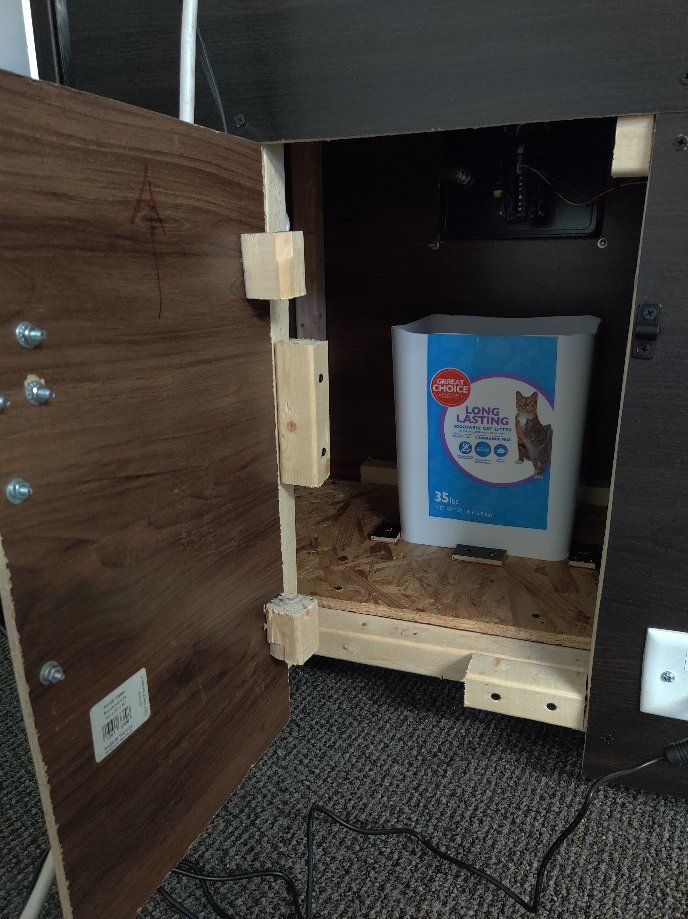
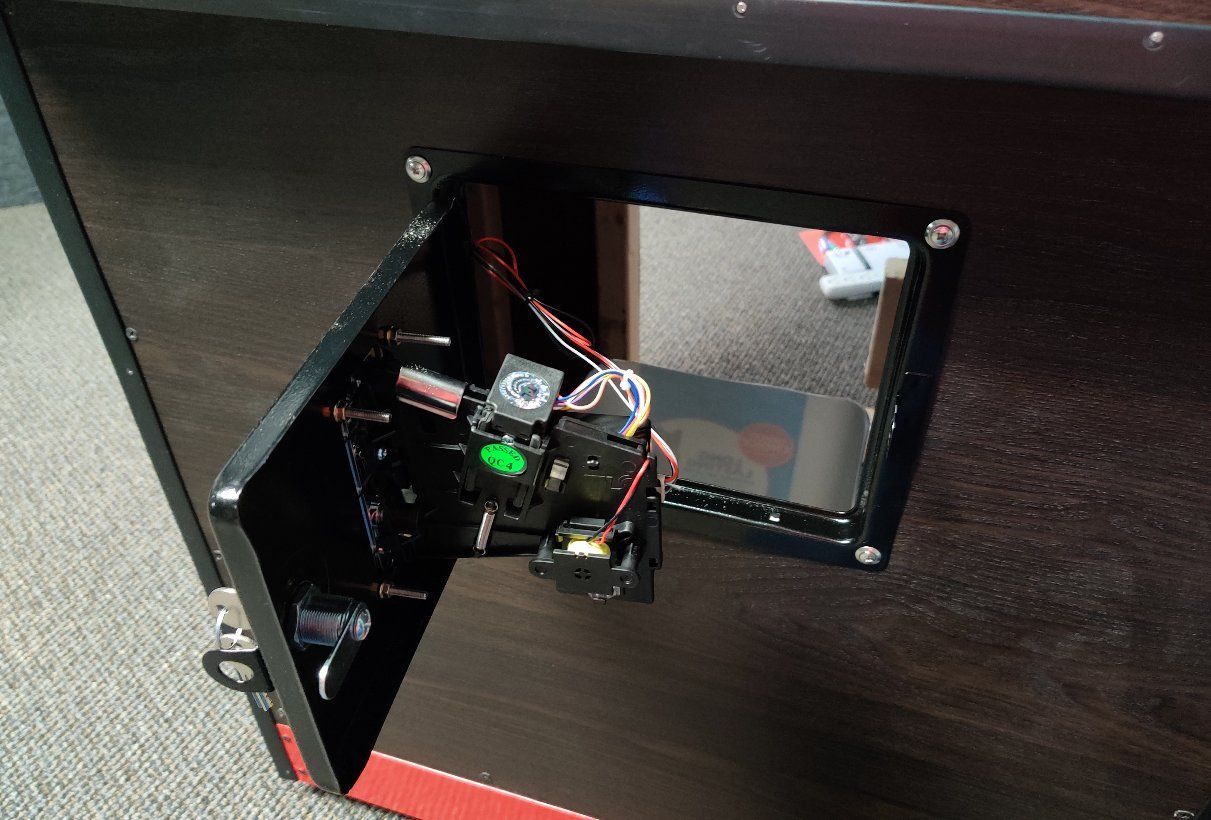
I don't like obviously overbuilt stuff that is needlessly difficult to move. I also HATE working with MDF (toxic dust, needs to be routed for trim, tricky to paint). I used "handy panel" pre-finished java 1/4" particle board around a 2x2 furring strip frame. The furring strips I found were much cheaper and lighter than 2x4s, you just have to sort through them to make sure they are straight/square at the lumber yard (most they had were warped or bent, possibly why the wood was so cheap). I mounted furniture casters on the bottom corners to make moving the thing easier for one person. The red kick-plate is just a piece of 1/4" handy panel that I wrapped in some red self-adhesive vinyl (similar to Cricut material). This ended up matching the red paint of the bartop perfectly, and if it gets scuffed it's easy to replace or re-wrap it. I added an inexpensive coin door from Amazon, threw in an inexpensive furniture lock and a simple/inexpensive comparative electronic coin mech. The coin catch is an upcycled cat litter bin with the top sliced off, it's loosely held in place by some pieces of handy panel I screwed to the floor inside the cabinet. The coin door didn't come with the needed panel clips, so I had to get creative and use screws/washers to mount it. The comparative coin mechanism requires 12v to run, so I had to route that in from an external 12v power supply I had on-hand. The signal circuit from the coin mech is connected via Ethernet cable out an Ethernet port on the back, then back into the upper bartop through another Ethernet port. Inside, I crimped two alligator clip test leads onto the in-use signal circuit pair from the Ethernet cable to attach to player 1's start button leads. I used an assortment of low-voltage connectors, electrical pliers and RJ45 Ethernet tools. I tested everything with a cable certifier and multimeter as I went, to be sure I wouldn't fry anything.
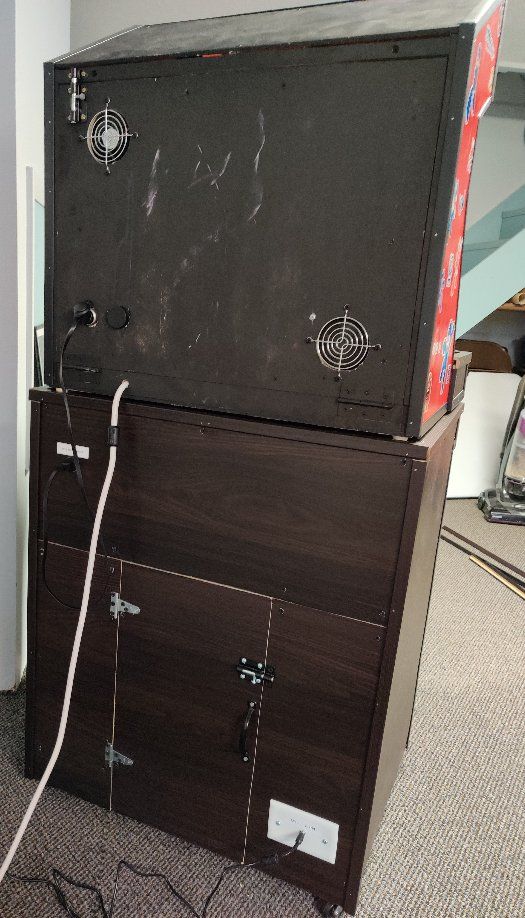
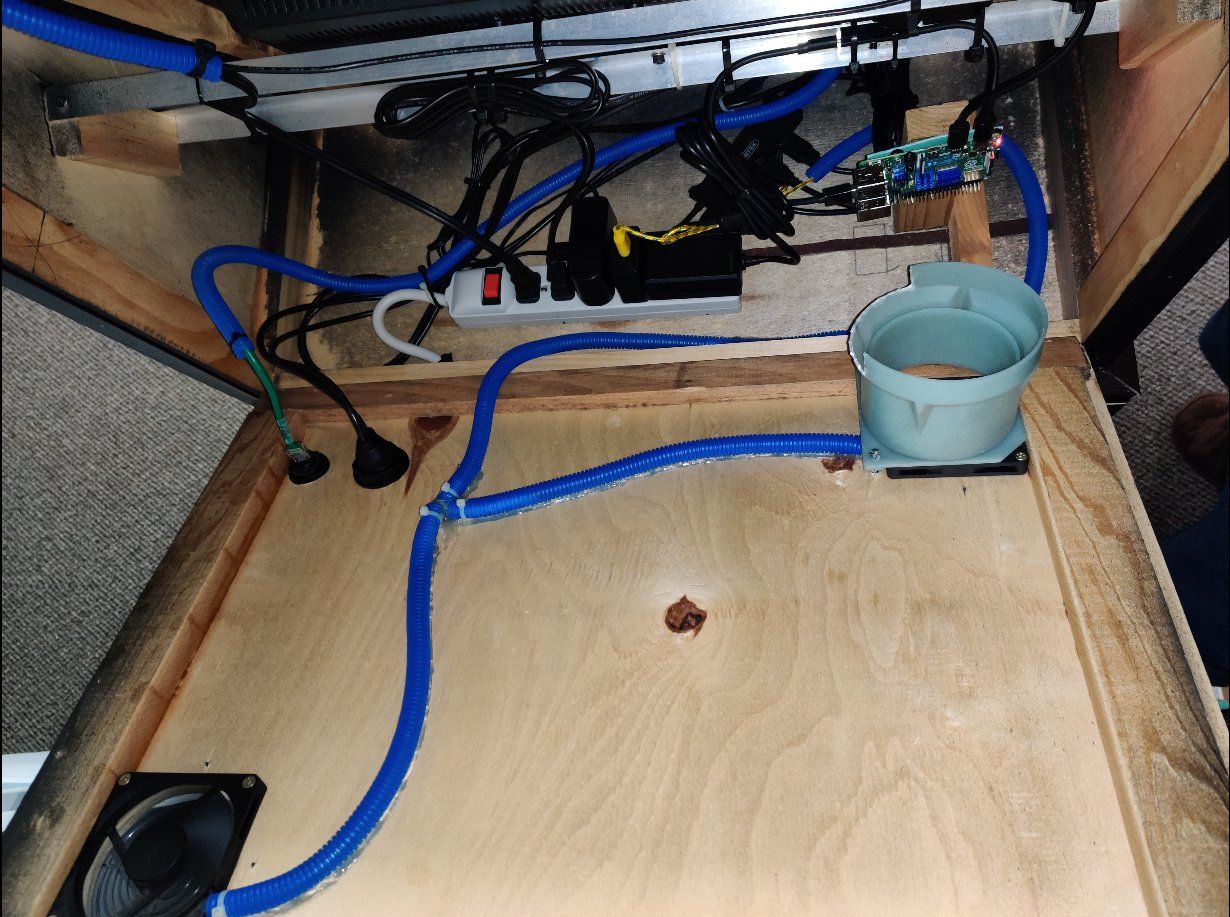
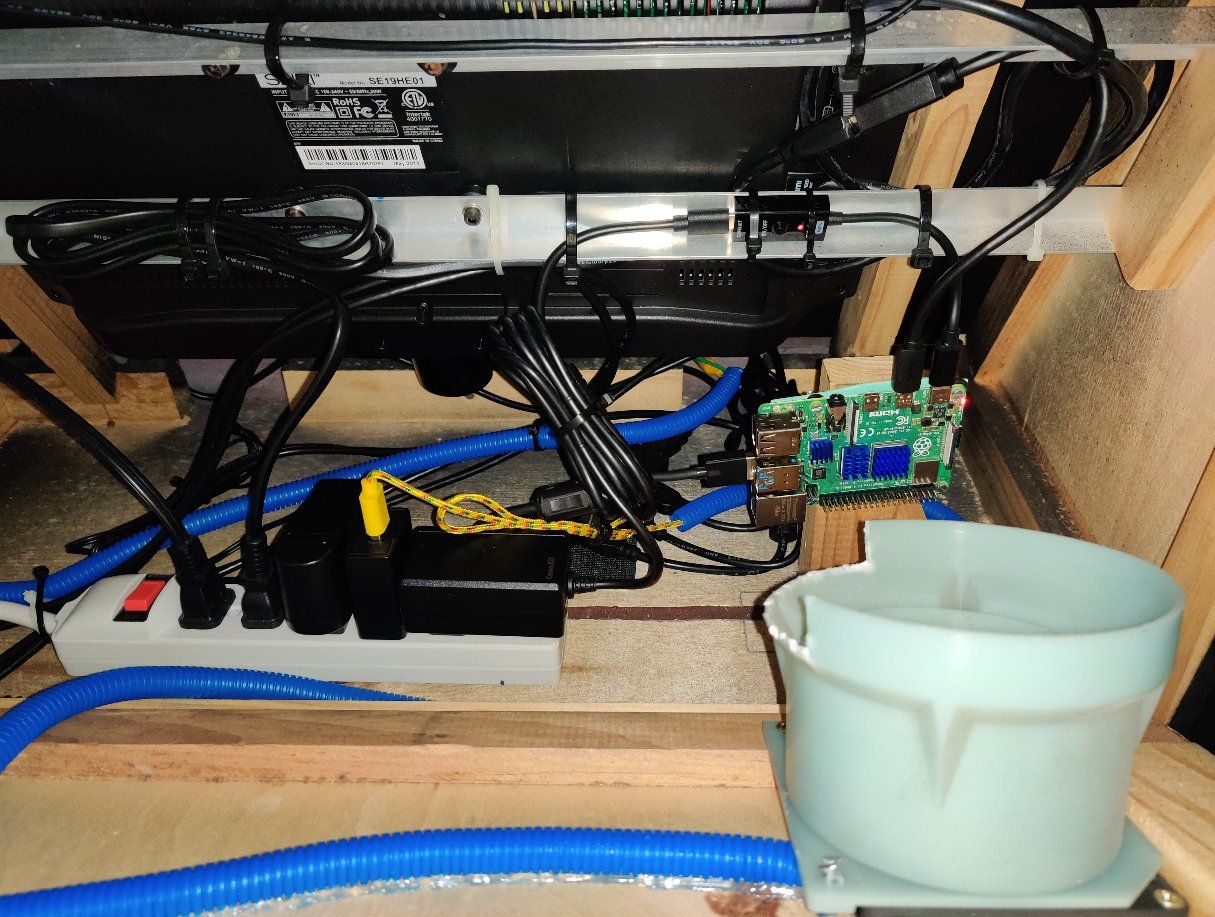
I also upgraded to a PI4 2GB board and a high-endurance 32GB MicroSD card. I overclocked the PI4 to 2Ghz CPU and 750Mhz GPU, which is quite stable with the ducted 80mm fan cooling the board directly. The fans are in a push/pull configuration, the bottom fan draws cool air into the cabinet and onto the PI4, the top fan draws warm air out of the cabinet (since hot air rises :-) ). Also inside is a power strip and a 4-port powered USB3.0 hub to handle accessory power draw. I routed two USB3 ports to the back panel using a panel-mount dual USB port kit, similar to the panel mount Ethernet ports used. The PI sends HDMI audio to the TV, which then feeds the Logitech speakers overhead (below the marquee) via 3.5mm analog connection. I find this is more stable and less noisy than amplifying the PI analog audio output directly. I disassembled the Logitech S120 speaker housings, cut holes in the panel below the marquee and mounted the speaker drivers and control board there. I used a pair of 80mm fan grills as speaker grills (nobody can see them anyways). I also made cutouts for the volume pot and 3.5mm headphone jack. This makes adjusting sound volume on the fly trivial and headphones could be used if needed. I personally find this speaker pair to be plenty loud and to have good audio range, but YMMV if you have a really noisy room with other running cabinets. (scuff marks on rear are from moving somehow)
For software, I started a clean RetroPie Pi4 image (current build) and built a curated game list mostly around lr-fbneo, but with some lr-mame2003+ and lr-mame2010 roms and console titles only where specific arcade ports were available. SSelph's scraper should be required for any arcade build, as without it the scraped game list titles are not descriptive enough to discern between parent and child roms with different features or regions. To organize things, games are in their own sub-folders so there is only one entry per game in the top level of the list. I put together a nice screensaver system by finding and cutting a long online video comprised of 30 second clips for the top 100 or so Mame arcade games. I compressed and cut the video into 15 minute sections and applied those videos as previews to the first several roms in my game list. (This works as my scrapes don't contain video, only images) I disabled video previews in the theme, then set RetroPie to play random game videos as screensavers for 15 minute intervals after 3 minutes of inactivity. Presto! Realistic "attract mode"-like screensaver! And with the cut video times matching the screensaver video times, it seemlessly cycles through the clips in random order. This may not be to everyone's taste, but it worked well for me! I used a synthwave theme and also a synthwave themed startup video. Major kudos to @lordnicholas for building the theme, it really looks great with my cabinet color scheme!
I guess I wanted to show that you don't have to go expensive to get something functional and that not all old projects need to be abandoned. I used very affordable and simple components and ended up with decent results for the effort. I'm currently building a matching external housing for a trackball at present, which should be able to stand on top of the control panel (via rubber feet that clear the buttons) between the sticks. I may share a photo of this mini project also once I have it completed.
I can honestly say that collectively you guys helped a ton through the years working on my RetroPie builds. Almost every question I had was already answered here after doing a quick search. This is an amazing community! If anyone has any questions about my low-cost/low-weight cabinet build or how I set up the software, I'd be happy to try and answer them.
-
Nice! I like the bartop/cab hybrid approach!
-
@theissdev Thanks! It was an idea that I just ran with and the results were better than expected.
-
@ramenraidery95 Damn, awesome writeup and I'm so glad you liked my theme! The build really looks authentic, especially the wood panels. Just like something I would've been excited to find in the back of the local pizza joint growing up!
-
@lordnicholas Thank You! It was sort-of a 70's aesthetics meets 90's arcade machine mash-up. The dark wood definitely does evoke retro Pizza Hut, which also makes me think of Pac-Man... This is why the control panel features Pac-Man and a pair of ghosts! Haha
-
Impressive work! It really seems like some exotic cabinet from an unknown manufacturer like there were quiet a few in the golden days of arcade games, when everyone wanted a piece of the pie.
I like your practical approach, like what you did with the glued-in cable tubes. I only used cable ties in my own DIY cabinet. And you saved money by investing time and technical skill, whereas I tend to throw money at things until even I can assemble them, being no handyman at all. 😌
-
@clyde Thanks! Over the years I had a lot of time to think about creative solutions to problems in the build. I never anticipated taking it as far as I eventually did (you can tell the original design was quite simple). But I'm happy with it now. Maybe someday I'll try something more advanced, like rebuilding a classic cabinet in need of saving or something.
Contributions to the project are always appreciated, so if you would like to support us with a donation you can do so here.
Hosting provided by Mythic-Beasts. See the Hosting Information page for more information.