Pi in a Super Famicom Build
-
@obsidianspider I love your idea of using Keystone plates and jacks! We use Panduit plates/jacks at my work but Keystone is typically less expensive. Bummer that your JST connector didn't work out but sounds like you got it working without it!
-
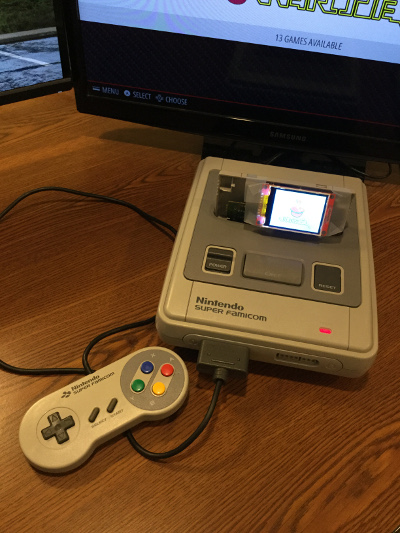
I decided to make a quick "Powering Off" screen that displays on the cartridge screen when you shut off the Mausberry.
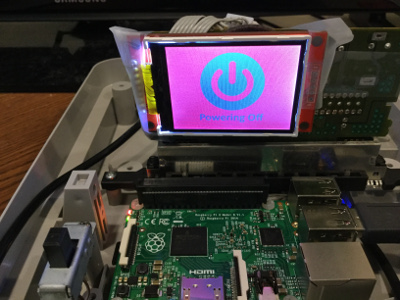
I don't know that I've ever had this much fun playing with a power switch.
-
@backstander said in Pi in a Super Famicom Build:
I love your idea of using Keystone plates and jacks!
I really just hate the loads of glue and wires all over the place that I've seen in a lot of builds and I wanted to try to find a way to do it as cleanly as I could.
Bummer that your JST connector didn't work out but sounds like you got it working without it!
Yeah, the JST connectors pointed down and the cables were making a 180 degree bend. If I hand right angle JST connectors it would have worked, but I didn't see anyone that sold them, and really, how often am I going to be swapping out the switch? Even if I do have to, now that I'm getting better at soldering, it's a quick job.
-
@obsidianspider your build is coming along nicely. I've been getting inspiration seeing how you've done things to tweak my own sfc build I'm doing.
Keep the post coming.
-
Hey, good work on the build its looking awesome. I'm going to put a pi in a SNES aswell, I have almost everything I need. Just a question, I got the SNES in but I can't open it, how did you open it? there are these little star-circle screws on it and I have no tool to open them? You are using a super famicon and I'm using an EU super nintendo so maybe they're different? thanks
-
@lorc34 those are "security screws", you can get them in a set of bits at a hardware store. But the snes ones are in a unusual size. I melted a bic-pen with lighter and made a temporary molded screwdriver. There are instructions on YouTube.
-
@lorc34 said in Pi in a Super Famicom Build:
Hey, good work on the build its looking awesome.
Thanks! I'm learning a lot and have had to re-do a few things as I mess them up, but it's coming along.
I'm going to put a pi in a SNES aswell, I have almost everything I need. Just a question, I got the SNES in but I can't open it, how did you open it? there are these little star-circle screws on it and I have no tool to open them? You are using a super famicon and I'm using an EU super nintendo so maybe they're different? thanks
You'll need what's called a "Gamebit" screwdriver. I got a two-pack from Amazon (not an affiliate link).

4.5mm for the SNES
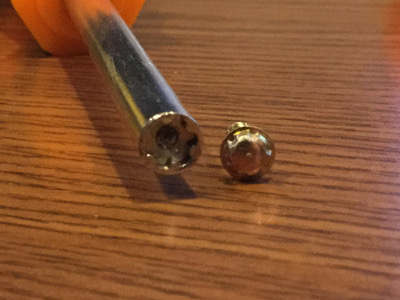
3.8mm if you want to open any games.
-
@Dipkid said in Pi in a Super Famicom Build:
@lorc34 those are "security screws", you can get them in a set of bits at a hardware store. But the snes ones are in a unusual size. I melted a bic-pen with lighter and made a temporary molded screwdriver. There are instructions on YouTube.
The problem with the bits at the hardware store is that they're usually too big of a diameter to fit down the hole in the SNES/SFC. I like tools, so $12 for two screwdrivers wasn't too bad for me.
-
I think I finally found not only a game label template, but also a good way to get the label printed. All for $3!
-
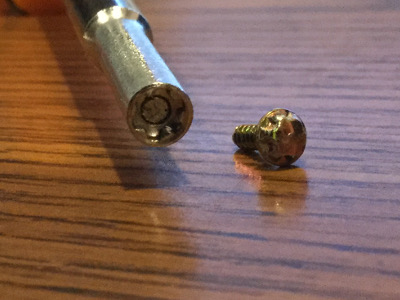
Thanks for the advice, I'm gonna try do it by melting the pen tip it seems pretty easy.
-
Ah... I've sort of fucked up my nintendo, I've managed to get 4 of the 6 screws open but on the 5th one the pen got stuck inside and I snapped it off by accident, and now its like glued inside by solidified plastic which is at the bottom and out of reach... might have to buy a new nintendo lmao.
-
@lorc34 cough buy a screwdriver cough
Seriously though, while you're waiting for your screwdriver to arrive in the mail, you can probably get the pen out with some sort of a pick, or even if you need to use a slightly undersized drill bit.
-
You know what happens when you assume? You get to see the rainbow square in the top right corner of your screen…
Due to space constraints a straight USB cable wouldn't fit in the back of my Super Famicom without a sharp bend so I bought a right-angle USB cable. Today it showed up and I proceeded to cut it in half and join it to a straight USB cable. (I couldn't find a right angle male-to-male cable). Everything looked good until I plugged in a controller. The Pi threw up the rainbow square and rebooted.
Something had to be crossed.
I took all the heat shrink off and checked the solder joints. Everything looked fine. Then I thought, "I wonder if these two cables are using different colored wires…" Just because there's a "standard" doesn't mean every manufacturer is using it, and really, most people don't unsheath their USB cables so in most cases it wouldn't be a problem.
Sure enough, the straight USB cable I bought was using the "standard" and the other cable was, well, not. I translated the wire colors from one cable to the other, rejoined everything, and now I'm good.
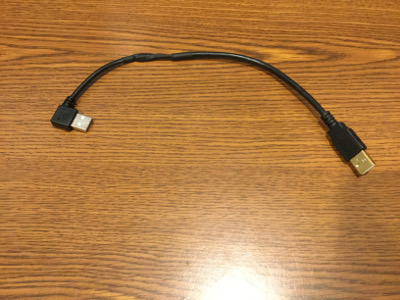
It's a good thing I learned to test for this BEFORE hooking up my Raphnet adapter.
-
@obsidianspider it is common for cheap chinese cables to have the wires crossed.
-
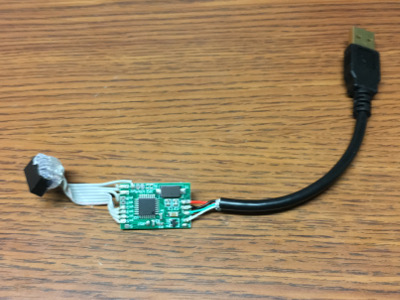
Today I decided to tackle the Raphnet adapter. I traced the pins on the SFC controller panel to the connector that I desoldered from the original main board. I soldered up a short USB cable and a ribbon cable to the SFC connector socket and it turned out pretty well. To keep the pins from touching each other I put some hot glue on the pins.
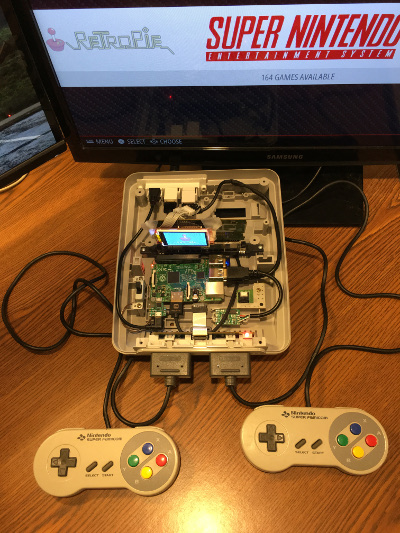
I plugged in the adapter and turned on the Pi and four controllers were detected (The Raphnet adapter is for up to four controllers.). I set up controller one and then after I hit OK I was into EmulationStation. That threw me off a bit. I thought EmulationStation would just cycle through all the controllers automatically, but when I was in EmulationStation I just hit Start and then went into "Configure Input" and set up controller 2.
The Raphnet adapter seems to work well, but after exiting a game I did notice the "pointing northwest" issue that Raphnet mentioned, so right now I'm trying to do the kernel patch that was mentioned to see if it will correct the problem. Apparently that takes around two hours to run on a Pi 2.
-
It took about two hours for the kernel to compile and install, but Raphnet's patch seems to have fixed the "pointing northwest" issue.
-
@obsidianspider just so you know you dont have to set up more than one identical controller. Set up the first then reboot emulationstation for the second to work in emulationstation. Or just skip that because it will work in the emulators as soon as you set up the first one.
-
@edmaul69 said in Pi in a Super Famicom Build:
@obsidianspider just so you know you dont have to set up more than one identical controller. Set up the first then reboot emulationstation for the second to work in emulationstation. Or just skip that because it will work in the emulators as soon as you set up the first one.
So it'll just "know" that it's the same for player 2? Good to know.
-
@obsidianspider yup.
-
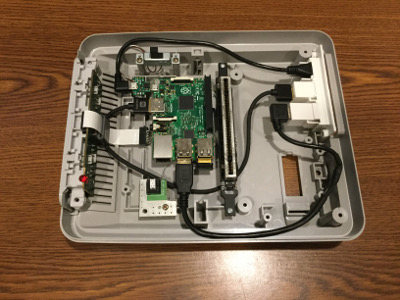
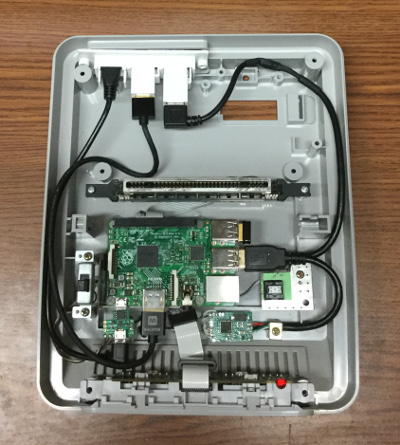
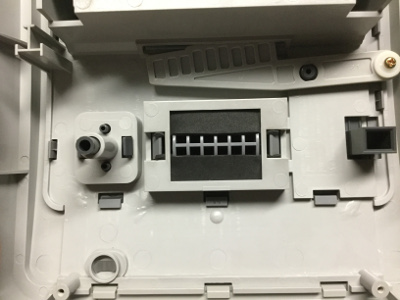
Since my friend is going to help me with my back panel today I wanted to try to get things a little closer to "done" before going to his house. When I put the top of the Super Famicom on I found that the cartridge slot area was hitting the GPIO area of the Pi. I could have cut the cartridge slot, but I'm really trying to keep the case intact, so I decided to take everything apart, remove the standoffs and relocate the Pi forward.

Now that the top fit I realized that since the eject mechanism wont be used there was nothing to keep the button up.
I looked at the button and there's a little bit of room on the bottom between the case and the button, so I took some black craft foam (I'm not sure of the real name for it, but it comes in sheets and is a few millimeters thick) and cut it into strips to fit between the bottom of the button and the case.
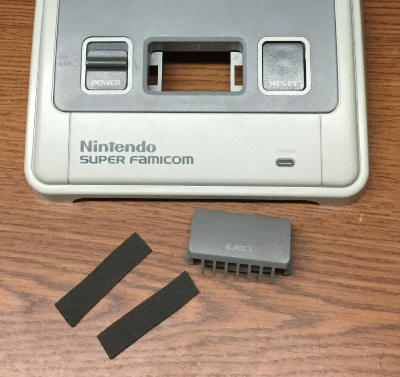
It worked out well. The button is snug and I didn't need to use any glue.
Things are looking good. Hopefully my friend and I will be able to make progress on the 3D printed back plate today.I'm REALLY liking using real Nintendo controllers. With the Raphnet adapter they seem much more responsive than the old Gravis Gamepad Pro that I had been using. The 2m extension cables I bought for the controllers work without any issues. With things working this well I may abandon my idea of also using Bluetooth controllers, or maybe I'll just use the Retro Receiver that 8bitdo makes.
Contributions to the project are always appreciated, so if you would like to support us with a donation you can do so here.
Hosting provided by Mythic-Beasts. See the Hosting Information page for more information.