Pi in a Super Famicom Build
-
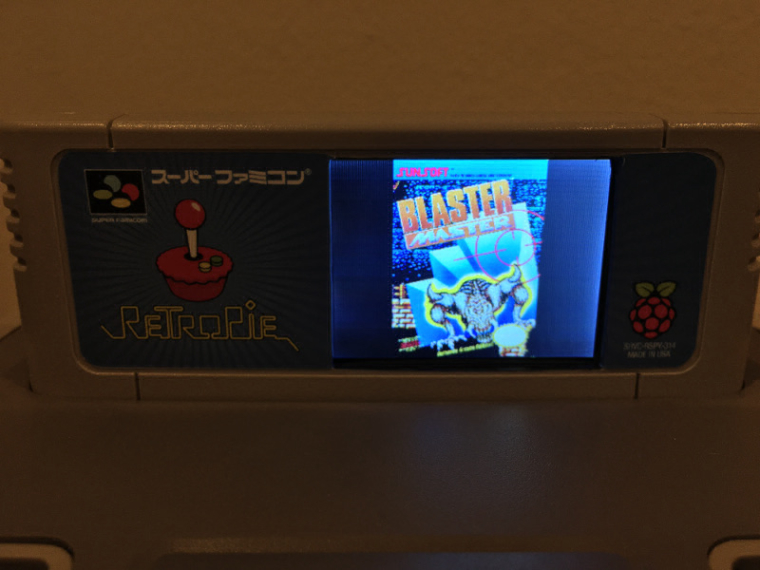
And that's what I think is great-the cart slot/cart has a purpose, albeit non-essential. What better way to make use of something that is often over looked: using it to display the box art makes your conversion as close to original as I see possible.
I was going to attempt the 50/60hz switch mod and region lockout Mod on my original SNES, but bought a Famicom like yours to try it on. As the SNES was on display, I used the Famicom to make a mould of the case so I could make a clear but fitted plastic dust cover. The dust cover was a success, however, the process disfigured the unit without me realising, so the project went on the backburner, and then I discovered the RPi. I'd like to attempt something like this, but like you, I'm not using my original console so it'll have to wait until I have some spare money for a second unit! (I've also been inspired by your GBA project too-could you lay off the projects for a bit please?!).
In relation to the screen, is it likely to cause any burn with it being switched on during gameplay as it is a static image?
-
@Danorak1981 I really don't know. It was $9 from eBay, so I'm sure it's not designed to be as resilient as a screen from an iPhone. I guess I'll find out over time. Stuff like that is part of why I made it removable. If it dies I can just unscrew it from inside the case and put in a new one with all of 9 soldered connections. Of course, that assumes they would still make a board of the same size if and when it dies.
-
Massive props to this build. The idea of popping in a display in the cartridge is only rivaled by your execution of it. Absolutely brilliant. It kind of transcends the "homebrew" category, it could well enough be a fully marketed product.
I hope it brings you just as much joy in using it as it did while building it.
Congratulations on a superb build!
-
In a case of "while I'm at it", when I got my TFT working again after the new 20170303 kernel update was released I decided to do something about the images being displayed on the TFT.
When I was first getting things going I just resized the image to 320x240 and displayed it. It worked, but if the image wasn't the correct aspect ratio, the script didn't care and it resulted in a distorted image. Today I managed to correct that. My new (still admittedly hacky) script will now resize images proportionally so they fit inside the window without stretching.
I think it's a "more right" way to address the issue, and is a whole lot more convenient than making custom images for every single game so it doesn't look stretched.
-
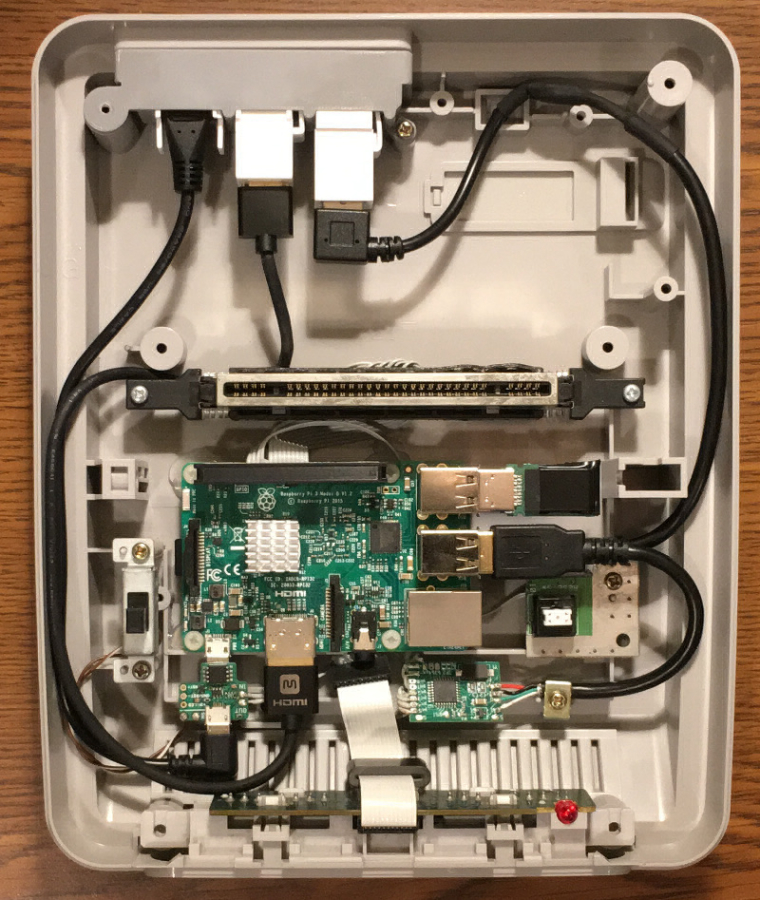
Today I added a 256GB USB drive to the Super Famicom Pi and it was pretty easy. The drive was a bit too long, but I learned from putting one in my Genesis hub Pi that by taking the case off it should fit with no problems. The blue LED is really bright, so I covered it with a piece of tape, because without it there was blue light bleeding out of all of the vent holes like a spaceship read to take off.
-
@obsidianspider
Monoprice is the place to get cables lol
I'm sure some people would like the blue-light-bleeding-out-of-all-of-the-vent-holes-like-a-spaceship-ready-to-take-off disease! -
@backstander Monoprice was the only vendor I could find with a short HDMI cable that also had small connectors. Everyone else had really thick rubber on the plug and the cable insulation was huge.
-
Today I decided to work on moving my scripts to my USB drive for stability, and to clean things up since I was initially just cobbling things together to get them to work. One challenge I faced was that the USB drive isn't immediately mounted when the system boots. It takes a few seconds. To get around that I put the
tftstart.shscript in the/home/pi/folder and added a bit to tell it to wait until the USB folder is available before trying to execute the scripts that are located on it.#!/bin/bash # Wait for USB disk detection # Disk drive mount we're waiting on usbdrive="/media/usb0/retropie-mount" # Max time to wait (in seconds) maxwait=60 for (( i = 0; i <= $maxwait; i++ )) do [ -d $usbdrive ] && break sleep 1 done #load image sudo python /home/pi/RetroPie/tft/imageparam.py "/home/pi/RetroPie/tft/images/RetroPie Splashscreen Blue.jpg" #turn on backlight and enable Reset button toggle sudo python /home/pi/RetroPie/tft/switch.pyI also updated my
runcommand-onstart.shscript to reference images located in the ROMs folder (I'm moving images to the ROMs folder) and to also handle file names with square braces[ ], which were breaking the script.# /opt/retropie/configs/all/runcommand-onstart.sh # get the full path filename of the ROM rom=$3 # get the system name system=$1 # get rom filename without folder rom_bn=$(basename "$rom") #get rom filename without extension rom_bn="${rom_bn%.*}" # escape square brackets in rom filename rom_bn="${rom_bn//\[/\\[}" rom_bn="${rom_bn//\]/\\]}" # Set a TFT-specific image if there is one img="$(find "/home/pi/RetroPie/tft/images/roms/${system}" -type f -name "${rom_bn}-image.*" -print -quit)" # If a TFT-specific image was not found, look in the images folder in the ROMs directory for that system if [[ -z "${img}" ]]; then img="$(find "/home/pi/RetroPie/roms/${system}/images" -type f -name "${rom_bn}-image.*" -print -quit)" fi # If an image was not found in the ROMs directory for that system, check to see if there are any in the default emulationstation location if [[ -z "${img}" ]]; then img="$(find "/opt/retropie/configs/all/emulationstation/downloaded_images/${system}" -type f -name "${rom_bn}-image.*" -print -quit)" fi # If no game images are found, display one for the system being emulated if [[ -z "${img}" ]]; then img="$(find "/home/pi/RetroPie/tft/images/systems" -type f -name "${system}.*" -print -quit)" fi # If no system image is found, default back to the Raspberry Pi logo if [[ -z "${img}" ]]; then img="/home/pi/RetroPie/tft/images/Raspberry_Pi_Logo.svg.png" fi # run the python script to display the image sudo python /home/pi/RetroPie/tft/imageparam2.py "$img"I'm sure there is a lot that could still be improved or optimized, but things are working well.
-
@obsidianspider Very good work. I am also rebuilding and have a question. How did you connect the original reset button? On the bottom are 4 connection possibilities?
-
-
Super, Thank You.
-
Update
I learned the hard way not to use
rpi-updateIt apparently updated you to the bleeding edge firmware, and not only did the update fail halfway through, but once it completed successfully, Linux kept crashing. Now to see if I can fix this mess. Fun?
-
Well that was less than fun. Lesson learned, kids. If you have a heavily customized install, make sure you create an image of your SD card in case you blow it up like I did.
Also, take better notes. ;)
Things are working now, but it was a lot of head scratching to get all of my scripts in the right places.
-
@obsidianspider I updated to the latest stretch build and that didn't go well. The gamecon driver wouldn't build. I reverted to stable stretch and fixed some dependencies to get ES to compile. I made a backup just in case, but it looks like I won't need to use it.
-
@darksavior I haven't tried Stretch. I heard it wasn't supported yet.
-
@obsidianspider Try at your own risk, but once I sorted my dependencies, ES and the emulators I use work fine https://retropie.org.uk/forum/topic/16145/retropie-upgrading-raspbian-jessie-to-stretch
-
@obsidianspider it's probably in the thread here somewhere but I can't seem to find it: have you linked the original power switch to a system shutdown, and if so, how?
Now that I have a Pi, I'm thinking about either murdering my old SNES or finding one to murder, and using it as a case for the Pi. If/When I do so, I may look closer to threads like these for inspiration.
- First Pi: Pi 3 in a PSone case
- Second Pi: Pi 0 in a Retroflag GPi Case
- Third Pi: Pi 4 as a desktop computer
- Some time in 2020: Picade
-
-
 O obsidianspider referenced this topic on
Contributions to the project are always appreciated, so if you would like to support us with a donation you can do so here.
Hosting provided by Mythic-Beasts. See the Hosting Information page for more information.