Guide: Setting Up a RetroPie controls using IPAC2 Controller - Extensive Tutorial + Preconfigured files
-
Guide: Setting Up a RetroPie controls using IPAC2 Controller Extensive Tutorial + Preconfigured files.
Introduction
Because button configuration is still a rather complicated topic for many new coming enthusiasts, I decided to share my own experience in a specially dedicated post rather than repeating myself in different places on the forum. Maybe what I have to share will be of benefit to some people.
My intention is to describe exactly how I configured my own arcade and share with you some preconfigured files which will allow you to replicate the design I used.
In the beginning, I will talk a bit about some hardware and design choices I had to take before I even started thinking about configurations. I promise it will make sense in the end.I will also share with you the template document which I made to keep track on the button positions, while I was configuring the controls for the different platforms. I hope it will be of use to people which plan to build an arcade with a different button scheme and can not simply copy the preconfigured files.
If you want to download all of the files shared on this post, just go straight to the end of it and you will find a list.
I want you to keep in mind that even if you have the same button panel and you decide to follow me step by step and use exactly the same set of emulators I picked up, there is no guarantee that everything will work straight away. Mainly when it comes to an individual per ROMS control configurations or specific ROMS versions chosen. Try to delve more into the official wiki pages as they are surely more informal.
Step 1 : Button Layout
Before ordering all of the hardware I had to take a decision which platforms I would use on the arcade cabinet, how many buttons I would need and how would I arrange them.
Out of all emulators available inside RetroPie, I chose the following 8”
- Atari 2600
- FBA
- Game Boy Advance
- Mame Libretro
- Megadrive
- NES
- Playstation
- SNES
The RetroPie based arcades I have seen rarely use more than 6 action buttons per player + 2 for start and select (8 in total for each player). This would have been sufficient enough for all game platforms I planned to use except for Playstation. To be able to map all of the buttons properly I needed 2 more buttons for each player. In total 10 buttons per player.
I have also seen some people doing additional customization to their arcades by adding special buttons for starting and exiting a game. This would require additional programming work so I decided to rely on the default settings as much as I can. I didn’t want to complicate things further.
Now that I knew I need a 20 button set I started looking for a good button layout which I can use and I picked this one:
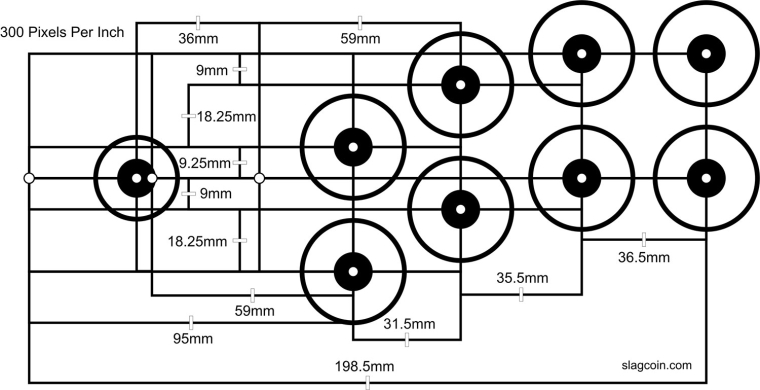
(You can find other button layouts available here: http://www.slagcoin.com/joystick/layout.html )
Before actually buying the buttons I put a lot of thought about what color buttons I want to install on the arcade. I see on the internet that a lot of people are using randomly colored buttons, which I find very impractical. I wanted the mapping to be intuitive and easy to understand so I specifically decided to order buttons colored in the Super Nintendo color scheme. My reasoning is this:
- Most people would immediately associate the button position and function as this scheme is a classic on its own.
- It would be easier to communicate the button functions to new players in a manual.
Step 2 : The hardware I bought
The controller set I ended up buying included pretty much most of what I needed:
https://www.arcadeworlduk.com/products/Arcade-Joysticks-Buttons-And-Wiring-Kit-No-2.htmlThe only difference is that I contacted the seller and specifically asked for these button colors: 2x Yellow, 2x Blue, 2x Red, 2x Green, 2x White, 8x Black, 2x White Player start buttons, 2 x Balltop joysticks (Red)
The rest of the hardware should be familiar to you all: Raspberry Pi 3, Power supply, SD Card, Monitor, Speakers and one peculiarity: USB Dual Extension cable (https://goo.gl/9PvyJR )
I will briefly tell you what was this about as I have not seen anyone else use it. This thing is totally optional, you don’t need to make it if you don't want to.
When the Arcade is finished you will end up using only one of the USB port of the PI. When you close the cabinet you won't be able to access it easily. Not without an extension cable. I made a discrete hole on the lower side of the control panel and installed the USB ports there. Through them, I can add more roms to the SD card and plug in two additional Xbox controllers for some sweet 4 player arcade gaming.Step 3 : Deciding on the button usage for each game platform
Now that I knew how many buttons would I use and which consoles I'm going to emulate I started planning the mapping of the buttons for each console. It is crucial to make these decisions in the beginning and write them down in an easy to understand way if you want to keep track on what is going on while you are editing the config files for each console later on. If you don't do it you can easily get lost in the process.
First of all, I wrote down which buttons I plan to use for each console. Later when everything was wired I had time to do some testing and rearrange some buttons. These are the control schemes I decided to program for each emulator.

This is what the instruction manual for my arcade looks like. It is glued on the cabinet, just to the screen. I think it's descriptive enough.
And this is how the control panel looks like.I placed additional hint icons beside each button.
I had gone through a lot of testing later on and I can recommend this mapping to anyone.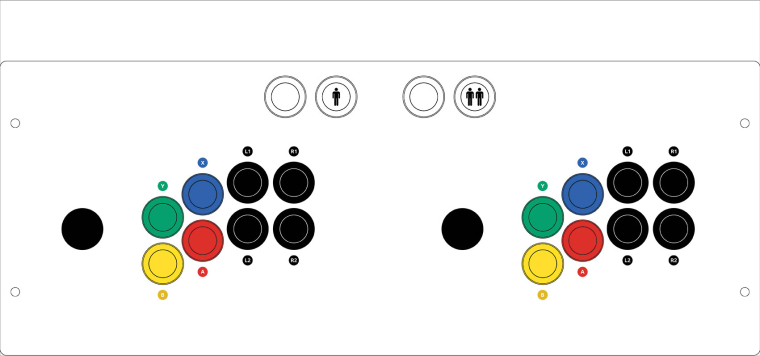
As you can see the controls for the MAME and FBA emulators are not specified as each individual game has a widely different control scheme. Because of this problem I had to do a custom remapping for certain games to fix the button position to either match their original layout (Street Fighter Series) or to make them match the commonly used layout for “Hit, Jump, Special” buttons (Metal Slug series, X-men). I will describe this later on.
Step 4 : IPAC2 Button wiring
When the cabinet was finally built it was time to wire the button switches to the IPAC2 Controller.
I assume that most of you are already familiar with the functionality of the IPAC2, but I will briefly describe what it is and how it is tied to the RetroPie.
The IPAC2 is a board which can be programmed to act as a keyboard. Keyboard buttons are assigned to each pin on the board. The pins are wired to the switches on the button panel. When the button is pressed it makes a contact and the IPAC sends a signal through USB cable to the Raspberry Pi telling him which keyboard key has been pressed. The RetroPie emulator then “looks” inside the configuration file (.cfg) “sees” which RetroArch control is assigned to that button and executes it.
If you are trying to replicate my button configuration it is important to wire the pins to the right buttons. This is how my buttons are wired to the IPAC2 board:
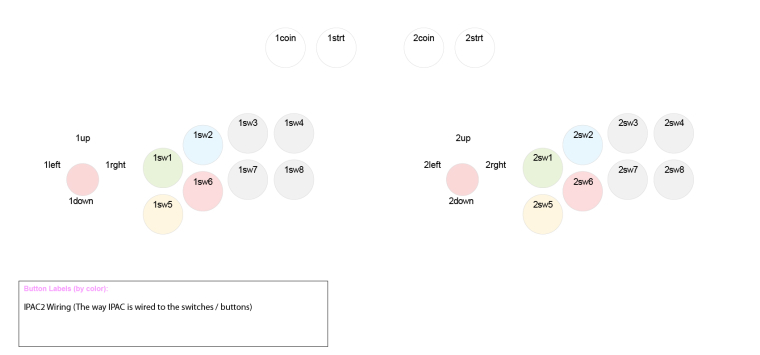
I advise you to look for more information about how exactly the cables connect to the switches here https://www.ultimarc.com/ipac2.html or in some youtube video tutorial.
Step 5 : IPAC2 Configuration
Now that the IPAC2 is connected to the buttons it is time to configure it.
To do that you will have to use a software called WinIpac
https://www.ultimarc.com/download.htmlThrough it, you can assign any keyboard key to a pin.
Things are pretty straight forward. You have to connect the IPAC2 board to your PC through USB Cable. When you start the software it will recognize the board and will display it on the left. You can select pins on the image and choose a key which you want to assign to it. It is important to set your IPAC2 to work as KEY, not as a GAMEPAD.
When you are ready you pressFile -> Force Board ReconfigureIf you want to replicate my configuration and make it work you will have to assign specific keyboard keys to the IPAC2 pins. Fortunately, WinIPAC can export .xml configuration files, which can then be imported to other boards, thus saving you all the manual work. Here is mine configuration file:
What you have to do after you download the file is to start WinIPAC, open the
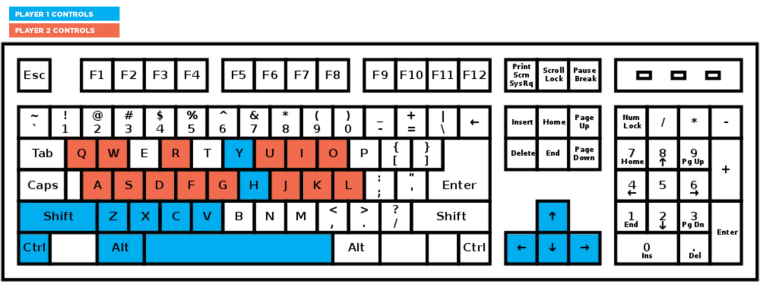
File -> Importmenu and browse for the file. Open it. Then click onFile -> Force Board Reconfigure. It is done, your board is now configured the same way as mine.On this image, you can see which Keyboard keys are now assigned to the IPAC board and respectively to the buttons.
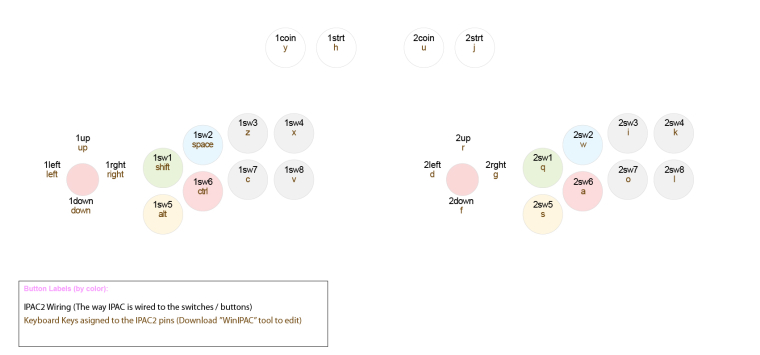
Just to wrap it up, here is another image showing you all the keyboard keys used.
SIDE NOTE:
IPAC2 can be switched to behave as a GAMEPAD controller. I have seen many discussions about how it would be easier to make everything work if you switch to that mode. The problem as I found out is this. If you switch the IPAC2 to act as a GAMEPAD RetroArch would recognize it as a single controller. You can not map two players on it. You would technically need another IPAC2 board to do that. So don’t waste your time and forget about it.SIDE NOTE:
I have to clarify that in the very beginning I started working on the working on this I
Stumbled on some problems with the mapping. For some reason, I eventually changed the keys used for Start and Select with different keys from the keyboard. I don’t recall what exactly was the problem for me, but in the end, everything worked out just fine.Step 6 : Planning the Button Mapping
This is where things get really complicated for the average user.
You might already know that Retropie can use different button mapping for each emulator.
I don’t want to get into too many details, especially because there is a very detailed wiki page on the subject: https://github.com/RetroPie/RetroPie-Setup/wiki/RetroArch-Configuration
(Read the “Hardcoded Configurations” section)In a nutshell, Retropie has 3 levels of button configurations which can be overwritten when you start a certain emulator or a certain game. The Config Hierarchy goes like this:
- Global Settings
- System Specific
- ROM Specific
While you are still inside the main menu the Global Settings apply. When you start an emulator which does not have System Specific settings written for it the Global ones keep on working. If you have a custom configuration file written for a specific system and you start the emulator, the Global Settings are overwritten and the System Specific Settings apply. If you exit the emulator the Global Settings start working again. If you start a specific ROM which has its own custom mapping both previous settings are overwritten.
This is what makes things so complicated and hard to track.
For this reason, I made myself a visual map of the button layout of each individual console and specific ROMS. The previous two images I showed you are exactly that in an early stage. It is nothing that special really. The template is made in Adobe Illustrator. It contains a set of images, showing the button layout of my arcade and inside each button, there are tree values written. These values tell you the name of the switches, the Keyboard Keys assigned to each switch and the Retroarch key values tied to the Keyboard input.
I have made a separate copy of this layout for each emulator.Here is an example. This is the default retroarch configuration map.
These controls will be active in the Main Menu of the RetroPie. They will also be automatically assigned to each new emulator you decide to use beside the 8 I’m using.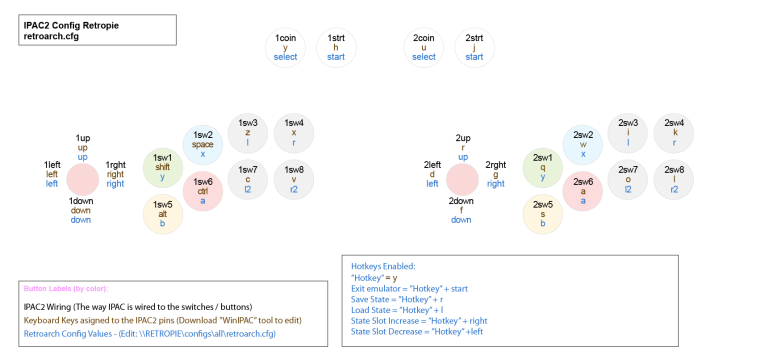
Here is a short description of what you should keep attention to in this image:
- In the upper left corner, there is a title telling you for which Game Platform these controls Apply.
- The text in BLACK tells you how are the button switches wired to the IPAC2 board. Once set up these values never change.
- The text in BROWN tells you which Keyboard Keys has been assigned to each pin on the IPAC2 board. Once set up these values never change.
- The text in BLUE tells you which RetroArch key values are tied to these Keyboard Keys. These values can be rearranged inside the different.cfg files! By making copies of the default .cfg file and rearranging the values in BLUE you are switching the buttons functions for each emulator!!!!
- Button Labels section is basically a legend. Take notice of the blue text, though, as it will tell you in which directory you should copy the edited .cfg file!
- Hotkeys Enabled section. RetroPie has a set of shortcuts for hidden functions like saving/loading a game and others. These functions can be disabled for specific gaming platforms or changed in such a way to keep being constant even if you have rearranged their position while editing some of the other buttons.
Finally, here is an archive containing my original Illustrator File + Image exports of each control scheme I mapped.
RetroArch Configuration Map Template.zip
Download it and look through all of the images and try to compare them. Also, don’t forget to look at the image I shared in Step 3. It will show you the same button arrangement, but without the additional information.
In the next step, I will give you a quick recap of how you can manually change the configuration files for each game platform and will than share the files I’m using.
SIDE NOTE
As you can see in the archive I myself ended up with 12 different maps for my Arcade.- 1 Global Mapping - Functioning in the main menu of the retropie.
- 8 System Specific Mappings
- 3 ROM Specific Mappings (Metal Slug series, Street Fighter series, Golden Axe, X-men)
In total, I have made 28 configuration files. (.cfg)
The number of configuration files is greater than the mapping schemes because certain game series are using a single mapping scheme, but the actual configuration file had to be duplicated several times for each individual ROM. The name of the .cfg file had to be changed to reflect the name of the ROM it should be tied to. For example, all Street Fighter Games, including the Marvel fighting games (11 in total) are using the same ROM Specific mapping, but each ROM has its own copy of this very same file.Step 7. RetroArch Configuration
Now the real work begins.
Configuring the controls through RetroPie GUI system is not efficient enough, so I’m going to talk only about the manual editing of the files. I will give you an example how you can use the Mapping template to help yourself.First, you need to access the files system of the RetroPie and copy the configuration files for the systems you plan to use. It would be easier for you to edit the files on your machine rather than directly on the card. This way you can safely keep backup copies each time you make changes.
You can access the files structure in two ways:
If you have a PC with a Linux OS installed on it, you can access the files structure through it.
If you have a Windows PC you can access it through your home network. Connect the Raspberry Pi to the router. It should appear in your NetworkBrowse to this directory :
/opt/retropie/configs/
It contains an individual folder for each emulator and one for the Global Settings. The folder name for the Global Settings is called “All”Copy this folder along with the folders of the emulators you plan to use.
In my case, I copied 8 additional folders for the emulators I listed in Step 1.1. Global Settings Configuration
First, we will configure the Global Settings file according to the Controller Map I showed you before.
Here it is again:

Open this file with a text editor:
/opt/retropie/configs/all/retroarch.cfg
You will find that there is a ton of text in it. These are all instruction which can help you understand how to configure the file in basically any way possible. But we will concentrate only on a certain part of it all.Search for these lines of code:
input_player1_a = "x"
input_player1_b = "z"
input_player1_y = "a"
input_player1_x = "s"
input_player1_start = "enter"
input_player1_select = "rshift"
input_player1_l = "q"
input_player1_r = "w"
input_player1_left = "left"
input_player1_right = "right"
input_player1_up = "up"
input_player1_down = "down"
These are the instructions which bind the RetroArch keys to specific Keyboard Keys.
This line in specific:input_player1_a = "x"What this line is telling you is that the input for RetroArch button “A” for Player 1 is a Keyboard key “X”. What you have to do is to look at the Map image above and edit the value inside the brackets to match the Keyboard Key written above the RetroArch key for value “A”.
So in our case, this same line will turn into:
input_player1_a = "ctrl"
THIS IS IMPORTANT!
Before continuing forward you have to know that I made some tweaks to my files. For starters, the default state of the config file will include mappings for only one player. This will change after your first configuration through the GUI system.
The default file will also be missing the Hotkeys configurations.
For those who are wondering what the Hotkeys are it is basically this:
Hotkeys are button combination which initiates hidden functions. Save/Load game, Exit Game and etc. There is always one specific HotKey which pressed in combination with other actives a certain function.To cut it short.
For my files, I included all possible lines of codes applying to player controls and rearranged them in more convenient way. I also moved these lines of code to the very top of the cfg file.This is how the Global Controls values are set inside my files:
input_player1_select = "y"
input_player1_start = "h"
input_player1_left = "left"
input_player1_right = "right"
input_player1_up = "up"
input_player1_down = "down"
input_player1_a = "ctrl"
input_player1_b = "alt"
input_player1_x = "space"
input_player1_y = "shift"
input_player1_l = "z"
input_player1_r = "x"
input_player1_l2 = "c"
input_player1_r2 = "v"
# input_player1_l3 =
# input_player1_r3 =

input_player2_select = "u"
input_player2_start = "j"
input_player2_left = "d"
input_player2_right = "g"
input_player2_up = "r"
input_player2_down = "f"
input_player2_a = "a"
input_player2_b = "s"
input_player2_x = "w"
input_player2_y = "q"
input_player2_l = "i"
input_player2_r = "k"
input_player2_l2 = "o"
input_player2_r2 = "l"
# input_player2_l3 =
# input_player2_r3 =

#hotkeys
input_enable_hotkey = "y"
input_exit_emulator = "h"
input_save_state = "x"
input_load_state = "z"
input_state_slot_increase = "right"
input_state_slot_decrease = "left"
input_menu_toggle = "nul"
input_reset = "nul"
Take some time and compare them to the Map image above.
Look at the HotKeys Enabled section on the image and you will understand what value should correspond to each hotkey.Take notice that on some of the hotkeys a value “nul” is written.
This value completely disables the button function!Now that I have organized the lines of code in what I think is a more convenient way what I did next is to copy and paste them in this arrangement inside each of the System Specific configurations files.
SIDE NOTE
Be careful! Beside the keyboard configuration inside the config files you will find lines like this one:input_player1_a_btn =The “btn” at the end of the line is indicating that this line of code is expecting GAMEPAD button input! If you try using it by mistake RetroArch will not detect your IPAC input, because it will expect a GamePad button press.
SIDE NOTE
Once you configure the Global Setting you might be surprised to find out that only the first player has control inside the Main Menu of RetroPie. It is supposed to work that way, so don't worry.SIDENOTE
On that note. Only the first player can execute HotKey commands.2. System Specific Configuration
I want to give you one example of System Specific Configuration, which will demonstrate for what reason and how are the Retroarch Config Values rearranged on the button panel.
For that reason, I will use the Game Boy Advance mapping as an example.
Navigate to this file and open it:
/opt/retropie/configs/gba/retroarch.cfgYou will see this written in it:
# Settings made here will only override settings in the global retroarch.cfg if placed above the #include line

input_remapping_directory = "/opt/retropie/configs/gba/"

#include "/opt/retropie/configs/all/retroarch.cfg"
First, take notice of the input remapping directory path.
For each system, it is different and reflects the file location.Second, take notice that because there is no Player Input commands written above the
#include "/opt/retropie/configs/all/retroarch.cfg"line the controls assigned to this emulator come from the Global Configuration file.To change them you will first have to paste the Player Input values from the Global Configuration file and edit them.
But before that… why edit them in the first place?
Look again at the image from Step 3. Then look at the image from Step 6.If I use these controls when I play Game Boy Advance game I will have to play with the RED and The YELLOW buttons for A and B respectively and the top two BLACK buttons for L and R. I would prefer to assign the L and R buttons to the GREEN and BLUE buttons.
I also want to disable all buttons I’m not using. To “nul” them.
These will be L2 and R2, but not X and Y as when they switch position with L and R they will keep acting as HotKey buttons evoking Save/Load functions.Look at the GBA Configuration Map:
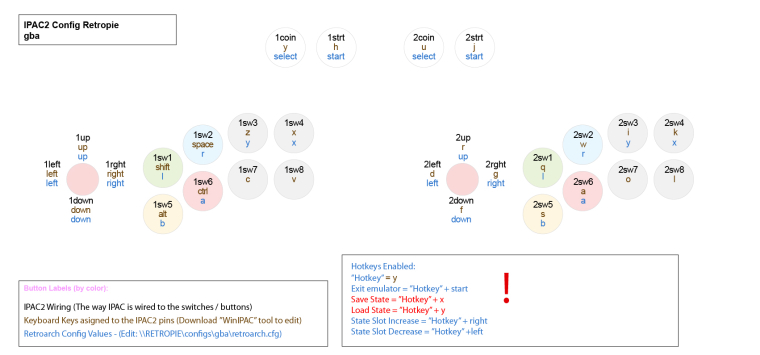
And now compare the code:
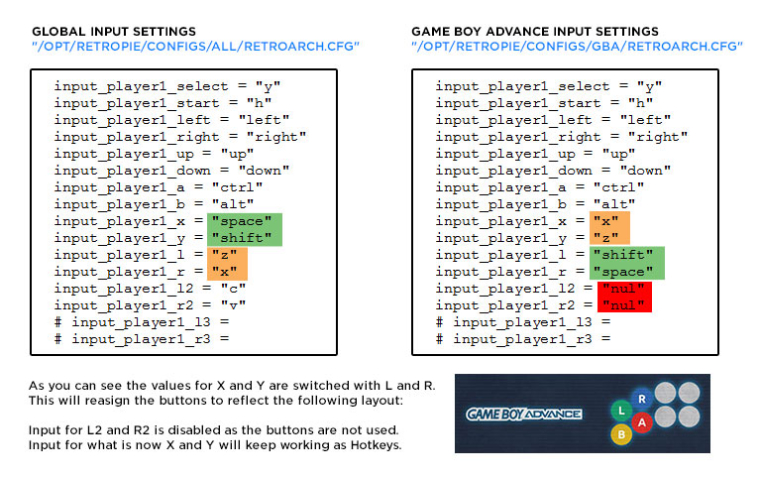
Simple enough.
These are really the basics.
When you are done with the file editing copy the new files over the ones in the original directory on the SD card.Before sharing my already preconfigured files I want to drop several lines about the ROM Specific configurations.
3. ROM Specific Configuration
ROM configurations work the same way.
The difference is that you will have to create your own files for each ROM. And place it in the directory where the ROM is located. It is important that both files have the same name!The only systems for which you will find yourself doing custom Per ROM configurations are MAME and FBA basically.
If you want to create a custom Per ROM configuration for Street Fighter 3 for FBA emulator you will have to create the cfg file inside this directory:
"/opt/retropie/roms/fba/"If the name of your ROM is “sfa3.zip”
The name of the configuration file would be: “sfa3.zip.cfg”When you create a configuration file for “Street Fighter 3” you can duplicate it several times for all your Street Fighter ROMS. They are using the same controls after all. The only thing you will have to edit is the name of the file. It must reflect the name of the ROM!
Doing a custom configurations for ROMS is a matter of testing and fixing.
You would have to put some time and effort to clear things out.And now finally.
Here is a zip archive containing all my configuration files.
Examine them, use them if you like.RETROPIE Controller Configurations.zip
Conclusion
As I was writing all this I came to realize what a complete nightmare this whole experience has been. But please don’t get discouraged it is worth it. Just try to be focused and calm and everything will eventually be resolved.
I want to express my respect to all the people involved in this project. I have no idea how are you even managing all of this.
I want to also say that the mapping template is not my idea at all. I stumbled on a Reddit post which explained things quite well.
https://www.reddit.com/r/RetroPie/comments/4a8ncv/ipac2_config_on_retropie_works_with_mame_nes_snes/I found this to be such an ingenious way to visually represent the whole mess that I decided to replicate and expand the idea.
SIDE NOTE
I think now that someone with good programming skills could possibly be able to create a visual .cfg file generator based on this concept. I can imagine that in such software you would at first pick your button layout. Then you will have to enter the Keyboard Keys assigned to the buttons and in a third step pick an emulator and select the buttons you want to use. Such a software would then generate the .cfg file by substituting the Keyboard Values. Sadly I’m not a programmer, but a graphical designer. Leaving you with this thought.List of all files included in this post:
IPAC2 Config - v4.xml
RetroArch Configuration Map Template.zip
RETROPIE Controller Configurations.zip -
I created a GitHub Repository for the manual:
https://github.com/iberov/retropie_ipac2_setup_wikiI will probably keep fixing things in it in the future.
Since I'm not a programmer I might have misused some terms.
If any of you have suggestions for improvement, please come by. -
Fantastic work, sir. This is a really good tutorial.
-
@theink Very comprehensive coverage of the process. Some of us have been discussing the need for a "Keyboard Controller" wiki page, and this may be the best start to it. Your story is obviously specific to your own project, but with a little pruning or qualifying as "one example" I think it could serve well. As an IPAC4 user, I was following along thinking, "yes. . .YES" as I followed each step. I think it is fair to admit that using a keyboard controller is somewhat nuanced, akin to building and wiring your own gamepad. The choices when you are looking at button holes, wires and screw terminals can be a little daunting to say the least, but your description carries the reader through the process--including some of the planning involved. Well done.
Do you have a github account? Perhaps you would be willing to take a crack at this? I am happy to assist.
<EDIT I see you posted it above>
Some version of this definitely belongs on a new page here: -
@caver01
I think I can manage this.When I was writing this guide I put a lot of consideration if it would be better to structure it in a more broad way and be formal about the subject or to follow a more personal approach. As I'm not really a programmer I thought that I would ineveadbly mess up some terms of expressing myself.
My own experience is telling me that it is easier to understand how something works from inside if you follow a specific case and then tweak it accordingly to your needs. On that matter, I'm curious for some input.
How and what parts of this text you think can be restructured in a more lie "a solution for all cases" type tutorial?
Another note.
I shared my idea about building a .cfg file generator with an interface similar to the template files I showed.
It is still on the table, but I think this would be fairly easy to achieve If he has the time to do it.
What can eventually be built could be an all case solution. -
@theink First of all, all of the diagrams are excellent examples that can apply broadly. I loved seeing the line in the retroarch.cfg tied directly to the button you wanted mapped, which of course ties directly back through the process to how the button was wired to the IPAC.
When I was going to write the Wiki for IPAC keyboard controllers, I was going to place it alongside the other controller options and introduce it with something very general, describing our particular use case: building a cabinet or a custom control panel using arcade parts. One good option that has been around for many years (predating RetroPie) has been to use a keyboard controller--a USB device that looks like a keyboard to the computer, but without keys. Instead, you have screw terminals you wire to buttons, and ideally, these are laid out for arcade system builders. A good example is the IPAC.
Then, I had hoped to orient the rest of it illustrating how the IPAC is setup, recognizing that other keyboard controllers might be similar. With your documentation already written, you could move through it more or less as you did. The layout, drilling template etc. are all great, but not really part of this, yet they do setup your examples. It would be easy to adjust with something like, -"Say you are building a 2-player panel with 8 action buttons, Coin and Start and joysticks for each." Then you go right into your setup.
These are minor tweaks, but more about making your excellent guide feel applicable to a wider audience.
One thing that is needed, especially for newer IPAC is some acknowledgement of the gamepad/keyboard configuration. You mentioned it after configuring your board with WinIPAC. Not everyone will have the utility, or access to a windows system. My IPAC4 is so old it is no a consideration, but I have heard about two ways to ensure KEYBOARD functionality out of the box. First, you use an external, actual keyboard to configure Emulation Station on first run. This initial detection is what gets people stuck, but there are accounts of new IPAC owners just using an extra keyboard to get through the initial setup in ES, then doing the mapping as you did in the .cfg files. The thought here is to endorse the configuration of the IPAC as it ships, and not require extra steps with WinIPAC. There are other accounts of folks reflashing their IPAC with different firmware from Ultimarc which might be ideal, but is no easier than using WinIPAC.
Anyway, those are my thoughts. I think you have a great document here that more people need to see.
-
@caver01
Thanks for the comment.I read some of the pages in the controller section of the wiki.
It seems that a substantial part of this text could fit on a page dedicated to Arcade Controllers.The problem with arcade controllers though is that the button layout can be widely different.
Because of that, I thin what I have written in Step 3 should be expanded in a section, showcasing the standard button layouts established by arcade building companies like Capcom, Midway etc.When this part is established the next one should probably suggest how the RetroArch controls could be mapped over the different button layouts to match the functionality.
After that, I suppose I could proceed with the specific example.
There still thing I have to consider. I will think about it in the coming days. -
@theink
Thanks much for your guide!Do you know by any chance if the kit you have purchased is available on US Amazon or Aliexpress? Does it have any brand or model name included somewhere?
The reason I'm asking is it appears there are many different manufacturers and some of their kits are certainly better than others. I'm going to build a bartop arcade soon and I was looking into Sanwa joysticks and buttons as I have only heard good things about them. The problem is it's hard to find which kit is original Sanwa and which is not.
-
@theink i think you could overcome the panel differences with just a few statements like, "when building an arcade control panel, there are many considerations that can affect your layout. Not all games are the same, so you will have to decide how many buttons you want to have and where they are located. No single layout will fit every arcade game perfectly, so there is always some compromise between what works for the games you want to play and what is practical." Then you can go on using your own example, "in the following example, we have an 8 buttons design for players 1 and 2," and so on.
-
@theink
Do you have the raw image file(ie Photoshop file if thats what you used) for this so, I can edit it with my custom buttons... I really like it... Once again you have done a great job!!!

-
Hi @theink ,
Thanks so much for your extensive guide about setting up Retroarch with different controllers and MAME !
I think it is the best guide ever, on the internet there are so many "guides" and partly right or wrong statements where you get completely lost...
I am working on my arcade cabinet to make an update on my first install which was not 100% OK, using your guide step by step on Github. If you are interested I can keep you informed about the progress and the end result...I have only one question at the moment:
I tried to import your xml file into my IPAC2 but it failed, saying there is an unexpected error in line 42....
I am using my IPAC2 with Winipac version 1.0.8.10 under Windows 10 home, my IPAC board has hardware version 1.33.
Can you take a look at your xml file "IPAC2 Config - v4.xml" or do I need to upgrade to the recent firmware? -
Step 5: Does anyone have I-PAC2 Config for 2 players with 6 buttons?
-
@waimea I have one, is the retroarch.cfg that you want? I'm not at home at the moment but I can send it to you later.
-
Perhaps you could upload it here so I can edit my retroarch.cfg?
-
@tuki_cat You will also need to include a wiring table for which SW# inputs are wired to which button locations and what keyboard key is configured for each.
There are layers of abstraction here, so by the time you get to the retroarch.cfg, you have already made several config decisions upstream.
-
@waimea - Here is the relevant section of my retroarch.cfg (https://pastebin.com/bPhzKrLr)
@caver01 - I am using all of the standard IPAC keys as outlined on the Ultimarc website - https://www.ultimarc.com/ipac2.html. I haven't changed any of them, they are all default settings. That being the case is there any reason that you know of why @Waimea can't use this layout?
-
I think there is new firmware that makes the I-Pac 2 register as two gamepads.
-
@tuki_cat he can use it, but the missing link is "six buttons". You are using Ultimarc defaults, that is a good start. But what switch#s are wired to what buttons? Ultimarc does not decide how you wire your buttons and where you drill the holes in your panel. Unless @Waimea has that detail from you, the configs may match, but the buttons won't. Make sense?
-
@caver01 For example, I have my panel wired like this for Players 1 and 2:
UP SW1 SW2 SW3 LEFT RIGHT DOWN SW4 SW5 SW6 -
I have my buttons set up like this (the LP, MP, etc is Street Fighter II specific!):
Player one
Top row from left to right
LP - lctrl (P1 button 2)
MP - lalt (P1 button 3)
HP - space (P1 button 5)Bottom row from left to right
LK - lshift (P1 button 1)
MK - z (P1 button 4)
HK - x (P1 button 6)
Contributions to the project are always appreciated, so if you would like to support us with a donation you can do so here.
Hosting provided by Mythic-Beasts. See the Hosting Information page for more information.